
You can edit custom payment automations you create, but you cannot change or reorder the default payment automations provided by the CollaborateMD software (the bottom four entries). You can only deactivate these default automations to disable them if needed.
-
Select Customer Setup > Customization > Payment Automations.
-
Click the New Automation button.
-
Enter a Name for this payment automation.
-
Enter a Description for the intended use of this automation.
-
Criteria:
-
Use the Remittance Codes field to enter remittance code(s) that should trigger the payment automation rule within the ERA.
 When adding a payment automation you must enter at least one remittance code.
Typically, adding actions to the following remittance codes is not recommended and can result in incorrect balance allocation or charge workflow after applying the ERA:
- 1: Deductible Amount
- 2: Co-insurance Amount
- 3: Co-payment Amount
- 23: The impact of prior payer(s) adjudication including payments and/or adjustments.
- 45: Charges exceed your contracted/legislated free arrangement
- 253: Sequestration: reduction in federal payment
-
Use the Group Codes drop-down menu to find group code(s) that should trigger the payment automation rule within the ERA.
-
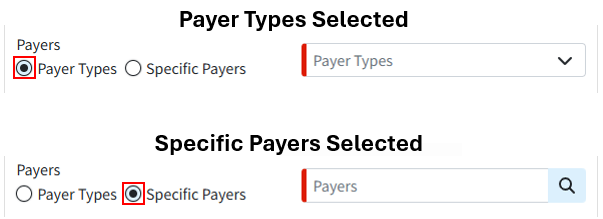
Select Payer Types or Specific Payers to determine if this payment automation rule applies to all payers within a selected payment type (e.g., Medicare, Medicaid, BCBS) or to specific, selected payers. Then, use the drop-down menu to make your selections.
-
Use the Payer Action drop-down menu to instruct the automation to apply to specific payer scenarios, such as ONLY for secondary payers or ONLY when a payer denies a claim.
-
Use the Next Payer drop-down menu to control the automation, ensuring it applies only when the selected payer is next on the claim. For example, the automation can be configured to apply only when the claim's balance transfers to the Patient or when the claim is Paid.
Use the Procedure Code field to select a single procedure code so the automation only runs when it matches the charge's procedure code (i.e. You never charge patients for a certain “procedure”).
-
Use the Payment Comparison (Payment Amount) drop-down menu to control whether payment automation applies based on the payment amount. For example, if you select "Greater Than" and set the amount to $100, this rule will only apply to payments exceeding $100.
-
Use the Charge Comparison (Charge Amount) drop-down menu to control whether payment automation applies based on the charge amount. For example, if you select "Less Than" and set the amount to $100, this rule will only apply to charges under $100.
-
-
Adjustment:
-
Use the Adjustment Method drop-down menu to select how the payment automation should adjust the balance.
 Selecting the Adjustment Method option to "Apply according to the payer's instructions" will adjust the charge amount based on the ERA.
-
-
Processing:
-
Use the Processing Method drop-down menu to select how the payment automation should process the payment.
-
Process according to the payer's instructions: This option will post the payment and adjustment exactly as the payer sent them on the ERA.
-
Forward to the next insurance: This option will apply the payment and forward any remaining balance to the selected "Next Payer" (secondary, tertiary, patient, paid, etc.).
-
Write off the charge's remaining balance: This option will write off any unpaid balance using the selected adjustment code and memo. Please note that when selecting to write off the charge's remaining balance, the "Next Payer" field should be set to Patient.
-
Process the payment as a partial denial (Recommended): This option will set only the amount associated with the code as a denial. Other payments or adjustments, if present, will still post.
The claim status will default to "Set to Denied at Remittance Payer," but users can select a different status. When the automation runs for this processing mode, it will apply the selected status to the charges.
-
Process the payment as a total denial: This option will not apply any payments or adjustments, and the entire charge will become an unpaid amount (equivalent to the previous Set to Denied At Insurance option)
The claim status will default to "Set to Denied at Remittance Payer," but users can select a different status. When the automation runs for this processing mode, it will apply the selected status to the charges.
 Processing methods other than "Process the payment as a total denial" do not affect how the payments and adjustments are applied and will not affect the status of a claim if the balance is $0.00 after payments, as the status is then Paid, including full payer adjustments resulting in $0.00 balances.
A "Process the payment as a total denial" option will set the claim status as Denied and no payment or adjustment will be posted. A denial will set the entire billed amount as Unpaid and all adjustment reasons will be unpaid reasons.
-
Keep the status the same: This option will apply the payment without changing the current charge status.
-
Set a specific status: This option will apply the payment and update the status to a pre-selected charge status.
-
-
Use the Charge Status drop-down menu to select your status.
The Charge Status drop-down is only available when selecting a partial or total denial processing method or the "Set a specific status" option is selected.
-
-
Additional Action:
-
Use the Assign Task To field to create and assign a task to a specific user or group for any payments that meet the payment automation rule. Enter the username you would like to assign this task to, or Click
 and select the user/group from the list.
-
-
Click Save.

 Selecting the Adjustment Method option to "Apply according to the payer's instructions" will adjust the charge amount based on the ERA.
 Processing methods other than "Process the payment as a total denial" do not affect how the payments and adjustments are applied and will not affect the status of a claim if the balance is $0.00 after payments, as the status is then Paid, including full payer adjustments resulting in $0.00 balances.