Important things to know before you upgrade.
The pricing will reflect in the month the plan was upgraded. We do not prorate the monthly invoice. For example, if the upgrade was made on 5/15, the invoice for May activity will reflect the upgraded Price Plan.
Important things to know before you downgrade.
Downgrades take effect on the first of the following month of your request. An e-mail confirmation will be sent upon completion of your downgrade.
Any service(s) not included in your new plan will automatically be disabled.
If you no longer wish to receive ERA's, please contact the insurance company to confirm how you will begin receiving ERA's after its been disabled.
If you were using In-Application Credit Card Processing, you must contact TSYS® to inactivate your account.
Please allow three (3) business days for full deactivation of ERA. Keep in mind that any ERA files already processed at the Payer and loaded into your CollaborateMD account prior to deactivation will still incur charges on your Monthly invoice.
If you're the Auth Rep, you have the option to upgrade or downgrade your account's plan. Use the steps below, and get in touch if we can help with anything.
Select Account Administration > Services.
Under Price Plan > Current Price Plan, the current plan will show in bold font.
Click the Change button to view available plans.
Select the desired Price Plan from the list to highlight it.
Use the Upgrade Plan Date drop-down menu to select when the change should take effect.
 Plan Downgrades will take effect on the 1st of the following month.
 Plan Downgrades will take effect on the 1st of the following month.
Click Save.
Click Acknowledge for the disclaimer letting you know that the price plan is being changed.
Claim Scrubbing helps you manage the complex rules and terminology of coding. This feature is used to analyze the claims before submission to the clearinghouse as a solution for catching problem claims, maximizing the potential for your healthcare facility to be paid correctly on the first submission.
Types of Claim Scrubbing Edits
- NCCI Edits: Prevents improper payments of procedures that should not be billed together.
- CPT/HCPCS Edits: Code Validation, Age Validation, Gender Validation, Add-On Code Edit, Relative Value Units sequencing.
- ICD Code Validation: Date of Service, Specificity, Valid Primary Diagnosis, Duplicate Diagnosis.
- Modifier Use: Date of Service, Global Fee Period, Invalid Modifier Use.
- Medical Necessity: Proprietary Medical Necessity, Non-Primary Diagnosis should be primary.
If you're the Auth Rep, follow the steps below to enable, configure, or disable claim scrubbing:
-
Select Account Administration > Services.
-
Click the button next to Claim Scrubbing.
-
The Enable Claim Scrubbing box allows you to enable or disable this service.
-
Set your Claim Scrubbing Settings:
-
Use the Specialty drop-down menu to select your specialty in order to get tailored edits for your specific claims.
 Your initial specialty will auto-populate based on what was set in the Practice or Provider section. If you already have claim scrubbing enabled, you can click "Change" to modify your specialty.
-
Automatically scrub new claims as they are entered through the claim section?
Select Yes to have the system automatically scrub all new claims manually entered directly through the applications claim section.
Automatically review and scrub new claims as they are entered through an Interface?
Select Yes if you want to automatically scrub new claims created from a DFT message received via the interface.
-
Automatically scrub existing claims when coding changes are made?
Select Yes to have the system automatically scrub claims after a coding change has been applied.
-
Only perform automatic claim scrubbing for claims that contain more than one charge?
Select Yes to have the system automatically scrub claims only if they contain two lines or more.
-
Exclude procedure codes marked as Retail or Other Medical from the code scrubbing process?
Select Yes so procedure codes with the specified types are not included in the Claim Scrubbing process, resulting in misleading errors.
-
-
Optional: Select Copy Configuration to copy these settings to another customer account you manage.
-
Check the box next to the customer account(s) to copy the settings to, then click Copy.
-
-
Click Save.

Eliminate the time your staff spends on verifying patient eligibility with our Real-Time and Batch Patient Eligibility feature. With this feature, you can determine if a patient is eligible for insurance benefits in seconds, avoiding possible loss of payment. Eligibility is the first step to a clean claim.
If you're the Auth Rep, follow the steps below to enable, configure, or disable Real-Time Eligibility:
Select Account Administration > Services.
Click the button next to Real-Time Eligibility.
The Enable eligibility checking checkbox allows you to enable or disable this service.
Set your Eligibility Settings:
Automatically check eligibility when saving appointment?
Select Yes to have the system automatically verify a patient's eligibility when an appointment is saved.
Automatically check eligibility when an appt has been set to Status: Use the drop-down menu to determine the (appointment) status that triggers the automatic eligibility check.
Automatically check eligibility when an appointment or claim is created over an Interface?
Select Yes if you want an automatic eligibility check when creating an appointment or claim, from an SIU or DFT message received via the interface.
Automatically check eligibility when a patient is created or updated over an Interface?
Select Yes if you want an automatic eligibility check when creating a patient from an ADT message received via the interface.
Limit automatic eligibility checking to: Use the drop-down menu to select the frequency in which you would like automated eligibility to run.
Show user an alert if they lack permissions to check eligibility when saving an appointment that otherwise would have run eligibility automatically?
Select Yes to alert the user when they don't have the necessary permissions to check Patient Eligibility.
Optional: Select Copy Configuration to copy these settings to another customer account.
Check the box next to the customer account(s) to copy the settings to, then click Copy.
Click Save.
The Patient Estimates feature allows you to easily create Good Faith Estimates as required by the No Surprises Act. Once an estimate is created using either the Scheduler or the Claim section, users can print the estimate (as required by the No Surprises Act for uninsured or self-pay patients), send a statement (electronically or on paper), enter payments in CMD, or have the patients make the payment on the patient portal.
If you're the Auth Rep, follow the steps below to enable, configure, or disable the Patient Responsibility Estimator:
-
Select Account Administration > Services.
-
Click the button next to Patient Estimates
-
The Enable Patient Estimates box enables or disables this service.
- Find your Patient Estimate Settings:
-
Automatically create estimates when new Appointments are created?
-
Select Yes if you want to automatically create an estimate when creating a new appointment.
Automatic estimates can only be created on appointments with default procedure codes for the Appointment Type or Patient.
-
-
Automatically create estimates when new Claims are created that don't already have estimates?
-
Select Yes if you want to automatically create a quick estimate when creating a new claim, and the claim does not already have an estimate.
-
-
Automatically create estimates when the above changes are made via Interface?
-
Select Yes if you want to automatically create an auto or quick estimate when creating a new appointment or claim (options 1 and/or 2) from an SIU or DFT message received via the interface.
The available estimates for Interface Automations depend on your Practice's selected Default Estimate Options. These options are either Auto (based on eligibility) or Quick (based on copay).
-
-
-
Click Save.
 Usage of this feature requires that the Real-Time Eligibility Service is enabled.
Spelling and formatting blunders can be corrected and geocoded instantly with our Address Verification Services. Upon patient data entry, address verification services will review the address while matching it to the United States Postal Services (USPS) directory. Re-sending documents are not only an inconvenience but are costly as well. Since the address check is done in real-time, patient address issues are caught and can be corrected before the patient leaves the office. By catching these data errors, you are able to decrease losses, rejections, or denials due to fraud or simple spelling errors.
If you're the Auth Rep, follow the steps below to enable, configure, or disable Address Verification:
Select Account Administration > Services.
Click the button next to Address Verification.
The Enable Address Verification box allows you to enable or disable this service.
Set your Address Verification Settings:
Automatically scrub the following when changes are made:
Check the box(es) next to the option(s) to indicate what address(es) you want to automatically verify.
Automatically scrub addresses when the above changes are made via Interface?
Select Yes if you want to automatically scrub addresses (based on your pre-selected options) when creating or editing a patient record from an ADT/DFT message received via the interface.
Optional: Select Copy Configuration to copy these settings to another customer account you manage.
Check the box next to the customer account(s) to copy the settings to, then click Copy.
Click Save.
Streamline your office with greater efficiency and reclaim full control over organizing files, customizing folders, and attaching documents directly to Patients, Claims, and Payments by using our Document Imaging feature. Document Imaging allows you to easily retrieve and view documents regardless of the location they were scanned in, streamlining your office for greater efficiency. Store your documents and files onto our secure servers rather than your local hard drive.
Partner with your CRXM representative to learn how much free storage is included in your price plan. Additional storage costs $25 per month for your 1st GB, and $10 per month for every extra GB.
If you're the Auth Rep, follow the steps below to enable, configure, or disable Document Imaging:
Select Account Administration > Services.
Click the button next to Cloud Document Imaging
The Enable Cloud Document Storage box allows you to enable or disable this service.
Use the Storage Limit drop-down menu to set how much storage you would like.
Use the Maximum File Size drop-down to set a size limit for individual files.
See how much storage currently used in the Current Usage bar.
Optional: Select View All Customers to enable, disable, and view their usage
Check the box next to the customer account(s) to enable or disable this service, then click Save.
Click Save.
Appointment Reminders notify patients of upcoming appointments, reducing the number of no-shows and increasing the productivity and revenue of your office. With this feature, patients are able to verify or cancel an appointment by using the keypad on their phone. For maximum convenience, all patient confirmations and cancellations are automatically synced with your appointments, so front office staff can easily reschedule patients and wait-listed patients are seen quickly, which ensures efficiency.
 CollaborateMD sends the appointment reminder file to our third-party vendor at 1 AM EDT daily. Any changes after this time will not reflect until the next day's file submission.
If you're the Auth Rep, follow the steps below to enable, configure, or disable Appointment Reminders:
Select Account Administration > Services.
Click the button next to Appointment Reminders.
The Enable Appointment Reminders box allows you to enable or disable this service.
Configure or view the General Options tab:
Enable Phone Reminder: Select this option if you want patients to receive phone call reminders.
Enable Text (SMS) Reminders: Select this option if you want patients to receive text message reminders.
 Text Reminders do not support sending or receiving MMS (Multimedia Message Services). I.e., we do not support pictures, video or audio messages.
 Enable Email Reminders: Select this option if you want patients to receive email message reminders.
Optional: Select the preferred reminder method (Phone, SMS, or Email). This option is available when selecting multiple methods.
Under Options:
Use the Send reminders for appointments set to status dropdown to select which appointment statuses should trigger sending a reminder.
Allow Patients to Confirm/Cancel appointment from reminder: Check this box to allow patients to confirm or cancel their appointment.
If Confirmed, set appointment status to: Select which status you want the appointment to be changed to in the event that the patient confirms their appointment.
If Cancelled, set appointment status to: Select which status you want the appointment to be changed to in the event that the patient cancels their appointment.
Under Timing:
Select how many days before the appointment to send the reminder.
Select what time, and time zone you want patients to be notified of their upcoming appointment.
Do not send reminders on Saturday/Sunday: Check these boxes if you don't want appointment reminders to be delivered on the selected days of the week.
Send an additional reminder before the appointment: Check this box if you want an additional appointment reminders to be delivered before the appointment.
If an additional reminder will be sent, select if you want it sent on the day of the appointment (and how many hours before) or if you want it sent the day before the appointment (and the time).
If an additional reminder will be sent, use the dropdown to select which appointment statuses should trigger sending the additional reminder.
Configure or view the Phone Options tab.
Contact Patient using: Select which phone number on file for the patient you wish to use. (e.g., Home/Cell/Work Phone).
 If the patient does not have a number in the selected field, the phone reminder will use the first available phone number it finds. Going in order of Home, Work and then Cell.
 If busy or not answered, retry times /wait minutes between calls: Select how many times you would like the system to call the patient back in the event there is no answer. Select how long you would like the system to wait before making another call.
Specify the Caller ID Name And Number to be used in the reminder message: Select from the dropdown one of the options below. Note: These options will apply to all Practices under the Customer you’re currently logged into.
Use CMD defaults: Selecting this option will call the patient from a generic phone number that will replay the reminder if called back.
Use the name and phone number entered in the Practice section: Selecting this option will send the Practice’s name as the Caller ID Name and the Practice’s phone number as the Caller ID Number. Note: The Practice information used is dependant on the Practice selected for the Resource associated with the appointment.
Custom name and number: Selecting this option will allow you to enter a custom Caller ID Name and Caller ID Number to ensure patients can easily recognize who is calling.
Customize Practice Recording: This option will allow you to create voice recordings. Not setting up this option will result in a standard computer generated recording.
Specify the "appointment with" name to be used in the reminder message: Select the name to be used in the phone reminder message. Note: Selecting the Customize link will allow you to edit the Provider Name. You can record the provider's name, play the recorded name, delete the recording, or re-record.
Request Sample Reminder: This option will allow you to receive a sample reminder call simply by entering your phone number.
Configure or view the Text Options tab.
- Edit the reminder message: Use the default reminder message or right-click on the message body to select fields to include in the text reminder message.
Note: If your message exceeds 160 characters, A long patient name could cause messages longer than 160 characters to be sent, which will incur an extra charge for each reminder. Want to make it even easier for your patients to confirm the appointment? Right-click the message body and select the [Confirm Link] option to allow your patients to confirm by simply clicking a link.
 Date Format: Use the drop-down menu to select the format you would like the data to be displayed in.
Resend text reminder: Select how many days before the appointment you would like the system to text the patient until they respond (Confirm, Cancel, or Stop).
Click on the Customize link to select the name within the text message.
Additional Reminder: Choose the subject and the reminder message to be used if the “send additional reminder before appointment” option is selected.
Specify hours for sending an SMS Text Opt-In message: Choose which hours of the day and time zone you would like patients to receive SMS text opt-in messages.
- Edit the reminder message: Use the default reminder message or right-click on the message body to select fields to include in the text reminder message.
Configure or view the Email Options tab.
Send Replies to: Select which patient email on file you wish to use to send reminders to. (Primary practice email, Custom email, or None).
Subject: Select the email subject line to be used in the reminder message.
Edit the reminder message: Use the default reminder message or right-click on the message body to select fields to include in the email reminder message.
Want to add a different reminder for different appointment types? Right-click within the message body and Customize Appointment Type Messages. Then add the Appt Type Message field to the email reminder.
Click the Reset to Default link to revert to the default message.Date Format: Choose what date format you would like used in the email reminder message.
Additional Reminder: Choose the subject and the reminder message to be used if the “send additional reminder before appointment” option is selected.
Optional: Select Copy Configuration to copy these settings to another customer account you manage.
Check the box next to the customer account(s) to copy the settings to, then click Copy.
Click Save.
 Text Reminders do not support sending or receiving MMS (Multimedia Message Services). I.e., we do not support pictures, video or audio messages.
  Want to make it even easier for your patients to confirm the appointment? Right-click the message body and select the [Confirm Link] option to allow your patients to confirm by simply clicking a link.
Data Snapshots is a service provided by CollaborateMD which takes current data such as patient demographics, codes, appointments, payers, provider list, facility, charge, etc. and captures (exports) a snapshot of the data. The data can be exported into several hundred files in .DAT format that is a tab-delimited or into an open-source relational database management system (RDBMS) known as MySQL.
 The export includes Data Sets from the following sections of the application:
Authorizations, Activity, Appt, Appt Types, Charge, Professional Claims, Claim Status, CPT Code, Credit, Facility, ICD Code, Location, Patient, Patient Notes, Payor, Practice, Provider, Referring, Remittance, Resources, Claim ICD Codes, ICD Procedure Codes, Institutional Claims, Insurance Parties, Insurance Policies, Payments, Insurance Check, Inventory Codes, Revenue Codes, and more.
If you're the Auth Rep, follow the steps below to enable, configure or disable Recurring (daily) Data snapshots:
-
Select Account Administration > Services.
-
Click the button next to Recurring Data Snapshots
-
The Enable Recurring (Daily) Data Snapshots box enables or disable this service.
-
Under Recurring Snapshot Settings, select the:
-
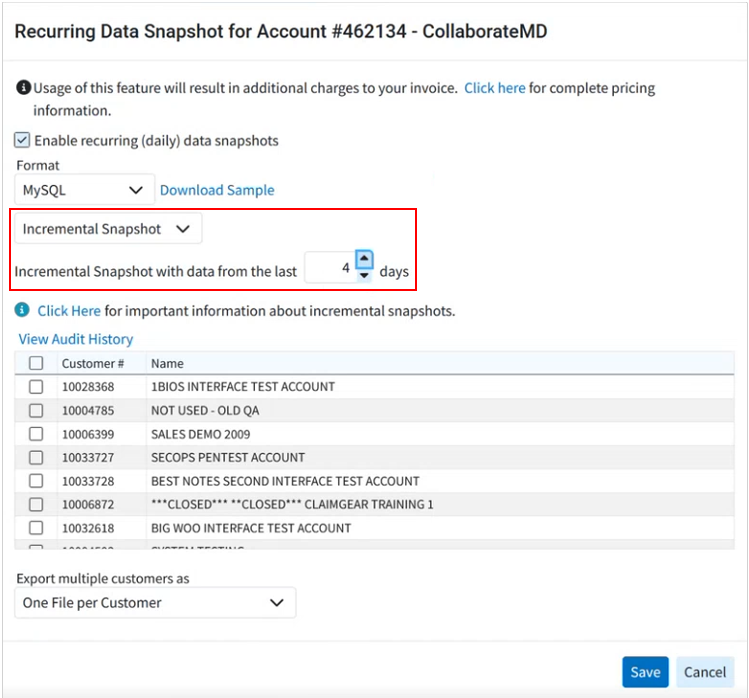
Format: Select the format you would like the data snapshot to be exported in.
 Click the Download Sample link to view a sample of what the snapshot will look like before purchasing. The sample will contain the first five (5) rows of each data file set contained within your account.
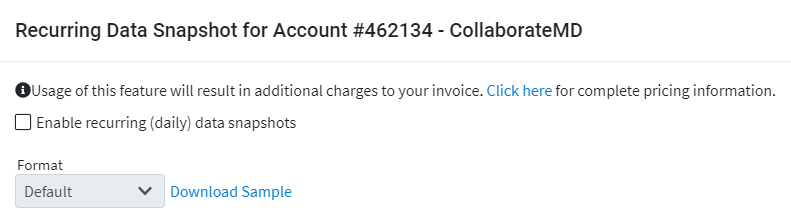
-
Default (Tab delimited).
-
MySQL.
-
-
Select the type of snapshot you want to receive:
-
Full Snapshot: All the data from all the Data Sets of the application will be exported daily.
-
Incremental Snapshot: Exports smaller files that will only include data that has changed for the Patient, Claim, IClaim, Claim Status, Claim ICD Code, Charge, Credit, and Activity tables (all the other data sets will receive the full data).
-
Select the minimum number of days to include in the incremental snapshot (between 1-7 days).
Setting up Recurring Incremental Data Snapshot is the preferred option as it will minimize the time required to run the snapshot process by including only the changed items in some of the larger tables, rather than capturing a complete snapshot of the entire database every day. The Incremental Snapshot option will export smaller (incremental) files that will only include data that has changed for the Patient, Claim, Claim status, Charge, Credit, and Activity tables (all the other data sets will receive the full data) ensuring that your snapshot is prioritized and available sooner than full snapshots.
-
-
-
Select the customer(s) to include in the data snapshot: If you have more than one customer account, check the box(es) next to the customer(s) you would like to schedule the snapshot for.
-
Export multiple customers as:
-
One Combined File: Exports the snapshot as one combined file for all selected customers
-
One File per Customer: Exports the snapshot as one separate file per each selected customer.
-
-
-
Click Save.
 Click the Download Sample link to view a sample of what the snapshot will look like before purchasing. The sample will contain the first five (5) rows of each data file set contained within your account.

Data Snapshots are overwritten each day. Please make sure you download before the next Data snapshot is generated. Auth Reps will receive confirmation and instructions on downloading the data snapshot(s) via the Messaging section of the application. When using Incremental Snapshots, the first snapshot (or the first snapshot after you add a new customer to a combined snapshot) will be a full snapshot; subsequent ones will only replace the changed data.
Limitations:
- No specific dates (past or present) can be captured within the export.
- A Full Snapshot will record all data that is present as of the time that the snapshot starts, which will be on or after 1:00 AM EST on the scheduled day. Data entered or modified after 1:00 AM EST may or may not be present in the snapshot.
- An Incremental Snapshot provides new or changed data as of 12:00 AM EST for incremental tables. Other tables are provided as described under Full Snapshot.
- Data will become available for download by 9:00 AM EST on the date of the snapshot. Users who select an Incremental Snapshot will receive their snapshot earlier.
- No specific criteria (e.g., ONLY Patient data set info) can be captured, as the Data Snapshots capture all of the data sets specified above.
- Document Imaging is NOT included.
- The data can only be used to import into other software solutions (e.g., Business Intelligence, Collections, etc.).
- In accordance with HIPAA rules and regulations, CollaborateMD will NOT provide users, admins, or third-party vendors this information, as the Data Snapshots contain PHI & PII.
CollaborateMD ensures hassle-free credit card processing that will easily reduce follow up on co-pays, deductibles, and co-insurance balances, which translates into improved A/R. By processing your patient’s credit card payments within CollaborateMD, you will increase business efficiency and accuracy. As well as saving you a ton of time, helping you work less and paid faster!
Enable In-Application Credit Card Processing
If you're the Auth Rep, follow the steps below to enable, configure or disable In-Application Credit Card Processing:
Select Account Administration > Services.
Click the button next to In-Application Credit Card Processing.
The Enable In-Application Credit Card Processing box enables or disables this service.
Click the Add New button.
For practices with more than one location, a merchant account must be added for each location and/or each tax ID. Repeat the steps for each location/tax ID listed in your Merchant’s Accounts box.Select the practice to add as a merchant from your list (the office location and the location contact info will auto populate based on your selection).
Enter your location primary contact information.
Click Next.
Under Merchant Information: Select your Industry (PT, Healthcare, Hospital, Chiro, etc.) and merchant category code from the dropdowns.
Enter your "Type of Goods/Service."
Check the box if "Payment is taken before delivery of services" in your office workflow.
Under Credit Card Information: Enter your average annual volume and average sales price.
Optional: Check the box if your location currently accepts credit cards and select the processing methods used.
Select the equipment that will be used.
Enter your bank account information.
Click Next.
Verify your Company legal information and primary contact information.
Enter your Company Business Information (ownership type, Tax ID, etc.).
Enter the Primary Owner information.
Click Next.
Check the "An owner will sign the agreement" checkbox.
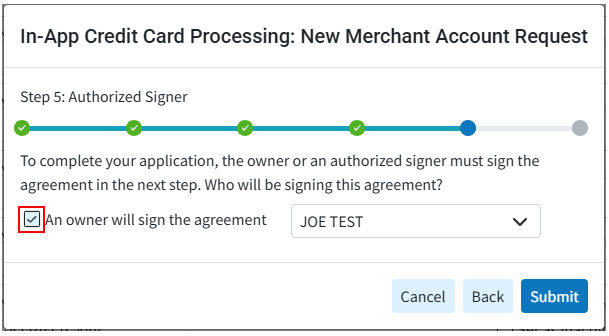
Click Submit.
Review the legally binding terms and conditions.
Download and sign the Terms and Conditions and Personal Guaranty from the links.
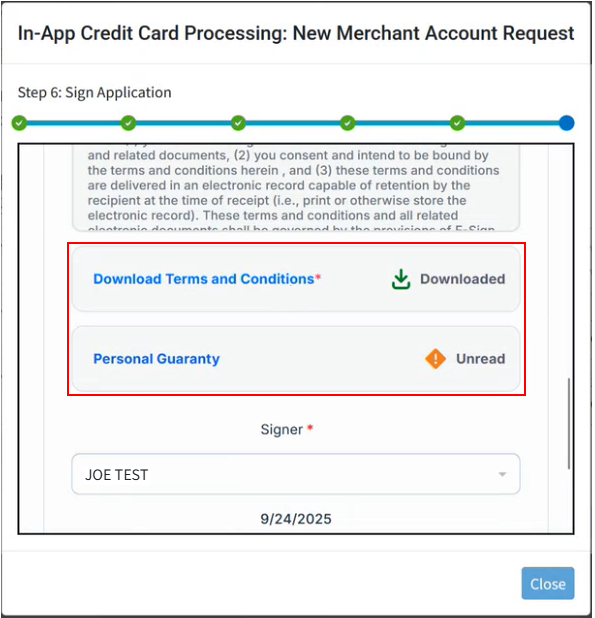
Click I agree.
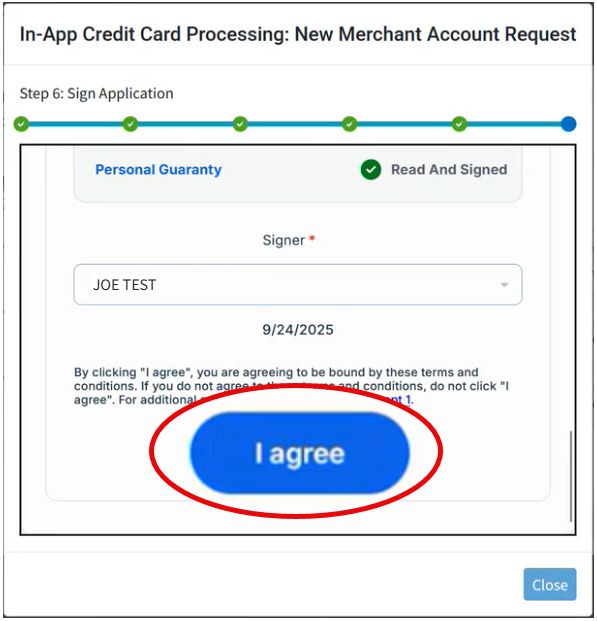
Click Close.


After submission, your application is approved in 24-48 hours and fully configured within 24-48 hours after approval. When configuration is complete, the request status will then display as "Active" and the In-App Credit Card Processing feature will be ready for use. Visit the Getting Started with CMD & OpenEdge Help Page for more information on how to begin using this feature.
Disable In-Application Credit Card Processing
Proceeding with this change will disable the applicable Integrated Payment Processing service. The customer’s account will no longer be allowed to process credit card service payments through the merchant account integration within CollaborateMD.
Select Account Administration > Services.
Click the button next to In-Application Credit Card Processing.
Place a check in the Set as Inactive checkbox by the name of the account you wish to inactivate.
If disabling your entire account, uncheck the Enable In-Application Credit Card Processing box.
Click Save.
Important: You must contact GPI® to inactivate your account completely. Deactivating the CollaborateMD integration does NOT close your merchant account with GPI®
The payment portal is CollaborateMD’s own in-house product that uses the highest form of security to protect the patient’s information and allows payments to post directly into the practice, in real-time,
CollaborateMD’s payment portal utilizes the highest form of security to protect the patient's information. The payment portal is our own in-house product which allows payments to post directly into the practice, in real-time. By providing patients a secure online payment portal, offices are reducing patient calls, increasing billing accuracy, and accelerating patient payments. Plus, patients can view their visit and payment history instantly.
If you're the Auth Rep, follow the steps below to enable, configure, or disable your Payment Portal:
Select Account Administration > Services.
Click the button next to Patient Payment Portal.
The Enable Patient Payment Portal box enables or disables this service.
Check the box to choose your Payment Portal Settings:
Payment Portal Options:
Statement Template: Please visit the Statements section to configure electronic statements.
Payment Options: Set a minimum payment threshold and enable the Patient Directed Payment Plan feature (only applies to payments of less than the balance due).
Patient Directed Payment Plans:
Under Patient Directed Payment Plans, check the "Allow patients to set up a patient payment plan from the Payment Portal" checkbox.
Enter the Minimum and Maximum amounts that patients can create a payment plan for via the portal (the system defaults to 75 min and 20,000 max).
Select the Payment Plan Terms:
(Recommended) Allow CollaborateMD to select the best payment plan terms: CMD will select the best 3 options based on the amount owed.
Set up allowed payment plan terms: Select your own payment plan terms by disabling (checking the box(es)) the terms based on owed amounts/installments you don't want available as an option.
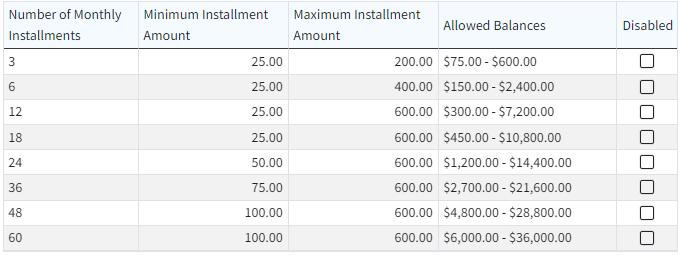
Set the Minimum and Maximum amount for the installments that patients will set up (the system defaults to $25 min and $600 max).
Change the patient's account type to Payment Plan when a plan is started: Check the box if you wish to set the patient account type to Payment Plan when the plan is created.
Allow patients to set up multiple payment plans: Check the box if you wish to allow patients to set up more than one payment plan at a time (otherwise, leave it unchecked).
Select the account types that can set up a payment plan on the Payment Portal (all account types or select individual account types that can set up payment plans).
Terms and Conditions Summary: Enter the terms and conditions that will be visible to patients creating the payment plan, or use our default template.

Full Terms and Conditions: Enter the full terms and conditions on how your office handles missed payments and cancelations, or use our default template.
 For more information on Patient Directed Payment Plans, please visit our Please reference our Patient Directed Payment Plans Help Articles. Want to revert back to the default message? Click Reset to Defaults.
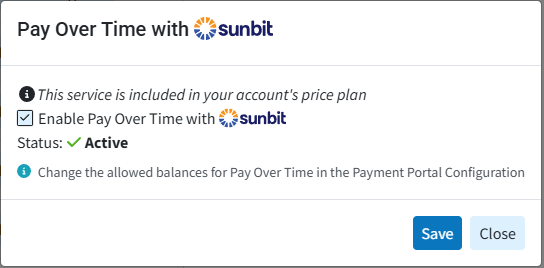
Pay Over Time with Sunbit:
Under Plan Types, enter the Minimum and Maximum amounts that patients can create a Sunbit payment plan for via the portal. Eligible patients will be able to choose their plan length and payment amount within these limitations.
Under Eligibility, select the Account Type(s) that can set up a Sunbit Payment Plan within the Payment Portal.
Patient Communications:
Automatically send a receipt via email or text for successful payments made via the portal: Check the box if you wish to send receipts/notifications to your patients once they’ve successfully processed their payment via the online patient Payment Portal. Receipt options can be configured in the Practice section.
Automatically send payment portal registration invites when adding new patients: Check the box if you wish to send registration invites automatically to your patients when they are created.
Automatically send payment portal registration invites when new balance is owed: Check the box if you wish to send registration invites automatically to your patients when they owe a new balance.
Click Save.


The Enhanced User Print Statements feature allows you to customize your full-color statements you will be printing and mailing out to patients. This customizable template allows you to add your company logo, and customize the text on your statement.
If you're the Auth Rep, follow the steps below to enable, configure, or disable Enhanced Statements:
Select Account Administration > Services.
Click the button next to Enhanced User Print Statements
The Enable Enhanced User Print Statements box enables or disables this service.
Enhanced User Print Statements can be configured in Statements screen. Please take a look at our Statement Configuration Help Article for more info.Optional: Select Copy Configurations to copy these settings to another customer account you manage.
Check the box next to the customer account(s) to copy the settings to, then click Copy.
Click Save.
Automated Statements allow you to eliminate the time your staff spends printing and mailing patient statements. Send statements out in a timely manner while improving your bottom line and simplifying your mailing process.
If you're the Auth Rep, follow the steps below to enable, configure, or disable Automated Statements:
Select Account Administration > Services.
Click the button next to Automated Statements.
The Enable Automated Statements box enables or disables this service.
 Automated Statements can be configured in the Statements screen. Take a look at our Statement Configuration Help Article for more info.
Optional: Select Copy Configurations to copy these settings to another customer account you manage.
Check the box next to the customer account(s) to copy the settings to, then click Copy.
Click Save.
Application Co-Branding is a service provided by CollaborateMD that will help you promote your business in a unique way. Represent your company visually throughout the application and on (excel) reports by adding your business logo. Application Co-branding can help you build and enhance your brand loyalty as well as extend your reach into other markets to increase your sales. Contact your CRXM representative for pricing information.

If you're the Auth Rep, follow the steps below to enable, configure, or disable Co-Branding:
Select Account Administration > Services.
Click the button next to Application Co-Branding.
The Enable Application Co-Branding checkbox enables or disables this service.
After enabling Application Co-Branding, click the Image icon under “Login Image.” to upload the logo that will show on the login screen.
Click Upload.
Locate the image on your computer.
Adjust the scale to fit.
Click Done.
Click the Image icon under “Banner Image.” to upload the logo that will show on the banner on every screen and reports exported in Excel.
Click Upload.
Locate the image on your computer.
Adjust the scale to fit.
Click Done.
Optional: Add a personalized welcome message that will be visible on the welcome screen.
Click Save.
 Application Co-branding is an account-level service that applies to your main account and to each customer account.

 Application Co-branding is an account-level service that applies to your main account and to each customer account.
Processing and submitting Workers Compensation (Workers Comp) and Property & Casualty (P&C) claims have always presented unique challenges. Many require manual processing and the attachment of supporting documentation, which prevents electronic submission. These challenges result in higher costs to the provider, higher rejections, and slower reimbursement.
Claim Attachments is the solution for submitting Worker’s Comp and P&C claims and their associated attachments efficiently and effectively. By enabling electronic submission, you can use one solution for these specialty claims and bypass the effort and expense of paper processing.
The Claim Attachments (Change Healthcare) or ePS Claim Attachments Help Articles should be referenced to enable, configure, process claims, follow up and disable the services included with the Claim Attachment feature.
If you're the Auth Rep, follow the steps below to enable or disable Claim Attachments:
Select Account Administration > Services.
Click the button next to Claim Attachments.
The Enable Claim Attachments box enables or disables this service.
Click Save.
Manual Electronic Statements allow you to send statements electronically in a batch instead of printing and mailing them out to patients, reducing your carbon footprint. Send statements out in a timely manner via email or text (SMS) messaging.
If you're the Auth Rep, follow the steps below to enable, configure, or disable Manual Electronic Statements:
Select Account Administration > Services.
Click the button next to Manual Electronic Statements.
The Enable Manual Electronic Statements box enables or disables this service.
The electronic statement templates must be edited in the statements section under User Print Statements. Automated Electronic Statements can be configured in the Statements screen under Automatic Statement Generation. Take a look at our Statement Configuration Help Article for more info.Click


Important Note: You must have the In-App Credit Card processing and the Patient Payment Portal features enabled and configured in order to use electronic statements. For more information on turning these services on, please visit our Manage In-Application Credit Card Processing and Manage your Patient Payment Portal Help Articles.
CollaborateMD's Intake Forms feature allows offices to reduce paperwork and streamline front-office workflows. Updox, a part of EverHealth, has developed a Forms product that enables the creation of forms and their automatic distribution to patients through CMD (as part of their appointment reminders) or manually. The form data is received back as discrete fields that can be imported into the Patient section.
This workflow will reduce the chances of errors and increase automation in the patient check-in process. Patients can complete forms online using their phone, tablet, or computer and submit them. Once the form is submitted, users will receive the data in CMD, associate it with patient records, and decide which data should replace or populate fields within the record, making it a more efficient method of collecting patient information.
-
Select Account Administration > Services.
-
Click the button next to Intake Forms.
-
Select either Basic Forms or Custom Forms.
-
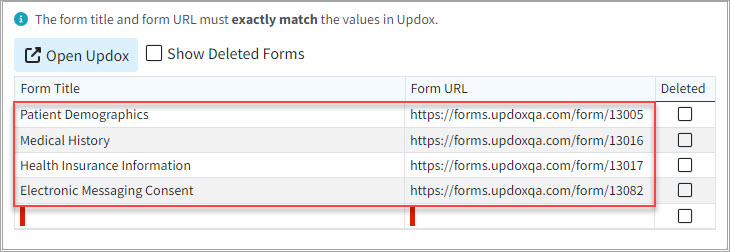
Basic Forms Consist of 4 available forms: Patient Demographics, Patient Medical History, Health Insurance Information, Electronic Communication Consent.
-
Forms Options:
-
Allow Setting Forms by: Forms sent via Appointment Reminders are not affected by this setting.
- Click the Email Only option to exclusively send intake forms via email.
- Click the "Text and Email" option to enable sending intake forms via text message or email.
-
-
Message Template:
-
Based on your selections, review or edit your text message and/or email template(s).
Use the Right-click options to select and add the available variables to the template. The [Form Link] is a required field and will not save if removed from the template.
-
-
Portal Options:
-
Header Template: General contact information that will shared between the Payment Portal and the Forms Portal and be displayed in the header of every page on both portals.
- Click the Edit button to upload a logo.
- Enter the required fields: Practice Name, Address, City, State, Zip code, Phone, or select "Copy From Practice."
- Optional: Enter your practice website.
-
-
-
Custom Forms Consist of Basic Forms, plus you can make changes to basic forms and create your own Intake Forms.
-
Forms Options:
-
Allow Setting Forms by: Forms sent via Appointment Reminders are not affected by this setting.
- Click the Email Only option to exclusively send intake forms via email.
- Click the "Text and Email" option to enable sending intake forms via text message or email.
- Click Open Updox
- Click Menu > Admin
- Select Form Manager to add, remove, or edit forms.
Be sure to set the EHR Key for your form fields to link fields to CollaborateMD.
Also, if you have added or removed any forms, update the table within the Forms Options. To do this, visit Updox, select Menu > Home, and then select Forms Library. Use the Copy button next to each form to copy the URL of the form into the table. Also, Copy the Title of each form into the table (both the title and the URL must match the values in Updox). For more information on setting up custom forms, visit our Add/Manage Custom Forms Help Article.
 You can also customize the order of the forms and determine their sequence as they appear to patients within the forms portal, by dragging and moving them on the list. This will determine the order of the forms within the Appointment Types section as well as the Forms Portal.
-
-
Message Template:
-
Based on your selections, review or edit your text message and/or email template(s).
Use the Right-click options to select and add the available variables to the template. The [Form Link] is a required field and will not save if removed from the template.
-
-
Portal Options:
-
Header Template: General contact information that will be shared between the Payment Portal and the Forms Portal and be displayed in the header of every page on both portals.
- Click the Edit button to upload a logo.
- Enter the required fields: Practice Name, Address, City, State, Zip code, Phone, or select "Copy From Practice."
- Optional: Enter your practice website.
-
-
-
Optional: Click Save and Demo to view the fields in the forms portal.
-
Optional: Select Copy Configuration to copy these intake form configurations to another customer account.
- Click Save.
Important Note: You must use the CMD Scheduler in order to use Patient Intake Forms. For more information on setting up your scheduler, please visit our Appointment Configuration Help Article. Please note that it will take 24-48 hours after configuring Intake Forms for the feature to be enabled.
 You can also customize the order of the forms and determine their sequence as they appear to patients within the forms portal, by dragging and moving them on the list. This will determine the order of the forms within the Appointment Types section as well as the Forms Portal.
 It is highly recommended that you have the Appointment Reminder feature enabled and configured to use Patient Intake Forms. For more information on setting up your appointment reminders, please visit our
Manage Appointment Reminders Help Article.
It is highly recommended that you have the Appointment Reminder feature enabled and configured to use Patient Intake Forms. For more information on setting up your appointment reminders, please visit our
Manage Appointment Reminders Help Article.
Some of CollaborateMD's largest clients are multi-state healthcare practices or billing service providers with separate customers under their main accounts. This setup enables them to maintain distinct patient, claim, and payment information for each of their individual Customers. Having these separate customers also requires users to input setup data such as Referring Providers, Facilities, Codes (procedure codes, fee schedules, diagnosis codes, remittance codes, revenue codes, etc.), and Payers independently for each customer, resulting in a significant amount of setup work.
To simplify this manual process into a fully automated solution, we created our Data Sync feature. This new capability allows clients to automatically sync their data with multiple customers whenever a change is made. You no longer need to manually add new codes, payers, and other details for each individual customer. Instead, simply enable the Data Sync feature and let it do it for you. Start automating this process and enhance your productivity within CMD today!
 Please note that this feature will replace the Data Copy, streamlining the process of copying important data while offering a more cost-effective solution for customers.
Enable and Configure Data Sync
If you're the Auth Rep, follow the steps below to enable, configure, or disable Data Sync:
-
Select Account Administration > Services.
-
Click the button next to Data Sync.
-
The Enable Data Sync box enables or disables this service.
-
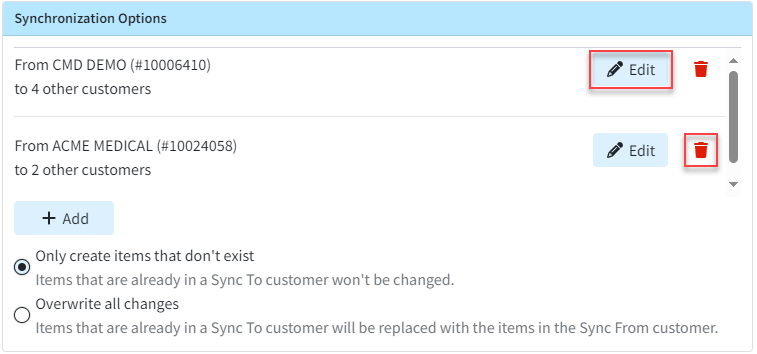
Under Synchronization Options:
-
Click Add.
-
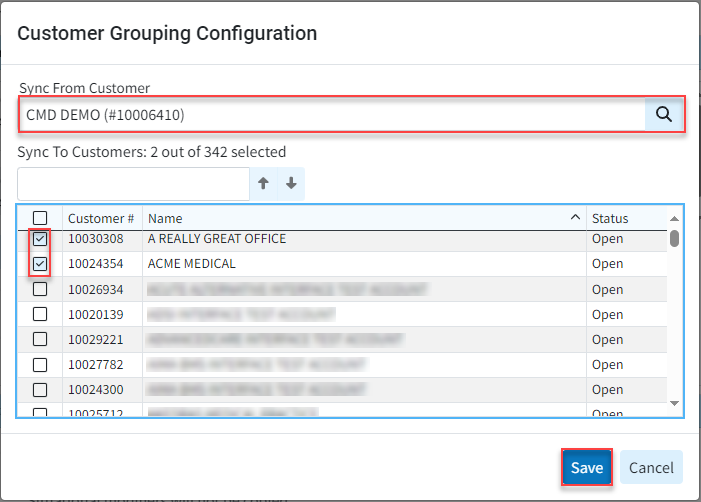
Use the "Sync From Customer" search field to select the customer from which to sync the data.
-
Use the "Sync To Customers" checkbox(es) to select the Customer(s) to which to transfer the data.
The "Sync From" customer is the primary source file from which the data will be copied. The "Sync To" customer(s) are the ones whose data will be overwritten with the copied information.
-
Click save.
 You can also have multiple "Sync From" customers synchronized to copy data to different "Sync To" customers.
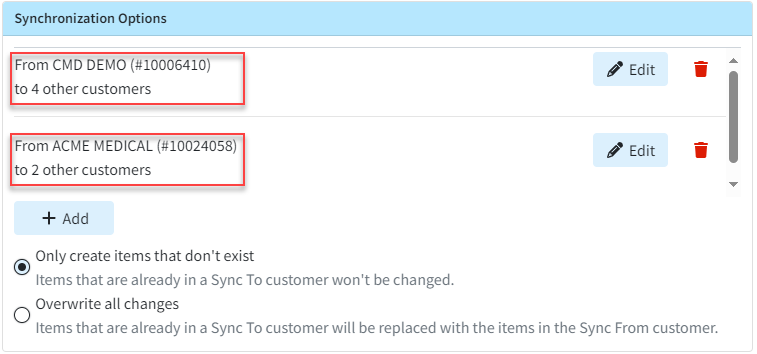
-
Use the "Only create items that don't exist" radio button (Defaulted option).
-
Selecting this option will ensure that the existing items in the "Sync To" customer are not modified.
-
-
Use the "Overwrite all changes" radio button.
-
Selecting this option will overwrite existing items in the "Sync To" customer and replace them with those in the "Sync From" customer.
Important: We recommend selecting the "Only create items that don't exist" option, as this will not alter any existing records. It will only update new ones moving forward, ensuring that nothing is accidentally overwritten. Billing Services that plan to maintain all of their configurations and manage all their lists from one customer (the Sync From customer) without making any changes to individual customers (other than Situational Modifiers or Provider BIlling Options, which are not part of Data Sync) can use the "Overwrite all changes" option to ensure that all configurations exactly match the Sync From customer. It's also important to note that there is no way to undo this action once the data has been overwritten.
-
-
-
Under Data Options:
-
Use the radio button to select the data types to copy.
-
Codes - You can select to sync Procedure, Diagnosis, ICD Procedure, Revenue, Remittance, and Adjustment codes. You can also select to sync Fee Schedules. Please note that existing situational modifiers will not be copied to procedure codes.
-
Facilities - Select this option to sync any updates to the Facility section.
-
Referring Providers - Select this option to sync any updates to the Facility section.
-
Payers - Select this option to sync any updates to the Facility section. Please note that existing provider billing options will not be copied to payers.
 Data Sync does not include rendering/attending providers, billing providers, claims, financial data, pending information (appts., etc.), notes (e.g. patient notes, claim notes, etc.), or patient balance.
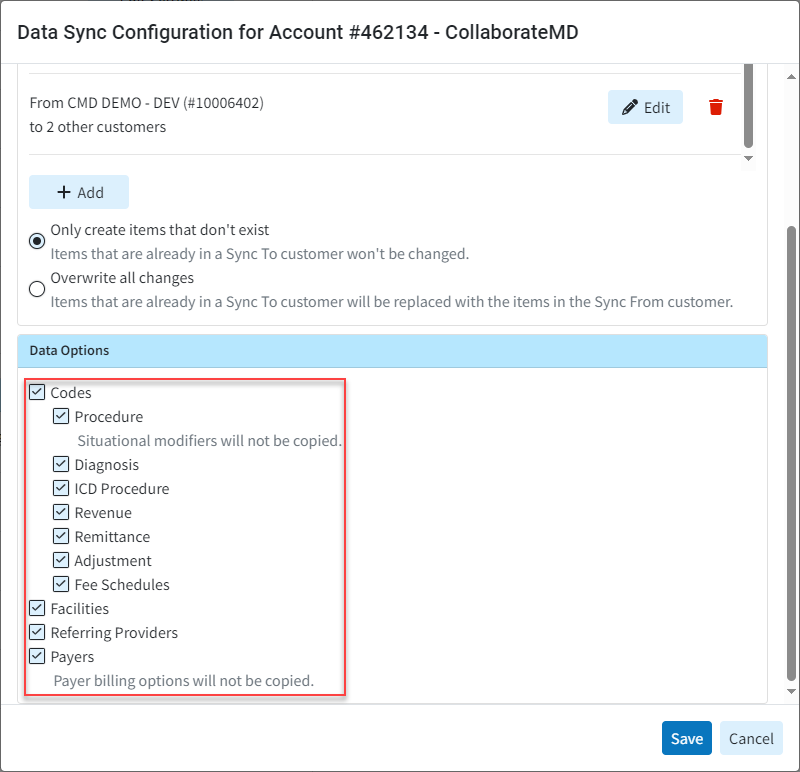
-
-
-
Click Save.


 When selecting the Data Sync option to "Overwrite all changes," any time a record is updated in the "Sync From" customer, you will receive a pop-up notification. This pop-up will inform you that the data will be synchronized and will also indicate the number of customers that will be synced.
Edit A Data Sync
If you're the Auth Rep, follow the steps below to edit an existing Data Sync:
-
Select Account Administration > Services.
-
Click the button next to Data Sync.
-
Under Synchronization Options:
-
Click Edit to make any updates or changes to the "Sync From" or "Sync To" customers within the customer grouping configuration, then click Save.
-
To delete a specific synchronization option, click the delete (trash can icon) option.
-
-
Update any desired Data Options.
-
Click Save.

Want to copy data to customers in a different CMD account? Visit our Request a Data Copy Help Article for more information.
Patient Broadcast Communications allows providers to send targeted one-way communications to multiple patients using various methods (text, email, or phone). Customers can set campaigns with unique parameters to target specific patients, helping them with their healthcare needs and encouraging retention or usage of optional/elective medical services through intelligent marketing for better patient engagement.
If you're the Auth Rep, follow the steps below to enable, configure, or disable Broadcast Communications:
Select Account Administration > Services.
Click the button next to Broadcast Communications.
The Enable Broadcast Communications box enables or disables this service.
Select the Allowed Communication Methods:
Email: Select this option to have communication messages sent through email.
Text: Select this option to have communication messages sent through SMS.
Phone: Select this option to have communication messages sent through voice messages.
Email and Text at the same time: Select this option to have communication messages sent through both email and text.
Optional: Select Copy Configurations to copy these settings to another customer account you manage.
Check the box next to the customer account(s) to copy the settings, then click Copy.
Click Save.
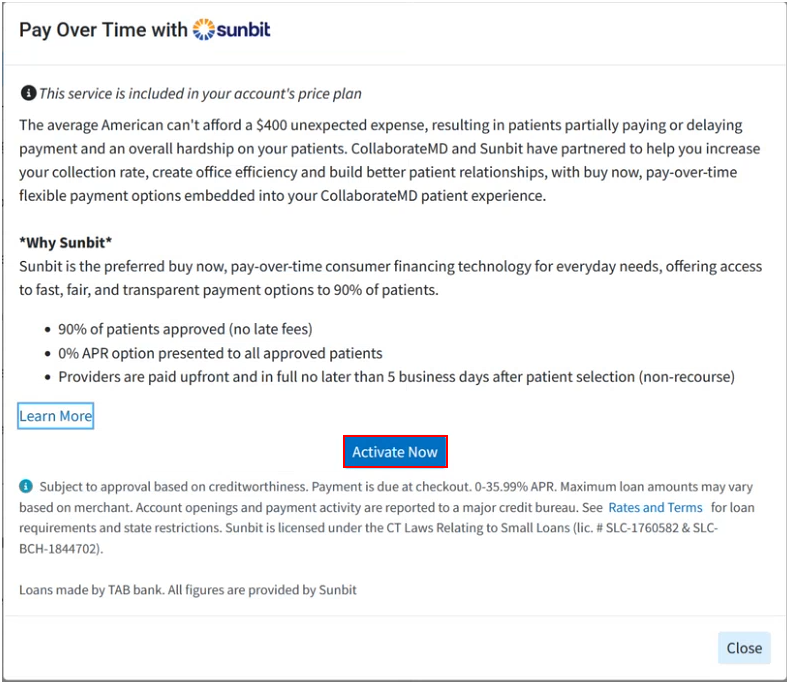
Sunbit helps practices and billing services eliminate the stress of managing in-house payment plans by offering a pay-over-time option for patient invoices. Providers can now offer their patients financing without assuming any financial risk, as they receive the full amount within 72 hours. Sunbit manages all patient billing, allowing providers to reduce time in accounts receivable and minimize collection efforts. Patients can easily request financing directly from the payment portal.
Important Note: You must have the In-App Credit Card processing and the Patient Payment Portal features enabled and configured in order to use Pay Over Time with Sunbit. For more information on turning these services on, please visit our Manage In-Application Credit Card Processing and Manage your Patient Payment Portal Help Articles.
-
Select Account Administration > Services.
-
Click the button next to Pay Over Time with Sunbit.
-
Click the Activate Now button.
-
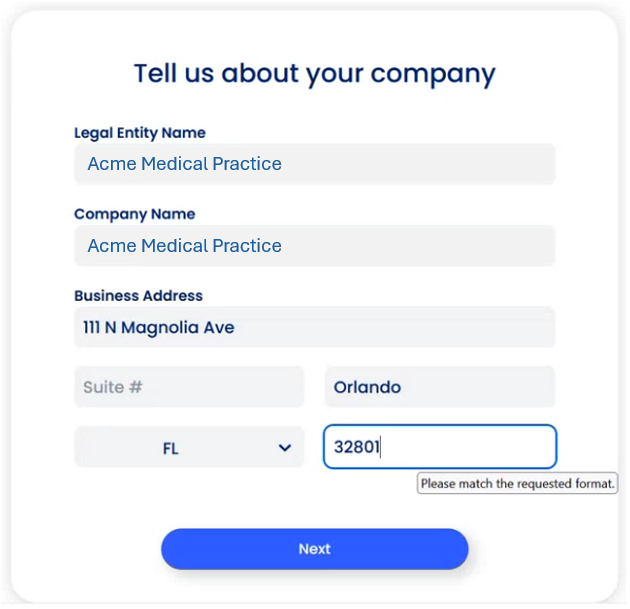
Within the Sunbit screen, click Next > Next > Get Started.
-
Enter your Company Details and click Next.
-
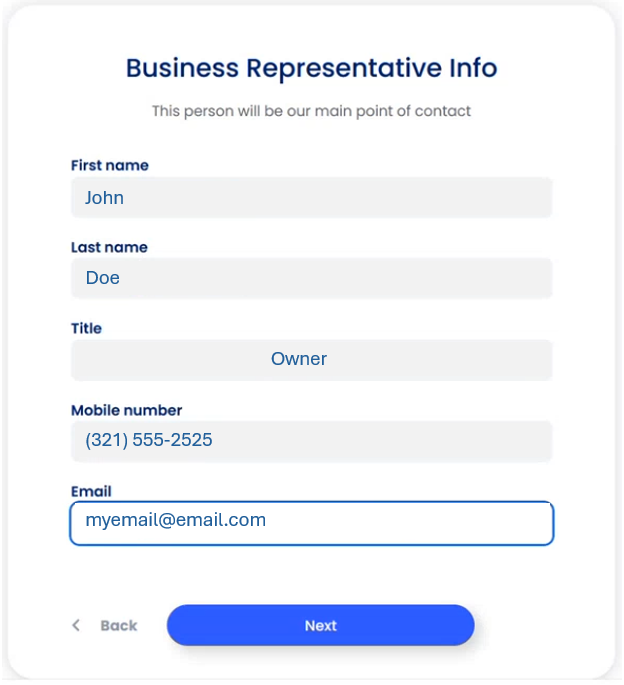
Enter your Business Rep Info (point of contact) and click Next.
-
Fill out a brief questionnaire, and click Next.
-
Enter your Company Bank Account details, and click Next.
-
Click Close.
-
Once Sunbit reviews the application, the status will become active.