Patient Directed Payment Plans allow patients to make arrangements to pay off high balances over a period of time directly from the Patient Payment Portal. Allowing a patient to set up their own payment plan for outstanding balances significantly increase the chance that a bill is paid, due to the simplicity of charging the agreed-upon amount each period until the balance is paid in full.
Important Note: You must have the In-App Credit Card Processing and the Patient Payment Portal features enabled and configured in order to use the Patient Directed Payment Plans. Patients setting up payment plans from the portal will be prompted to set up Auto-Pay for their installments in order to complete the payment plan.
 In order to use the Patient Directed Payment Plan feature you must enable and configure the Patient Payment Portal. Please reference our Manage your Patient Payment Portal Help Article for more info on enabling and configuring the payment portal.
Select Account Administration > Services.
Click the button next to Patient Payment Portal.
The Enable Patient Payment Portal box enables or disables this service.
Set up your Payment Portal Settings and options.
Click on Payment Options and set a minimum payment threshold (only applies to payments of less than the balance due) and select if you don't want to include account credits in the amount due.
Under Patient Directed Payment Plans, check the "Allow patients to set up a patient payment plan from the Payment Portal" checkbox.
enter the Minimum and Maximum amounts that patients can create a payment plan for via the portal (the system defaults to 75 min and 20,000 max).
Select the Payment Plan Terms:
(Recommended) Allow CollaborateMD to select the best payment plan terms: CMD will select the best 3 options based on the amount owed.
Set up allowed payment plan terms: Select your own payment plan terms by disabling (checking the box(es)) the terms based on owed amounts/installments you don't want available as an option.
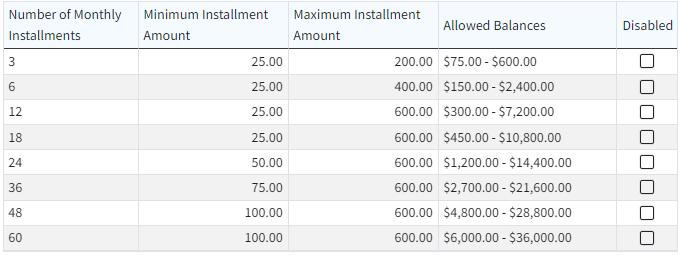
Set the Minimum and Maximum amount for the installments that patients will set up (the system defaults to $25 min and $600 max).
Change the patient's account type to Payment Plan when a plan is started: Check the box if you wish to set the patient account type to Payment Plan when the plan is created.
Allow patients to set up multiple payment plans: Check the box if you wish to allow patients to set up more than one payment plan at a time (otherwise, leave it unchecked).
Select the account types that can set up a payment plan on the Payment Portal (all account types or select individual account types that can set up payment plans).
Terms and Conditions Summary: Enter the terms and conditions that will be visible to patients creating the payment plan, or use our default template.

Full Terms and Conditions: Enter the full terms and conditions on how your office handles missed payments and cancelations, or use our default template.

Click


