The payment portal is CollaborateMD’s own in-house product that uses the highest form of security to protect the patient’s information and allows payments to post directly into the practice, in real-time,
CollaborateMD’s payment portal utilizes the highest form of security to protect the patient's information. The payment portal is our own in-house product which allows payments to post directly into the practice, in real-time. By providing patients a secure online payment portal, offices are reducing patient calls, increasing billing accuracy, and accelerating patient payments. Plus, patients can view their visit and payment history instantly.
If you're the Auth Rep, follow the steps below to enable, configure, or disable your Payment Portal:
Select Account Administration > Services.
Click the button next to Patient Payment Portal.
The Enable Patient Payment Portal box enables or disables this service.
Check the box to choose your Payment Portal Settings:
Payment Portal Options:
Statement Template: Please visit the Statements section to configure electronic statements.
Payment Options: Set a minimum payment threshold and enable the Patient Directed Payment Plan feature (only applies to payments of less than the balance due).
Patient Directed Payment Plans:
Under Patient Directed Payment Plans, check the "Allow patients to set up a patient payment plan from the Payment Portal" checkbox.
Enter the Minimum and Maximum amounts that patients can create a payment plan for via the portal (the system defaults to 75 min and 20,000 max).
Select the Payment Plan Terms:
(Recommended) Allow CollaborateMD to select the best payment plan terms: CMD will select the best 3 options based on the amount owed.
Set up allowed payment plan terms: Select your own payment plan terms by disabling (checking the box(es)) the terms based on owed amounts/installments you don't want available as an option.
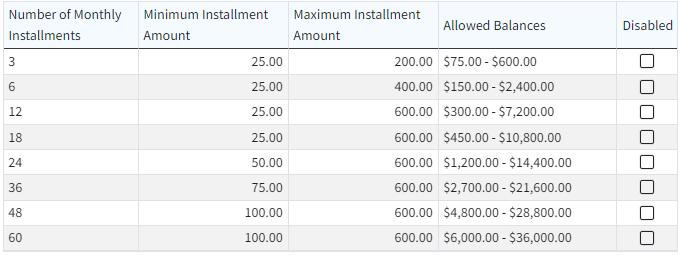
Set the Minimum and Maximum amount for the installments that patients will set up (the system defaults to $25 min and $600 max).
Change the patient's account type to Payment Plan when a plan is started: Check the box if you wish to set the patient account type to Payment Plan when the plan is created.
Allow patients to set up multiple payment plans: Check the box if you wish to allow patients to set up more than one payment plan at a time (otherwise, leave it unchecked).
Select the account types that can set up a payment plan on the Payment Portal (all account types or select individual account types that can set up payment plans).
Terms and Conditions Summary: Enter the terms and conditions that will be visible to patients creating the payment plan, or use our default template.

Full Terms and Conditions: Enter the full terms and conditions on how your office handles missed payments and cancelations, or use our default template.

 For more information on Patient Directed Payment Plans, please visit our Please reference our Patient Directed Payment Plans Help Articles. Want to revert back to the default message? Click Reset to Defaults.
Pay Over Time with Sunbit:
Under Plan Types, enter the Minimum and Maximum amounts that patients can create a Sunbit payment plan for via the portal. Eligible patients will be able to choose their plan length and payment amount within these limitations.
Under Eligibility, select the Account Type(s) that can set up a Sunbit Payment Plan within the Payment Portal.
Patient Communications:
Automatically send a receipt via email or text for successful payments made via the portal: Check the box if you wish to send receipts/notifications to your patients once they’ve successfully processed their payment via the online patient Payment Portal. Receipt options can be configured in the Practice section.
Automatically send payment portal registration invites when adding new patients: Check the box if you wish to send registration invites automatically to your patients when they are created.
Automatically send payment portal registration invites when new balance is owed: Check the box if you wish to send registration invites automatically to your patients when they owe a new balance.
Click Save.


 For more information on Patient Directed Payment Plans, please visit our Please reference our