Before adding a new code, we recommend checking your list to verify the code doesn't already exist. Follow the steps below to manually add a CPT or HCPCS code.
-
Select Customer Setup > Codes... > Procedure Codes.
-
Click the New CPT/HCPCS button.
-
Add the code name in the Code field.
 Only the first five (5) digits will be sent on the claim; any added extensions will not populate.
 -
Use the Type drop-down menu to select the code Type.
 Selecting Retail will set this charge to the status of Balance Due Patient when added to claims.
 -
Write the code Description.
-
Set the Claim Defaults you would like this code to follow.
- Use anesthesia base units from the Medicare Physician Fee Schedule: Place a check in this box to use the MPFS's anesthesia base units when a claim is created. Alternatively, you can manually enter the base units (per minute) if they are different for this code.
-
Exclude this code from duplicate service checks: Place a check in this box to exclude this code from being validated when a duplicate service request is made or when a claim is created.
-
This is an all-inclusive code: Place a check in this box means this code covers all other procedures on the claim, therefore all other line items on the claim will behave based on one of the following selections:
-
No other charges on the claim will be billed: No other charges that are part of the claim will be sent out to the payer (all-inclusive).
-
All other charges on the claim will be sent with an amount of $0.00: The $0.00 charges are only sent as information to the payer and will not be paid.
-
Automatically mark other charges as PAID after billing: Select this option to set all other charges to PAID, rather than AT INSURANCE, when claims are submitted.
-
-
All other charges on the claim will be sent with an amount of $0.01: The $0.01 charges are only sent as information to the payer and will not be paid.
-
Automatically mark other charges as PAID after billing: Select this option to set all other charges to PAID, rather than AT INSURANCE, when claims are submitted.
-
-
-
This code is a percentage of the claim total: Place a check in this box if the code should be calculated as a percentage of the claim total dollar amount. This will also remove the Default Price and Default Units fields, as well as add a Default Percent field, in which to specify a percentage of the total claim dollar amount this code represents.
-
Enter the Default Price, Units for this Code, and set the Default Charge Status this code should have when added to a claim.

-
Enter the Default Rev Code manually, or click the magnifying glass and choose from the list of options.

-
Place of Service: Enter the default Place of Service (POS) for this code manually or by clicking on the magnifying glass and choosing from the list of options.
 If no default POS code is selected, it will automatically default to POS 11 on the claim.
 -
Optional: Enter the Clinical Laboratory Improvement Amendment (CLIA) Number for this code.
-
Populate the Type of Service (TOS) for this code manually, or click the magnifying glass and choose from the list of options.
If no defaulted TOS is selected, it will automatically default to TOS 1 on the claim. Visit our Claim Defaults Priority Rules Help Article for a detailed list of the order of precedence of claim defaults.
-
Set the Modifiers (Global & Situational) you would like this code to follow.
-
Modifiers (Global): If this code has global default modifiers that should be billed with the code a majority of the time, enter them here manually or by clicking the magnifying glass and choosing from the listed options.
-
Modifiers (Situational): To enter modifiers that should be billed with the code in certain situations, click the Create situational modifiers link to begin entering the modifiers and rules for when these modifiers should be used on the claim.

-
Place a check in the "Dates of Service in a range" box to set the Start and End date that this modifier should apply to.
-
Place a check in the "A certain primary payer" box to select a specific payer or payer type that this modifier should apply to.
-
Place a check in the "A specific facility" box to set the Start and End dates that this modifier should apply to.
-
Place a check in the "A specific rendering provider" box to select the specific Rendering Provider that this modifier should apply to.
- Place a check in the "Specific Rendering Provider Credentials" box to enter the specific Rendering Provider Credentials that this modifier should apply to. Note: The credentials entered here must match the credentials entered in the credentials field within the Provider section.
 Situational-based modifiers can be set for Dates of service, Primary Payer, Facility, , Rendering Provider, and Rendering Provider Credentials. Users can add an internal note within the Notes box for Situational-based modifiers.
-
-
Set the default Diagnosis Codes you would like this procedure to automatically populate on claims.
Use the
 icon to search and select the related Diagnosis Codes you want to default for this procedure.
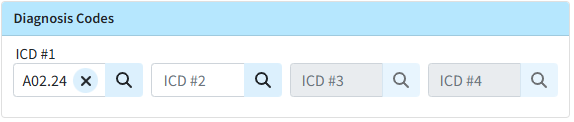
-
Set the Billing Alerts you would like this code to follow.
-
Use the drop-down menu to select the Global Period this Code should follow.
-
A warning message will appear when creating a new claim that falls within the global period of a previously rendered procedure.

-
-
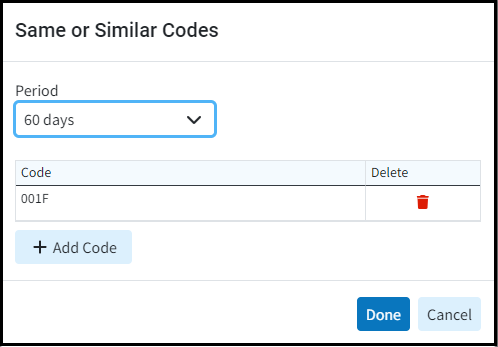
Use the Add New Same/Similar Code List option to select the similar code period this Code should follow.
 You can add specific procedures (or similar codes) that payers won't cover if billed within a specific time period (e.g., a routine care procedure) to your Same/Similar Code List. A warning message will then appear when creating a new claim that falls within the period after a "same or similar" previously rendered procedure.
-
Use the drop-down menu to select the Period (in days) this Code should follow.
Tip: For same/similar codes that can't be billed on the same day, use 0 days as the Period. -
Click the Add Code option and search for the Procedure Code(s) to add to your list.
-
Check the box for the code and click Select.
-
When finished click Done.
-
Use the Prior Authorization Requirements options to select if this code requires payer authorization for:
-
None: No payers require prior authorization for this procedure.
-
All Payers: All payers require prior authorization for this procedure.
-
Certain Payers: Some payers require prior authorization for this procedure (select all that apply from the list).
Billing alerts (including Prior Authorization Requirements) will be displayed when running the claim review within Claim Control.
-
-
-
-
Set the Drug Information you would like this code to follow.
-
Enter your default Drug Price, Drug Units, and use the Drug Units Measure drop-down menu to select the measurement for this drug code.

-
Enter the Drug Code, and use the Drug Code Format drop-down menu to select the drug code format.

-
Write an Additional Description (for non-specific procedure codes).
-
-
Set the Effective/Termination Dates you would like this code to follow.
-
Set the Effective and Termination Dates.

-
-
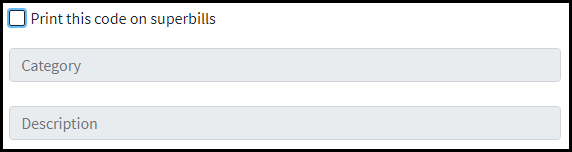
Set the Superbill Options you would like this code to follow.
-
Print this code on Superbills: Place a check in this box to have the code display on your Superbill.
-
Category: This option shows how you group the code(s) on the Superbill
-
Description: Write an abbreviated description.
-
- Statement Description: Write a statement description for the revenue code that will be printed in the patient statements.
-
Click Save.
 Only the first five (5) digits will be sent on the claim; any added extensions will not populate.
 Selecting Retail will set this charge to the status of Balance Due Patient when added to claims.

 If no default POS code is selected, it will automatically default to POS 11 on the claim.
 Visit our
 Situational-based modifiers can be set for Dates of service, Primary Payer, Facility, , Rendering Provider, and Rendering Provider Credentials. Users can add an internal note within the Notes box for Situational-based modifiers.
 icon to search and select the related Diagnosis Codes you want to default for this procedure.

 You can add specific procedures (or similar codes) that payers won't cover if billed within a specific time period (e.g., a routine care procedure) to your Same/Similar Code List. A warning message will then appear when creating a new claim that falls within the period after a "same or similar" previously rendered procedure.


This is the easiest way to add a CPT Code to your personal list is to import/add it from the CPT® codes Master List.
Before adding a new code, we recommend checking your list to verify the code doesn't already exist. Follow the steps below to add a CPT code from the master list.
Select Customer Setup > Codes... > Procedure Codes.
Click the Add from CPT® List button.
Once the Master CPT Selection window opens, enter your Search Criteria.
Use the All Codes drop-down menu to select the code category you are looking for.
Enter Code to Search For: Use this field to type in the code you would like to import.
Enter Keywords to Search For: Use this field if you're unsure of the exact code, but know what is in the description.
Use the Order Results By drop-down to order your search results by descriptions or code.
Click Search.
Place a check in the box(es) under the Selected column for the code(s) you want to add.
Click Add .
Click OK when the confirmation "All codes were successfully added." displays.
 Claims sent from your EMR/EHR to CollaborateMD with any new CPT® codes not on your local list will be added to your list automatically. You can also add new codes if you're manually entering a claim into the claim section with a code that is not on your local list.
 Claims sent from your EMR/EHR to CollaborateMD with any new CPT® codes not on your local list will be added to your list automatically. You can also add new codes if you're manually entering a claim into the claim section with a code that is not on your local list.
This is the easiest way to add a HCPCS Code to your personal list. The codes containted in the Master List are the codes developed by the Centers for Medicare and Medicaid Services (CMS) in conjunction with 3M Health Information Management.
Before adding a new code, we recommend checking your list to verify the code doesn't already exist. Follow the steps below to add a HCPCS code from the master list.
Select Customer Setup > Codes... > Procedure Codes.
Click the Add from HCPCS List button.
Once the Master HCPC Selection window opens, enter your Search Criteria.
Use the Select Range to display drop-down menu to select the code category you are looking for.
Enter Code to Search For: Use this field to type in the code you would like to add.
Enter Keywords to Search For: Use this field if you're unsure of the exact code, but know what is in the description.
Use the Order Results By drop-down to order your search results by descriptions or code.
Click Search.
Place a check in the box(es) under the Selected column for the code(s) you want to add.
Click Add .
Click OK when the confirmation "All codes were successfully added." displays.
Required fields are indicated in red.
Code: Enter the Procedure code (numbers and/or letters).
Code Type: Select the type of Procedure code (CPT/HCPCS, Other Medical or Retail).
Claim Defaults: Select any applicable claim defaults for the code, as well as the default price, number of units and default charge status for the code.
Modifiers: Add any applicable global or Situational modifiers to the code if applicable.
Drug Information: If applicable, include a drug price, units, and drug unit measure (GR, ML, UN, etc.) as well as drug codes and code format.
Effective Date: Effective code date for reporting and tracking purposes only.
Termination Date: Termination code date for reporting and tracking purposes only.
Superbill Options: Configure Superbill options (Enable code to print on superbill and enter code category and description that will reflect on the superbill).
Statement Options: Configure Statement options (Enter a code description that will reflect on the statement).
Reporting: Configure the procedure code by setting a Cost of Goods and Services (COGS) to allow tracking of this data through a custom report.