It is important that your Resources, Types, Departments, Statuses (optional) and Settings (optional) are configured under the Appointment Configuration screen before creating appointments.
The scheduler display will default to the Day View.

Actions/Options
Mini Calendar: This displays the current month in the top left corner of the screen; you can view past or future months. When you're in the day view, the current date has a small red circle around it. The day selected within the mini calendar will display the associated appointments within the main calendar view.
Schedule Appointment button: Click this button to create a new appointment.
Add to Waiting List button: Click this button to add an appointment to your waiting list.
Print button: Click this button to print your daily or weekly schedule.
Department: Use this to filter through your scheduler departments.
Day View: Use to view appointments for a single day separated by resource.
Week View: Use to view appointments for the week.
 Appointment Resources are not visible within the weekly view. To view appointment resources within the weekly view, right-click on the appointment and select Edit Appointment or double click on the appointment.
Filter: Allows you to narrow down the view of the appointments and blocks by selecting the filters you want to see, and deselecting the filters you don't want to see.
Main Calendar View: This is where all of the appointments will be displayed by Resource.
Advanced Search: Use this to search for an appointment by the patient or comments.
 Appointment Resources are not visible within the weekly view. To view appointment resources within the weekly view, right-click on the appointment and select Edit Appointment or double click on the appointment.
Add from Waiting List: Schedule an appointment from your Wait List.
New Appointment: Schedule a new appointment in this time slot.
New Block: Add a new Schedule Block in this time slot.
New Block From Template: Add a new Schedule Block using an existing template in this time slot.
Edit Appointment: Edit the selected appointment
Update Status: Change the status for the selected appointment.
Schedule Follow Up: Schedule a new appointment for the patient of the selected appointment
Move Appointment: Move the selected appointment to a new date or time.
Reschedule Appointment: Sets the selected appointment to the “Rescheduled” appointment status and schedules a new appointment for the patient. Use if this you would still like to track and report on all of your rescheduled appointments.
Send Forms: Send patient intake forms message for the selected appointment.
Apply Forms: Apply any completed patient intake form for the selected appointment.
Print Superbill: Prints a Superbill of your choice for the patient of the selected appointment.
Print Label: Prints a Superbill of your choice for the patient of the selected appointment.
Create Claim for Visit: Create a claim for the patient for the selected appointment.
 The claim will be billed under the provider assigned as the Appointment Resource.
 Find Claim for Visit: Locate any claims created for the selected appointment.
Find Claims for Patient: Locate any claims for the patient of the selected appointment.
Create Task For Patient: Create a task for the patient of the selected appointment.
Edit Block: Edit the selected Block.
Update Status: Change the status for the selected Block.
Copy Block: Copy the selected Block to a date date and/or time.
Move Block: Move the selected Block to a new date or time.
Reschedule Block: Sets the selected Block to the "Rescheduled" status and schedules a new Block for a selected time slot. Use this to track and report on all of your reschedule blocks.
 The claim will be billed under the provider assigned as the Appointment Resource.
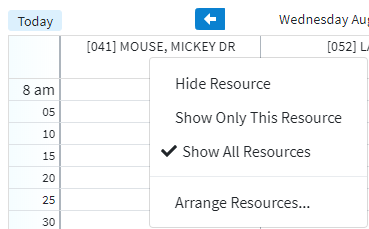
 Right-clicking on a Resource header within the Schedulers Day View provides you with the following options:
Hide Resource: Selecting this option will hide the selected Resource.
Show Only This Resource: Selecting this option will show the selected Resource only.
Show All Resources: Selecting this option will show all Resources, including those that have been hidden.
Arrange Resources...: Selecting this option will allow you to rearrange the order in which Resources appear within the Daily View..
Do you have appointment types or statues that you use more often than others? Take control and customize the order in which they display within the application. Save time when creating or editing appointments by displaying the appointment types and statues in the order that is the most efficient for you!
Select Appointments > Configuration.
Click Edit .
Use the Drop-down menu to “Choose which colors and icons to show for each appointment based on the appointment type and status.”
Only the custom options allow you to edit the order.Highlight a Type or Status and use the
 arrows to move them up or down in the list.
 Want to view your list in alphabetical order? Click the
  button to order your lists.
Click Save
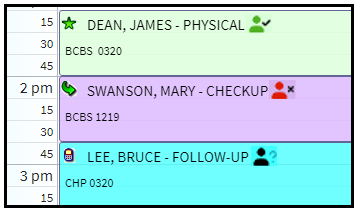
Real-time Eligibility allows you to check if a patient is eligible for services in seconds, avoiding possible loss of payment. Eligibility is truly the first step to a clean claim. Wouldn’t it be great to see a Patient Eligibility status directly from the appointments in the scheduler? We thought you might think so. You can view a patient’s eligibility results without having to leave the scheduler.
An icon on the right side of the appointment will indicate the eligibility status of the patient.
 Within 30 days from the last eligibility check this patient is eligible for services.
 Within 30 days from the last eligibility check this patient is not eligible for services.
 Eligibility for this patient has not been checked within the last 30 days.

 Within 30 days from the last eligibility check this patient is eligible for services.
 Within 30 days from the last eligibility check this patient is not eligible for services.
 Want to see a little more detail? Hover over the icon will provide more details regarding the eligibility status.
Want to save even more time and have CMD check eligibility whenever you save a new appointment? Enable the Eligibility Setting to “Automatically check eligibility when saving appointment” within the services section. Visit our Manage Real-Time Eligibility Help Article for detailed steps on how to enable this setting.
With this setting enabled, CMD will check the eligibility for the patient right after you create the appointment. The results will appear within a notification tile. Clicking on the tile will open the patient’s record.
The Intelligent Intake (Patient Intake Forms) feature enables patients to complete forms online using their phone, tablet, or computer and submit them. Within CollaborateMD, users will then receive the form data, associate it with patient records, and decide which data provided by the patient should replace or populate fields within the actual record making it a more efficient method of collecting information from the patient. You can now view the patient's intake form status directly from the appointments without having to leave the scheduler.
An icon on the far right side of the appointment will indicate the status of the patient intake forms.
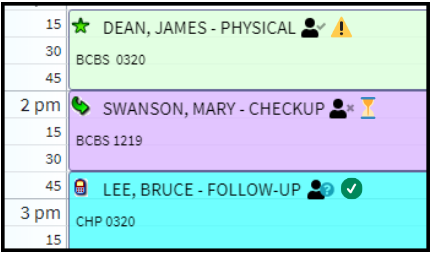

The appointment is for today or later and forms have not been sent or submitted

Intake forms were sent, but the patient hasn’t filled them out yet

Intake forms have been submitted and are ready to apply

Intake forms were applied
No IconThe appointment is in the past and forms were not sent or submitted


Want to see a little more detail? Hovering over the icon will provide more details regarding the status of the intake form.