Follow the steps below to change the follow up date.
Select Claim > Follow Up Management.
Enter your Search Criteria or Load a Search Filter.
Click on a line item to open up a specific claim.
Click on the Calendar Icon and select the new Follow Up date.
Click Save. Otherwise, click the Close button.

Reduce the amount of clicks when saving by using the Save button’s drop-down arrow
 to update this claim and move onto another record or return back to your search results.
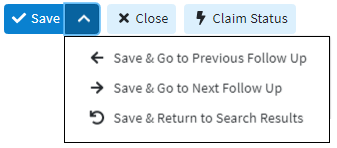


Follow the steps below to change the claims charge status.
-
Select Claim > Follow Up Management.
-
Enter your Search Criteria or Load a Search Filter.
-
Click on a line item to open up a specific claim.
-
Click the Set all charges to dropdown and select your claim's charge status from your list.
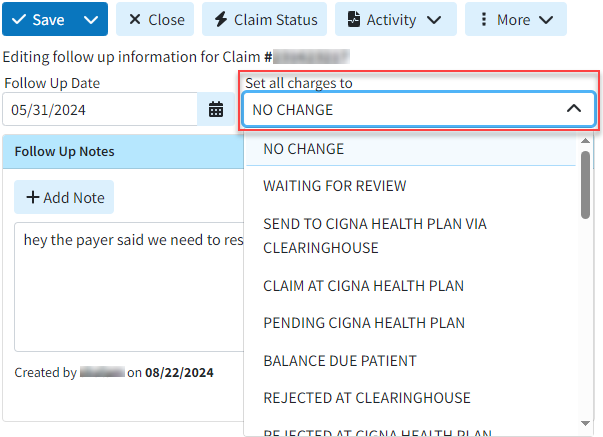
If no selections are made, the defaulted "NO CHANGE" option will keep the claim's existing charge status.
-
Click Save. Otherwise, click the Close button.

Follow the steps below to manage follow up notes.
Select Claim > Follow Up Management.
Enter your Search Criteria or Load a Search Filter.
Click on a line item to open up a specific claim.
Click the Add Note button to add a new text box.
Type your note in the text box.
Additional options:
The copy icon
 copies the note to other unpaid claims for this patient.
The gear icon
 is used to configure which users can view this note.
The remove icon
 removes this note from the claim.
The Undo Icon
 Undoes removing the follow-up note.
 You can only undo this action if you have not saved the claim.
Click Save. Otherwise, click the Close button.
Reduce the amount of clicks when saving by using the Save button’s drop-down arrow
to update this claim and move onto another record or return back to your search results.
 You can only undo this action if you have not saved the claim.
You can also add follow-up dates to one or multiple claims in order to boost insurance receivables by checking up on claims at a specific day or date. Follow the steps below to manually add a Follow Up Date to multiple claims at once.
Select Claim > Follow Up Management.
Enter your Search Criteria or Load a Search Filter
Check the box next to the claims you wish to update.
Click the Set Follow Up button
Enter the new Follow Up Date.
Click Save.
Follow the steps below to Enter Patient notes
Select Claim > Follow Up Management.
Enter your Search Criteria or Load a Search Filter.
Click on a line item to open up a specific claim.
Locate and click on the Notes tab from the side-panel.
Use the drop down menu to select the type of note you want to enter.
Click the Add Note button to start creating the note.
Click Done.
Click Save. Otherwise, click the Close button.
Reduce the amount of clicks when saving by using the Save button’s drop-down arrow
to update this claim and move onto another record or return back to your search results.
Follow the steps below to change the follow up date.
Select Claim > Follow Up Management.
Enter your Search Criteria or Load a Search Filter.
Click on a line item to open up a specific claim.
Click the Create Task button.
Visit our Tasks Help Artifices for detailed steps on how to add and manage tasks.
Enter your task Title.
Set the Due Date, Status and Priority.
Enter the description for this task.
Add any links to this task.
Select which user to assign this task to
Click Save
Click Save. Otherwise, click the Close button.
Reduce the amount of clicks when saving by using the Save button’s drop-down arrow
to update this claim and move onto another record or return back to your search results.
Follow the steps below to quickly open any related records to this claim.
Select Claim > Follow Up Management.
Enter your Search Criteria or Load a Search Filter.
Click on a line item to open up a specific claim.
Click the
 button found at the top of the page.
Open Claim: Opens the claim record
Open Patient: Opens the patient the claim was sent for.
Open Payer: Opens the payer this claim was sent to.
Open Provider: Open’s the provider that billed this claim
Click Save. Otherwise, click the Close button.
Reduce the amount of clicks when saving by using the Save button’s drop-down arrow
to update this claim and move onto another record or return back to your search results.
Need to review all the times this claim has been submitted? Or do you want to verify which payers this claim was sent to? Quickly track the claim’s submission history from within the claim following up section.
Select Claim > Follow Up Management.
Enter your Search Criteria or Load a Search Filter.
Click on a line item to open up a specific claim.
Click the
 button found at the top of the page.
Select Track Claim Submission History.
The claim will be opened in the Claim Tracker screen.
Reduce the amount of clicks when saving by using the Save button’s drop-down arrow
to update this claim and move onto another record or return back to your search results.
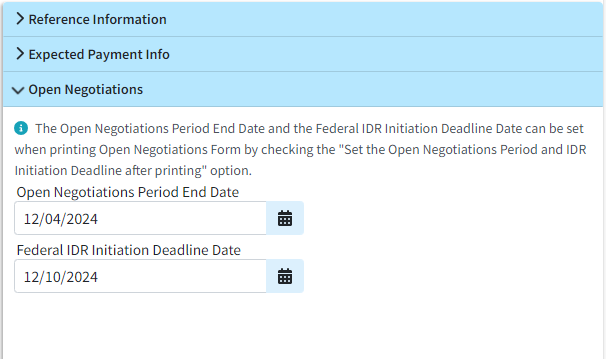
When negotiating out-of-network rates for emergency services, users print and submit the Open Negotiations Form to the payer. Upon submission, this triggers two important deadlines:
- The end of the Open Negotiations Period, which occurs 30 business days after the form has been submitted
- The deadline to initiate the Federal Independent Dispute Resolution (IDR) process, which is 4 business days after the conclusion of the Open Negotiations Period
These "Dates" are stored within the application to allow users with multiple claims to efficiently manage the Open Negotiations process. The Open Negotiations Period End Date and the Federal IDR Initiation Deadline Date can be set when printing the Open Negotiations Form by checking the "Set the Open Negotiations Period and IDR Initiation Deadline after printing" option. For more information, please reference our Print Open Negotiations Form Help Article
Select Claim > Follow Up Management.
Enter your Search Criteria or Load a Search Filter.
Click on a line item to open up a specific claim.
Locate and click Open Negotiations from the right-hand side panel.
View the previously set Open Negotiations Period End Date and the Federal IDR Initiation Deadline Date.
Click


Follow the steps below to view the EOB info from a follow up.
Select Claim > Follow Up Management.
Enter your Search Criteria or Load a Search Filter.
Click on a line item to open up a specific claim.
Click the EOB Info tab from the side panel.
View the EOB information (Check#, Payer, Received Date, Payment Type, Processing Type, Allowed Amount, Paid Amount, And Adjusted Amount).
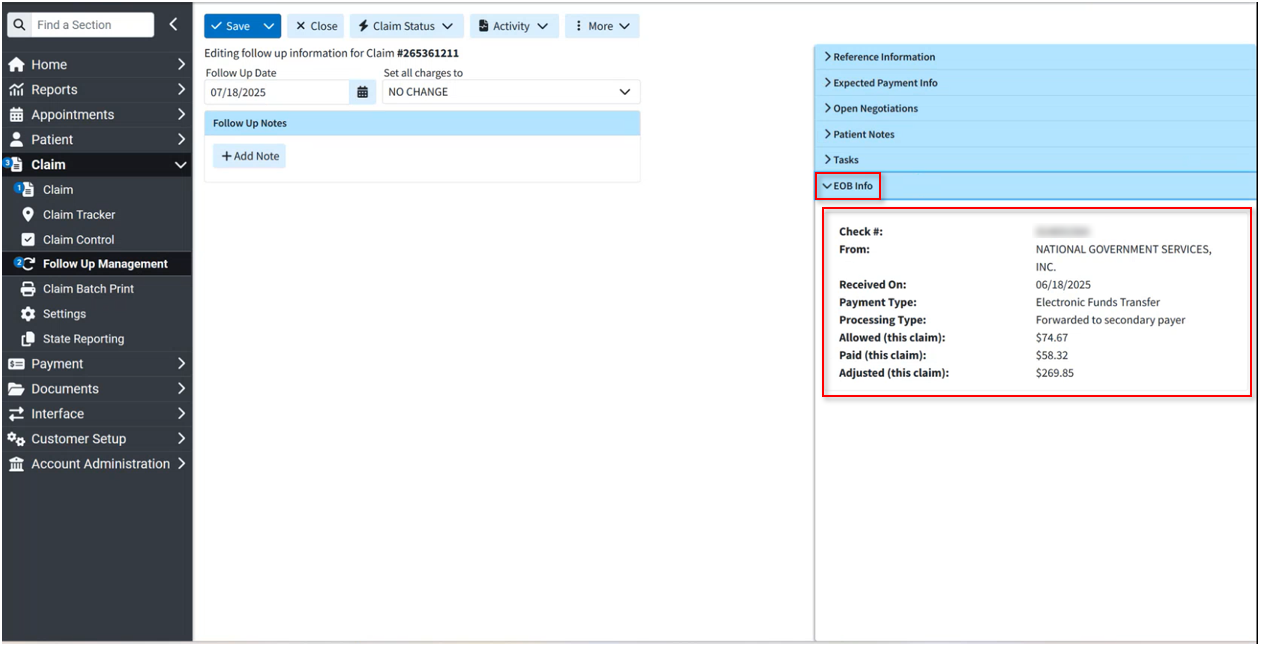
To view the EOB details, click the desired check information to open the EOB details window.
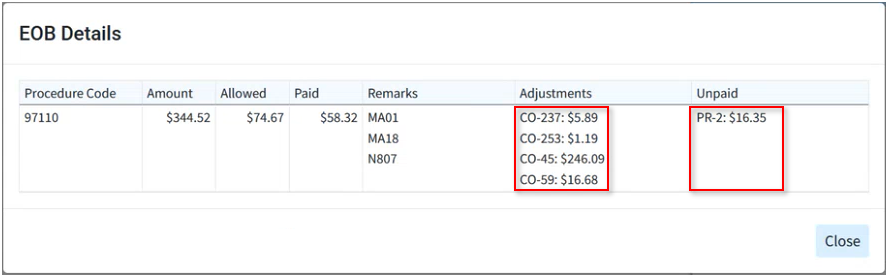
 Hovering over the adjustment codes provides their descriptions; hovering over the unpaid reason codes provides any denial reasons.
When finished, click Close.


 Hovering over the adjustment codes provides their descriptions; hovering over the unpaid reason codes provides any denial reasons.
Follow the steps below to view/add an alert from a follow up.
-
Select Claim > Follow Up Management.
-
Enter your Search Criteria or Load a Search Filter.
-
Click on a line item to open up a specific claim.
-
Click the Alerts tab from the side panel.
-
Click Add Alert.
- Write the message you would like to have appear in the alert pop-up.
-
Use the Display Options boxes to determine when you would like the alert to appear.
For more information on the Display Options, reference the Alert Display Options Help Article. -
The Effective Date Range allows you to set how long the alert should remain active.
-
Click Done to add your alert.
-
Click Save.
Reduce the amount of clicks when saving by using the Save button’s drop-down arrow
 to update this claim and move onto another record or return back to your search results.

The Proof of Timely Filing letter allows users to print a basic proof of timely filing letter directly from the Claim, Claim Tracker, and Claim Follow Up screens for payers who don't have their own required format.
-
Select Claim > Follow Up Management.
-
Enter your Search Criteria or Load a Search Filter.
-
Click on a line item to open up a specific claim.
-
Click the Print button.
-
Select Proof of Timely Filing
-
Select your claim submission (TCN).
-
Review your letter.
-
Click Print.
-
Click Save. Otherwise, click Close.
 Visit our Proof of Timely Filing Letter Sample Help Article to view a sample Proof of Timely Filing letter.
 Visit our
 The Appeal letter allows users to print a basic Appeals letter directly from the Claim, Claim Tracker, and Claim Follow Up screens for payers who don't have their own required format.
-
Select Claim > Follow Up Management.
-
Enter your Search Criteria or Load a Search Filter.
-
Click on a line item to open up a specific claim.
-
Click the Print button.
-
Select Appeal.
-
Select your claim submission (TCN).
-
Review your letter.
-
Click Print.
-
Click Save. Otherwise, click Close.
Visit our Appeal Letter Sample Help Article to view a sample Appeals letter.