Some of CollaborateMD's largest clients are multi-state healthcare practices or billing service providers with separate customers under their main accounts. This setup enables them to maintain distinct patient, claim, and payment information for each of their individual Customers. Having these separate customers also requires users to input setup data such as Referring Providers, Facilities, Codes (procedure codes, fee schedules, diagnosis codes, remittance codes, revenue codes, etc.), and Payers independently for each customer, resulting in a significant amount of setup work.
To simplify this manual process into a fully automated solution, we created our Data Sync feature. This new capability allows clients to automatically sync their data with multiple customers whenever a change is made. You no longer need to manually add new codes, payers, and other details for each individual customer. Instead, simply enable the Data Sync feature and let it do it for you. Start automating this process and enhance your productivity within CMD today!
 Please note that this feature will replace the Data Copy, streamlining the process of copying important data while offering a more cost-effective solution for customers.
Enable and Configure Data Sync
If you're the Auth Rep, follow the steps below to enable, configure, or disable Data Sync:
-
Select Account Administration > Services.
-
Click the button next to Data Sync.
-
The Enable Data Sync box enables or disables this service.
-
Under Synchronization Options:
-
Click Add.
-
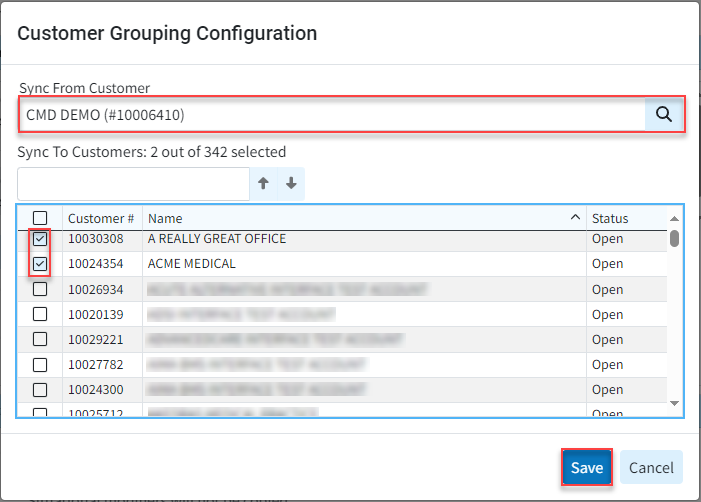
Use the "Sync From Customer" search field to select the customer from which to sync the data.
-
Use the "Sync To Customers" checkbox(es) to select the Customer(s) to which to transfer the data.
The "Sync From" customer is the primary source file from which the data will be copied. The "Sync To" customer(s) are the ones whose data will be overwritten with the copied information.
-
Click save.
 You can also have multiple "Sync From" customers synchronized to copy data to different "Sync To" customers.
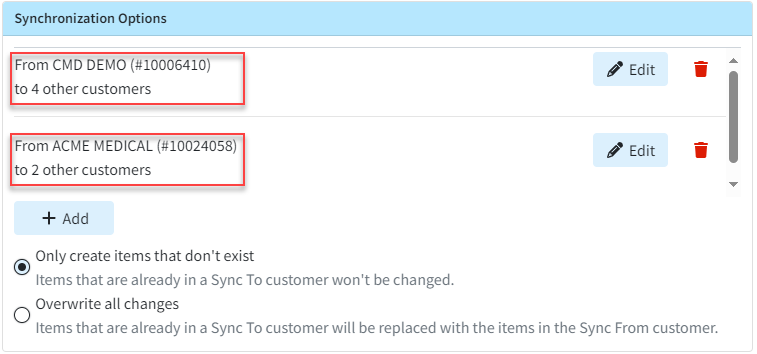
-
Use the "Only create items that don't exist" radio button (Defaulted option).
-
Selecting this option will ensure that the existing items in the "Sync To" customer are not modified.
-
-
Use the "Overwrite all changes" radio button.
-
Selecting this option will overwrite existing items in the "Sync To" customer and replace them with those in the "Sync From" customer.
Important: We recommend selecting the "Only create items that don't exist" option, as this will not alter any existing records. It will only update new ones moving forward, ensuring that nothing is accidentally overwritten. Billing Services that plan to maintain all of their configurations and manage all their lists from one customer (the Sync From customer) without making any changes to individual customers (other than Situational Modifiers or Provider BIlling Options, which are not part of Data Sync) can use the "Overwrite all changes" option to ensure that all configurations exactly match the Sync From customer. It's also important to note that there is no way to undo this action once the data has been overwritten.
-
-
-
Under Data Options:
-
Use the radio button to select the data types to copy.
-
Codes - You can select to sync Procedure, Diagnosis, ICD Procedure, Revenue, Remittance, and Adjustment codes. You can also select to sync Fee Schedules. Please note that existing situational modifiers will not be copied to procedure codes.
-
Facilities - Select this option to sync any updates to the Facility section.
-
Referring Providers - Select this option to sync any updates to the Facility section.
-
Payers - Select this option to sync any updates to the Facility section. Please note that existing provider billing options will not be copied to payers.
 Data Sync does not include rendering/attending providers, billing providers, claims, financial data, pending information (appts., etc.), notes (e.g. patient notes, claim notes, etc.), or patient balance.
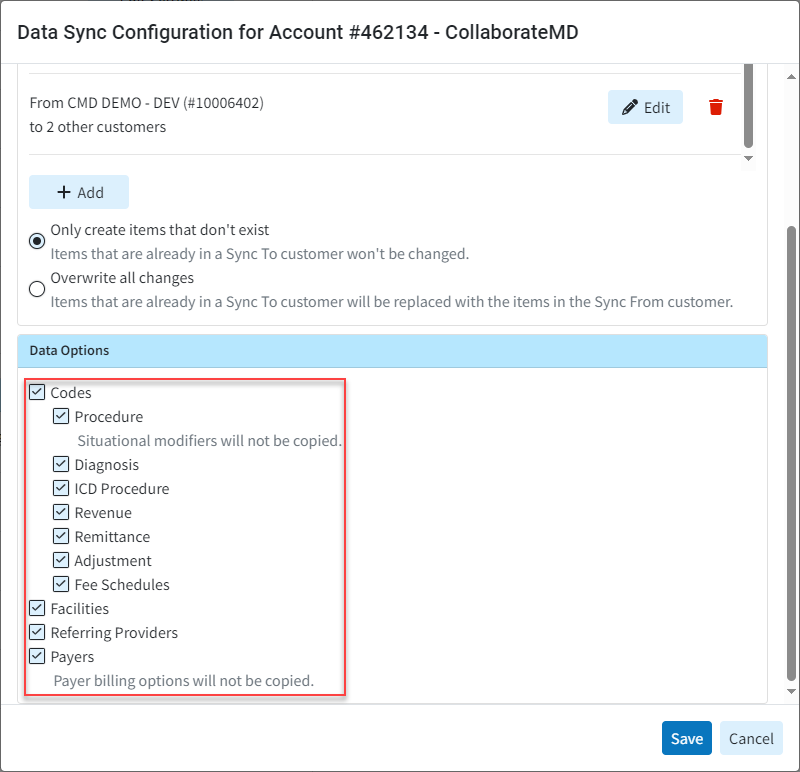
-
-
-
Click Save.


 Data Sync does not include rendering/attending providers, billing providers, claims, financial data, pending information (appts., etc.), notes (e.g. patient notes, claim notes, etc.), or patient balance.
 When selecting the Data Sync option to "Overwrite all changes," any time a record is updated in the "Sync From" customer, you will receive a pop-up notification. This pop-up will inform you that the data will be synchronized and will also indicate the number of customers that will be synced.
Edit A Data Sync
If you're the Auth Rep, follow the steps below to edit an existing Data Sync:
-
Select Account Administration > Services.
-
Click the button next to Data Sync.
-
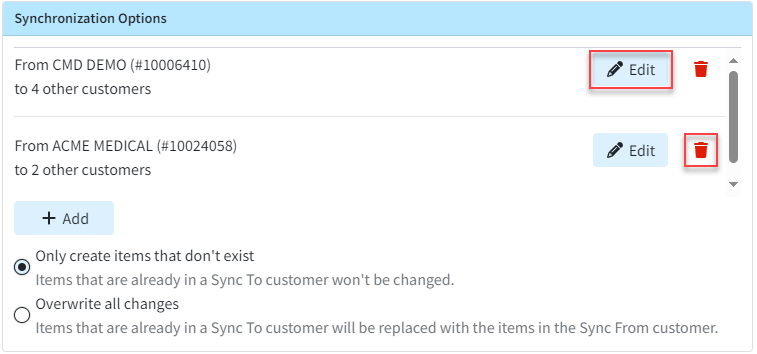
Under Synchronization Options:
-
Click Edit to make any updates or changes to the "Sync From" or "Sync To" customers within the customer grouping configuration, then click Save.
-
To delete a specific synchronization option, click the delete (trash can icon) option.
-
-
Update any desired Data Options.
-
Click Save.

Want to copy data to customers in a different CMD account? Visit our Request a Data Copy Help Article for more information.