CollaborateMD's Intake Forms feature allows offices to reduce paperwork and streamline front-office workflows. Updox, a part of EverHealth, has developed a Forms product that enables the creation of forms and their automatic distribution to patients through CMD (as part of their appointment reminders) or manually. The form data is received back as discrete fields that can be imported into the Patient section.
This workflow will reduce the chances of errors and increase automation in the patient check-in process. Patients can complete forms online using their phone, tablet, or computer and submit them. Once the form is submitted, users will receive the data in CMD, associate it with patient records, and decide which data should replace or populate fields within the record, making it a more efficient method of collecting patient information.
-
Select Account Administration > Services.
-
Click the button next to Intake Forms.
-
Select either Basic Forms or Custom Forms.
-
Basic Forms Consist of 4 available forms: Patient Demographics, Patient Medical History, Health Insurance Information, Electronic Communication Consent.
-
Forms Options:
-
Allow Setting Forms by: Forms sent via Appointment Reminders are not affected by this setting.
- Click the Email Only option to exclusively send intake forms via email.
- Click the "Text and Email" option to enable sending intake forms via text message or email.
-
-
Message Template:
-
Based on your selections, review or edit your text message and/or email template(s).
 Use the Right-click options to select and add the available variables to the template. The [Form Link] is a required field and will not save if removed from the template.
-
-
Portal Options:
-
Header Template: General contact information that will shared between the Payment Portal and the Forms Portal and be displayed in the header of every page on both portals.
- Click the Edit button to upload a logo.
- Enter the required fields: Practice Name, Address, City, State, Zip code, Phone, or select "Copy From Practice."
- Optional: Enter your practice website.
-
-
-
Custom Forms Consist of Basic Forms, plus you can make changes to basic forms and create your own Intake Forms.
-
Forms Options:
-
Allow Setting Forms by: Forms sent via Appointment Reminders are not affected by this setting.
- Click the Email Only option to exclusively send intake forms via email.
- Click the "Text and Email" option to enable sending intake forms via text message or email.
- Click Open Updox
- Click Menu > Admin
- Select Form Manager to add, remove, or edit forms.
Be sure to set the EHR Key for your form fields to link fields to CollaborateMD.
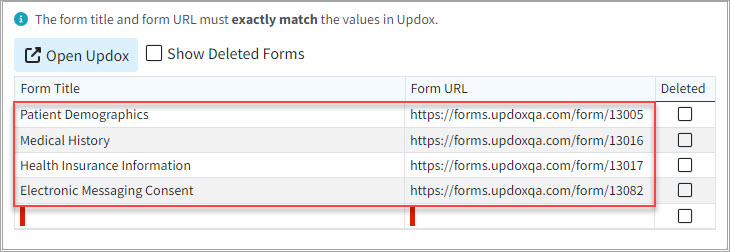
Also, if you have added or removed any forms, update the table within the Forms Options. To do this, visit Updox, select Menu > Home, and then select Forms Library. Use the Copy button next to each form to copy the URL of the form into the table. Also, Copy the Title of each form into the table (both the title and the URL must match the values in Updox). For more information on setting up custom forms, visit our Add/Manage Custom Forms Help Article.
 You can also customize the order of the forms and determine their sequence as they appear to patients within the forms portal, by dragging and moving them on the list. This will determine the order of the forms within the Appointment Types section as well as the Forms Portal.
-
-
Message Template:
-
Based on your selections, review or edit your text message and/or email template(s).
Use the Right-click options to select and add the available variables to the template. The [Form Link] is a required field and will not save if removed from the template.
-
-
Portal Options:
-
Header Template: General contact information that will be shared between the Payment Portal and the Forms Portal and be displayed in the header of every page on both portals.
- Click the Edit button to upload a logo.
- Enter the required fields: Practice Name, Address, City, State, Zip code, Phone, or select "Copy From Practice."
- Optional: Enter your practice website.
-
-
-
Optional: Click Save and Demo to view the fields in the forms portal.
-
Optional: Select Copy Configuration to copy these intake form configurations to another customer account.
- Click Save.
Important Note: You must use the CMD Scheduler in order to use Patient Intake Forms. For more information on setting up your scheduler, please visit our Appointment Configuration Help Article. Please note that it will take 24-48 hours after configuring Intake Forms for the feature to be enabled.
 You can also customize the order of the forms and determine their sequence as they appear to patients within the forms portal, by dragging and moving them on the list. This will determine the order of the forms within the Appointment Types section as well as the Forms Portal.
 It is highly recommended that you have the Appointment Reminder feature enabled and configured to use Patient Intake Forms. For more information on setting up your appointment reminders, please visit our
Manage Appointment Reminders Help Article.
It is highly recommended that you have the Appointment Reminder feature enabled and configured to use Patient Intake Forms. For more information on setting up your appointment reminders, please visit our
Manage Appointment Reminders Help Article.