The Edit Templates button is used to configure the design of the statements types. You are able to edit the wording of both user-print statement types. However, Enhanced Statements type provide you with complete control of the look and feel of your statements.
 If you have multiple practices, these template settings must be configured under each participating practice.
Select Customer Setup > Statements.
Use the drop-down menu to select the desired practice.
Under the User Print Statements table, click the Edit Templates button.
Use the drop-down menu to select the Statement Type you wish to configure.
Place a check in the Highlight editable fields box to show all of the fields that you are able to edit.
Click on any of the editable fields/boxes and type your desired text.
Add A Logo to your statement (Enhanced statements only).
Click the Your Logo Here icon, then click Upload to select a logo from your computer.
Adjust the logo.
Click Done.
Click Save.
The Edit Templates button is used to configure the design of the statements types. You are able to edit the wording of both user-print statement types. However, Enhanced Statements type provide you with complete control of the look and feel of your statements.
If you have multiple practices, these template settings must be configured under each participating practice.
-
Select Customer Setup > Statements.
-
Use the Practice to Manage Statement Configuration for drop-down menu to select the desired practice.
-
Under the User Print Statements table, click the Edit Templates button.
-
Use the drop-down menu to select the Statement Type you wish to configure.
-
Place a check in the Highlight editable fields box to show all of the fields that you are able to edit.
-
Click General from the right-hand side panel to access general settings that apply to the statements.
-
Select the credit cards accepted by this practice.
 Don't accept credit card payments by mail? Make sure all credit card boxes are unchecked.
 -
Show Due Date: Check this option to show the due date of Upon Receipt on the statement.
-
Do not include account credits: Check this box in order to remove credits on the patient's account from being included in the calculation of the Balance Due on the statement and from being listed within the detailed line items.
-
Summarize charges: Check this option to group multiple charges associated with one claim. The code and description that appear on the statement are associated with the first charge on the claim.
-
Show paid charges: Check this option to include all charges, with associated payments and/or adjustments, associated with the patient even if there is no outstanding balance on the charges.
-
Show units in charge description: Check this option to show the number of units used on each line item charge. The number of units will be displayed next to the charge description on your patient’s statements.
-
Increment Statements times Printed when sending FDN: Check this box if you wish to have FDNs be counted towards the patient's statement sent count.
-
Statement Separation: Choose an option for statement separation.
-
Send one statement for all charges.
-
Send separate statements for charges per provider.
-
Send separate statements for charges per practice.
-
-
Use separate address for Pay-To:
-
Statement Pay-To address: Check the box and populate the required information to receive payments at a different address than the practice address.
-
Statement Return Address: Populate the required information to have undelivered statements returned to a different address than the practice address.
-
-
-
Use the Revenue code description for charges on institutional claims: Check this option to print the revenue code description instead of the procedure code description on institutional claims.
-
For Enhanced Statement Layout, click the Enhanced Statement Options tab from the side panel to access settings for enhanced statements only.
-
Show Page Numbers: Adds the statement page numbers to the top right corner.
-
Show Payment Stub: Adds a payment stub to the bottom on page 1
-
Show Patient comments: Adds a page at the end of the statement containing patient comments.
- Show Insurance company, member ID, and group ID for all payers billed on the claim: Adds the insurance name, member ID and group ID to the insurance information on page 1.
-
Show Facility/Office Address: Adds the facility name, address, and phone number (optional) under the provider information on page 1.
Show Facility/Office phone number with address: Adds the facility phone number after the address on the Facility/Contact information.
-
Show Prompt Payment Discount (if applicable): Adds the discounted amount as the AMOUNT YOU OWE and the due date will reflect the last date that the discount is applicable. It will also show the amount due after the due date.
-
Charge Breakdown: Select the level of details you want on the statement:
-
Summarized: Summarized Statement will show totals for charges, payments/adjustments, amounts owed, etc.
-
Detailed Activity: Detailed Activity will show each individual charge, payment/adjustment, amount owed, etc.
-
-
Customize Patient Charge Message: This allows you to customize the charge message based on age or # of statements:
Always send the same patient charge message: Select this option to set/customize your patient charge message that will print on every statement.
Once selected, click the patient message section to customize your message.
Use Charge Age to set the patient charge message: Select this option to set/customize your patient charge message based on the charge age.
Once selected, click the patient message section to customize your dunning/aging message. Select 0-30, 31-60, 61-90, and Over 90 to set/customize individual messages that will be printed on the statement based on the charge age.
Use number of statements sent to set the patient charge message: Select this option to set/customize your patient charge message based on the number of statements sent to the patient.
Once selected, click the patient message section to customize your message based on the number of statements. Select Sent 1 Time, Sent 2 Times, Sent 3 Times, and Sent 4 Times to set/customize individual messages that will be printed on the number of statements that have been sent to the patient
- Font: Use the drop-down menu to select the font used on the statement.
-
Background Color: Select the color displayed on the statement.
-
Brightness: Use the slider to set how bright the selected color should be.
-
Icon Style: Use the drop-down menu to select how the icons in the statement should appear.
-
-
- For Plain Text Statement, Plain Text Final Demand Letter or Plain Text Payment Plan, click the Options side tab from the side panel to access settings for these types of statements.
-
Show aging buckets: Adds balance aging buckets to the bottom on page 2.
-
Show custom patient comments: Adds the patient's custom comments to page 2.
-
Show ‘Address Service Requested’: Adds the Address Service Requested note to page 1.
-
Show Prompt Payment Discount (if applicable): Adds the discounted amount as the AMOUNT YOU OWE and the due date will reflect the last date that the discount is applicable. It will also show the amount due after the due date.
-
-
Click Save.
 Don't accept credit card payments by mail? Make sure all credit card boxes are unchecked.
Important Note: You must have the In-App Credit Card processing and the Patient Payment Portal features enabled and configured in order to use electronic statements. For more information on turning these services on, please visit our Manage In-Application Credit Card Processing and Manage your Patient Payment Portal Help Articles.
Select Customer Setup > Statements.
Use the Practice to Manage Statement Configuration for drop-down menu to select the desired practice.
 If you have multiple practices, these settings must be configured under each participating practice.
Under the User Print Statements table, click the Edit Templates button.
Use the drop-down menu to select the Statement Type to configure:
Emailed Electronic Statements
- Review or edit your email template fields (email Subject and body).
Use the Right-click options to select and add the available variables to the template. The [Payment Link] is a required field and will not save if removed from the template.
Use the date format drop-down to select your date format.
Under Electronic Statement Template (used for all practices) review or edit your Important Message and your Contact Us fields. This General information will be shown on the payment portal's patient statement view.
- Enter a personalized Message To Patients that will be shown within the bottom portion of their online bill.
- Select whether or not you want to show your phone contact information, email contact information, or both by selecting them and entering the required data.
- Optional: Click Save and Show Demo to view the important message and the contact us fields in the payment portal.
Click the General tab from the side panel to access general settings that apply to all statements.
Select the credit cards accepted by this practice.
Don't accept credit card payments by mail? Make sure all credit card boxes are unchecked.Show Due Date: Check this option to show the due date of Upon Receipt on the statement.
Do not include account credits: Check this box to remove credits on the patient's account from being included in the calculation of the Balance Due on the statement and from being listed within the detailed line items.
Summarize charges: Check this option to group multiple charges associated with one claim. The code and description that appear on the statement are associated with the first charge on the claim.
Show paid charges: Check this option to include all charges, with associated payments and/or adjustments, associated with the patient even if there is no outstanding balance on the charges.
Show units in charge description: Check this option to show the number of units used on each line item charge. The number of units will be displayed next to the charge description on your patient’s statements.
Increment Statements times Printed when sending FDN: Check this box if you wish to have FDNs be counted towards the patient's statement sent count.
Use separate address for Pay-To: Check the box and populate the required information to receive payments at a different address than the practice address.
Use separate address for return: Populate the required information to have undelivered statements returned to a different address than the practice address.
- Use the Revenue code description for charges on institutional claims: Check this option to print the revenue code description instead of the procedure code description on institutional claims.
Click the Electronic Statement Options tab from the side panel.
Charge Breakdown options:
Summarized details for each charge: Enable this option to send a summary detail of charges.
Detailed activity listing: Enable this option to send a detailed listing of charges.
Show Facility/Office address: Check this option to display the facility/office address.
Select the email address for receiving replies: By default, this is set to the practice's entered email for receipts and statements, but it can be updated to a different address or disabled entirely.
Use patient comment (if exists) in place of important message: Check this option to set the Payment Portal’s important message to the patient’s comment if one exists.
Click Send Sample and enter a test email to receive a sample of your electronic Statement. 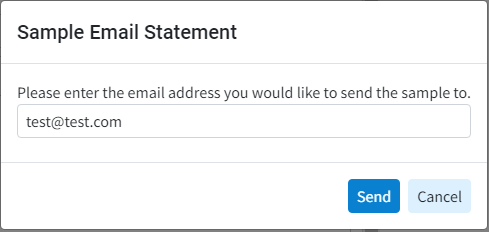
- Review or edit your email template fields (email Subject and body).
 If you have multiple practices, these settings must be configured under each participating practice.
SMS Text Electronic Statements
- Review or edit your text message template.
Use the Right-click options to select and add the available variables to the template. The [Payment Link] is a required field and will not save if removed from the template.
Use the date format drop-down to select your date format.
Under Electronic Statement Template (used for all practices) review or edit your Important Message and your Contact Us fields. This General information will be shown on the payment portal's patient statement view.
- Enter a personalized Message To Patients that will be shown within the bottom portion of their online bill.
- Select whether or not you want to show your phone contact information, email contact information, or both by selecting them and entering the required data.
- Optional: Click Save and Show Demo to view the important message and the contact us fields in the payment portal.
Click the General tab from the side panel to access general settings that apply to all statements.
Select the credit cards accepted by this practice.
Don't accept credit card payments by mail? Make sure all credit card boxes are unchecked.Show Due Date: Check this option to show the due date Upon Receipt on the statement.
Do not include account credits: Check this box to remove credits on the patient's account from being included in the calculation of the Balance Due on the statement and from being listed within the detailed line items.
Summarize charges: Check this option to group multiple charges associated with one claim. The code and description that appear on the statement are associated with the first charge on the claim.
Show paid charges: Check this option to include all charges, with associated payments and/or adjustments, associated with the patient even if there is no outstanding balance on the charges.
Show units in charge description: Check this option to show the number of units used on each line item charge. The number of units will be displayed next to the charge description on your patient’s statements.
Increment Statements times Printed when sending FDN: Check this box if you wish to have FDNs be counted towards the patient's statement sent count.
Use separate address for Pay-To: Check the box and populate the required information to receive payments at a different address than the practice address.
Use separate address for return: Populate the required information to have undelivered statements returned to a different address than the practice address.
- Use the Revenue code description for charges on institutional claims: Check this option to print the revenue code description instead of the procedure code description on institutional claims.
Click the Electronic Statement Options tab from the side panel.
Charge Breakdown options:
Summarized details for each charge: Enable this option to send a summary detail of charges.
Detailed activity listing: Enable this option to send a detailed listing of charges.
Show Facility/Office address: Check this option to display the facility/office address.
Select the email address for receiving replies: By default, this is set to the practice's entered email for receipts and statements, but it can be updated to a different address or disabled entirely.
Use patient comment (if exists) in place of important message: Check this option to set the Payment Portal’s important message to the patient’s comment if one exists.
Click Send Sample and enter a test phone number to receive a sample of your electronic Statement. 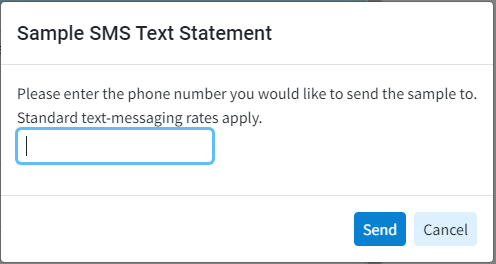
- Click Save.
Want to revert back to the default message? Click Reset to Default.
