Who can use this feature?
Users with the Control permission can view and update claim statuses.
Users with the Mass Claim Updates permission can use the "Update Claims" button to update information on a batch of claims.
Follow the steps below to update multiple claims.
 You can perform mass claim updates on up to 1,000 claims at a time. You can update Provider fields, Facilities, Office Locations, Place of Service, and more.
-
Select Claim > Claim Control.
-
Enter your Search Criteria or Load a Search Filter.
-
Use the Claim Status drop-down menu to filter by the status of the claim (e.g., Send to insurance via clearinghouse, Balance due patient, User print and mail to insurance, etc.)
-
Place a check in the “Include Deleted” box to include deleted statuses in your search results.
-
Use the Entered Date field to filter the search by the date the claim was entered into CollaborateMD.
-
Use the Date of Service field to filter the search by the date of service on the claim.
-
Use the Last Submitted Date field to filter the search by the date the claim was last submitted.
-
Use the Review Status drop-down menu to filter the search by the review status of the claim (e.g., Unreviewed, Reviewed - Error, etc.).
-
Use the Claim Type drop-down menu to filter the search by Professional, Institutional, or All claims.
-
Use the Current Payer drop-down menu to filter the search by the payer on the claim.
-
Use the Current Payer CPID field to filter the search by the Payer CPID.
-
Use the Current Payer Type drop-down menu to filter the search by the payer type (e.g., Self-Pay, Medicare, BCBS, etc.).
 You can select multiple payer types at once.
 -
Use the Patient field to filter the search by the exact patient the claim is associated with.
-
Use the Rendering Provider field to filter the search by the rendering provider on the claim.
-
Use the Facility field to filter the search by the facility on the claim.
-
Use the Procedure Code field to filter the search by procedure code on the claim. Note: You can only search by one procedure code at a time.
 You can use the Customize link to add Practice, Office, Billing Provider, Referring Provider, Supervising/Oprating Provider, and Ordering /Other Provider to your Claim Search Options. To do this, check the corresponding box(es) and click the Save button.
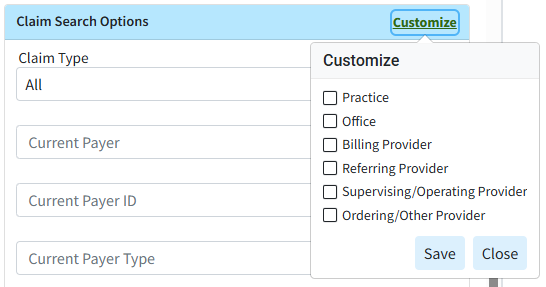
-
Use the Procedure Code field (Under Charge Search Options) to filter the search by procedure code/charge on the claim.
-
Populate the Tracking Status (contains) field to filter the search by keywords in the status message sent back by the payer.
You can use the Customize link to add Place of Service to your Charge Search Options. To do this, check the corresponding box and click the Save button. 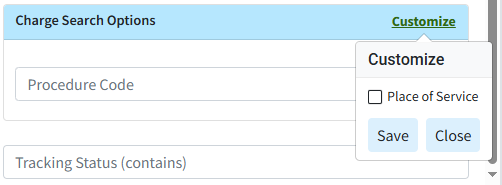
-
-
Click the Search button.
-
Optional: Click on the
 icon to edit your search criteria.
 Sort your search results. Visit our Reorder Table Columns Help Article for detailed steps on how to hide, rearrange, or add header columns.
 -
To update your claims, check the box next to the claim(s) and click the Update Claims button.
-
Select your options to update on the claims.
 Please note that the available options for updating claims will depend on the type(s) of claims selected: Professional, Institutional, or both.
-
Available Options for Professional Claims:
-
Use the Rendering Provider option to select the Rendering Provider to update the claims.
-
Use the Billing Provider option to select the Billing Provider to update the claims. This will default to the Rendering Provider selected in the previous field but can be changed.
-
Use the Other Providers option to select any Supervising Providers, Ordering Providers, or Referring/PCP Providers to update the claims.
-
Use the Facility option to select a Facility to update the claims.
-
Use the Office Location option to select an Office Location to update the claims. This option is available if the claims are from the same practice.
-
Use the Place of Service option to select a Place of Service to update the claims.
-
Use the Resubmit Claims To option to select where to resubmit the claims, either the Current Payer (default) or Primary Payer. You can also set the frequency to 7 (replacement claim) by checking the box.
-
-
Available Options for Institutional Claims:
-
Use the Attending Provider option to select the Attending Provider to update the claims.
-
Use the Billing Provider option to select the Billing Provider to update the claims. This will default to the Attending Provider selected in the previous field but can be changed.
-
Use the Other Providers option to select any Operating Provider, Other Provider, or Referring/PCP Provider to update the claims.
-
Use the Facility option to select a Facility to update the claims.
-
Use the Office Location option to select an Office Location to update the claims. This option is available if the claims are from the same practice.
-
Use the Institutional Claims options to select the Type of Bill, Admission Type, Admission Source, and Patient Status to update the claims.
-
Use the Resubmit Claims To option to select where to resubmit the claims, either the Current Payer (default) or Primary/Secondary Payer. You can also set the frequency to 7 (replacement claim) by checking the box.
-
-
Available Options when selecting both Professional and Institutional Claims:
-
Use the Rendering/Attending Provider option to select the Rendering or Attending Provider to update the claims.
-
Use the Billing Provider option to select the Billing Provider to update the claims. This will default to the Rendering/Attending Provider selected in the previous field but can be changed.
-
Use the Other Providers option to select any Supervising/Operating Provider, Ordering/Other Provider, or Referring/PCP Provider to update the claims.
-
Use the Facility option to select a Facility to update the claims.
-
Use the Resubmit Claims To option to select where to resubmit the claims, either the Current Payer (default) or Primary Payer. You can also set the frequency to 7 (replacement claim) by checking the box.
-
-
-
Click Next.
-
Add a Note to all the updated claims.
It is recommended to add a note to the claims with the reason for the update so they can be easily tracked within the audit history and Claim Notes in case of errors. - Review the updates and click Update (#) Claims.

-
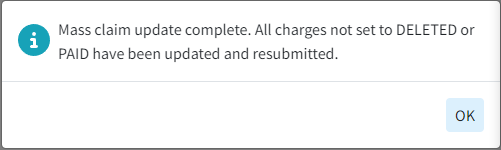
Click Ok.
-
Click Close to exit.
 You can select multiple payer types at once.
 You can use the Customize link to add Practice, Office, Billing Provider, Referring Provider, Supervising/Oprating Provider, and Ordering /Other Provider to your Claim Search Options. To do this, check the corresponding box(es) and click the Save button.

 Please note that the available options for updating claims will depend on the type(s) of claims selected: Professional, Institutional, or both.
