Follow the steps below to find or edit an existing claim.
Select Claim > Claim.
Use the Search field to search for your claim.
 Place a check in the “Show exact matches only” box to search for exact matches or “Show unpaid claims only” to show claims that may need follow-up.
Open the claim.
Optional: Modify the claim information.
Click Save. Otherwise, click Close if no changes were made.
Claims may be marked as incomplete for multiple reasons. Incomplete claims will not be sent to the clearinghouse or the payer.
 The system will not allow users to manually set a charge to a status of incomplete when all required data is present on the claim and patient record. Users will see a warning that this action is not supported and provided a recommendation to use another status (for example, a custom status) for charges needing further action before being billed. Visit our Custom Claim Status Help Article for more information on creating your own customized charge statuses.
Follow the steps below to identify why a claim is incomplete:
Select Claim > Claim.
Use the Search field to search for your claim.
Place a check in the “Show exact matches only” box to search for exact matches or “Show unpaid claims only” to show claims that may need follow-up.
Open the claim.
Hover your mouse over the
 icon.
icon.A window will open providing you with additional information as to why the claim is incomplete.
Make edits to your claim accordingly.
 If the patient's record is incomplete and you're unsure why, please open the patient's record and follow the same steps as above. Once the patient record is completed, you must open the claim and save it to mark it as complete
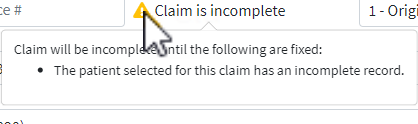
Once all required fields are complete the claim will automatically be marked as Completed.
Click Save.

Quick Tip: How to find Incomplete Claims
Follow the steps below to find all of your incomplete claims using the report viewer.
Select Reports > Viewer
Search for the Incomplete Claims Report and click to open it.
Select the date range and any applicable filters
Click Run Report.
Follow the steps below to delete an existing claim.
Select Claim > Claim.
Use the Search field to search for your claim.
Place a check in the “Show exact matches only” box to search for exact matches or “Show unpaid claims only” to show claims that may need follow-up.Open the claim.
Click the Delete button.
When the confirmation window opens, select Delete Claim.
Print Option provide the capability for users to print, copy, or show a preview of how the claim will print. Follow the steps below print your claim, view a preview or print a copy.
Select Claim > Claim.
Use the Search field to search for your claim.
Place a check in the “Show exact matches only” box to search for exact matches or “Show unpaid claims only” to show claims that may need follow-up.
Open the claim.
Click the Print button and choose one of the following actions:
Save and Print Claim: Prints the claim from your desired printer.
Make sure the appropriate claim form(s) are loaded in the printer before selecting this option and that scale to fit is unchecked and set to 100!Show Preview: View what the claim will look like once printed on the form.
Copy: Prints a copy of the claim for your record or to provide to a patient.
Save and Print With Form: Downloads a pdf copy of the claim on the official CMS-1500 or UB-04 claim form.
A printed copy of this CMS-1500 form should not be used for the submission of claims. They must be submitted in the official form since the copy will not accurately replicate the scale and OCR (in Flint OCR Red, J6983) color of the form as directed by the CMS and the payers. Each Print will count as a 1/2 claim transaction.Claim Transaction History: Prints the transaction history of the claim.
EOB: Prints the EOB based on the claims ERA Report.
Open Negotiations Form: Prints an Open Negotiation Form (OMB 1210-0136) directly from the claim screen so that providers that are out-of-network can enter open negotiations with the insurance company.
Click Save. Otherwise, click Close.
The Claim Transaction History contains a list of all of the claim’s transactions and billing activity. You can quickly print out a detailed list of the claims transaction dates, charges, TCN #s, payments and adjustments, etc.
Select Claim > Claim.
Use the Search field to search for your claim.
Place a check in the “Show exact matches only” box to search for exact matches or “Show unpaid claims only” to show claims that may need follow-up.
Open the claim.
Click the Print button.
Select Claim Transaction History.
Click Save. Otherwise, click Close.
The Open Negotiations Form allows users to print an Open Negotiation Form (OMB 1210-0136) directly from the claim screen so that providers who are out-of-network can enter open negotiations with the insurance company to determine the amount that the insurance company will pay for emergency services.
-
Select Claim > Claim.
-
Use the Search field to search for your claim.
Place a check in the “Show exact matches only” box to search for exact matches or “Show unpaid claims only” to show claims that may need follow-up.
-
Open the claim.
-
Click the Print button.
-
Select Open Negotiations Form.
-
Enter the Signer's relationship to the office.
-
Enter the out-of-network rate offer to the desired percentage of the total amount and click Set.
-
Optional: You can also Enter/Edit the Offer for Total Out-of-Network Rate column for each individual service line.
-
Check the "Open Negotiations Period and IDR Initiation Deadline after Printing" box.
-
When checked, it will set and store the "Open Negotiations Period End" and Federal "IDR Initiation Deadline" dates when sending the Open Negotiations Form, making it easier for users to manage the Open Negotiations process.
This data will be stored and available within the "Open Negotiations" tab in the Claim Follow-Up Activity screen.
-
-
Click

-
Click Save. Otherwise, click Close.

The Proof of Timely Filing letter allows users to print a basic proof of timely filing letter directly from the claim screen for payers who don't have their own required format.
-
Select Claim > Claim.
-
Use the Search field to search for your claim.
Place a check in the “Show exact matches only” box to search for exact matches or “Show unpaid claims only” to show claims that may need follow-up.
-
Open the claim.
-
Click the Print button.
-
Select Proof of Timely Filing
-
Select your claim submission (TCN).
-
Review your letter.
-
Click Print.
-
Click Save. Otherwise, click Close.
 Visit our Proof of Timely Filing Letter Sample Help Article to view a sample Proof of Timely Filing letter.
 Visit our
 The Appeal letter allows users to print a basic claim appeal letter directly from the claim screen for payers who don't have their own required format.
-
Select Claim > Claim.
-
Use the Search field to search for your claim.
Place a check in the “Show exact matches only” box to search for exact matches or “Show unpaid claims only” to show claims that may need follow-up.
-
Open the claim.
-
Click the Print button.
-
Select Appeal
-
Select your claim submission (TCN).
-
Review your letter.
-
Click Print.
-
Click Save. Otherwise, click Close.
Visit our Appeal Letter Sample Help Article to view a sample Appeals letter.
Claim Review helps you manage the complex rules and terminology of coding. This feature analyzes the claim(s) before submission to the clearinghouse and identifies any issues with your claim(s), maximizing the potential for you to be paid correctly on the first submission. Claim review is made up of 3 parts.
Real Time Claim Submission (RTCS): Real-Time Claim Submission (RTCS) gives you on-demand visibility into your claim. Within seconds, claims are scrubbed for tens of thousands of clearinghouse edits.
The charge must be in the status of “send to insurance via clearinghouse” to use RTCS.Claim Analysis: Claim Analysis is a built-in clearinghouse edit engine that validates professional and institutional claims for Generic or Payer-Specific Edits. This feature allows you to correct claims before it’s rejected by the Clearinghouse. Analyzing your claim prior to it being sent to the Clearinghouse will save you a significant amount of time on rework.
Code Scrubbing (If the service is enabled): Code Scrubbing is a solution that validates your procedure codes, diagnosis codes, CCI, NCD, LCD, HCPCS, Modifiers, and LMRPs to catch any common errors before the claim is sent to a payer.
Follow the steps below to review a claim.
Select Claim > Claim.
Use the Search field to search for your claim.
Place a check in the “Show exact matches only” box to search for exact matches or “Show unpaid claims only” to show claims that may need follow-up.Open the claim.
Click the Review button and select one of the following options:
Review Claim.
If the claim hasn't been reviewed yet the following message will appear in the drop-down “This claim has not yet been reviewed.”View Results.
If the claim has been reviewed, you will see the date and time it was last reviewed and allow you to click “view results”.
A Claim Review Result window will open with a summary of the review.
Click Close.
Follow the steps to pull an activity listing for a patient’s claim.
Select Claim > Claim.
Use the Search field to search for your claim.
 Place a check in the “Show exact matches only” box to search for exact matches or “Show unpaid claims only” to show claims that may need follow-up.
 Place a check in the “Show exact matches only” box to search for exact matches or “Show unpaid claims only” to show claims that may need follow-up.
Open the claim.
Click
 and select one of the following options:
For This Claim Only: Select this option to view activity history for the patient and will include only the claim you currently have open under the claim activity listing.
For All Claims: Select this option to view the activity history for the patient and will include all claims created for the patient you currently have open.
An Activity record will open in a new window.
Reference our Activity Help Article to learn more about the activity record.
Claim Status provides the capability for users to submit status requests and receive responses in real-time regarding their claims. The claim status response provides information about your claim within the payer’s adjudication process, including how much is being paid on the claim once approved. Users can retrieve this information within the CollaborateMD application without having to contact the payer. There are no additional fees for this service.
Claim status can be verified for any claim that meets the following criteria:
-
The payer supports electronic Real-Time Claim Status (RTCS).
-
The claim was submitted electronically to the payer.
-
The claim status must be set to “Claim At Insurance.”
 Depending on the payer, an agreement may need to be filled out prior to checking claim status. Please refer to our Payer Agreements Help Article for more information.
Follow the steps below to check a new or existing claim status.
-
Select Claim > Claim.
-
Use the Search field to search for your claim.
Place a check in the “Show exact matches only” box to search for exact matches or “Show unpaid claims only” to show claims that may need follow-up.
-
Open the claim.
-
Click the Claim Status button.
-
Select Claim Status Check to perform a new request for the status of the claim.
-
Select Last Checked On (Date) to view the last existing request for the status of the claim.
-
View All Past Claim Status Reports to view all previous requests for the status of the claim.
-
-
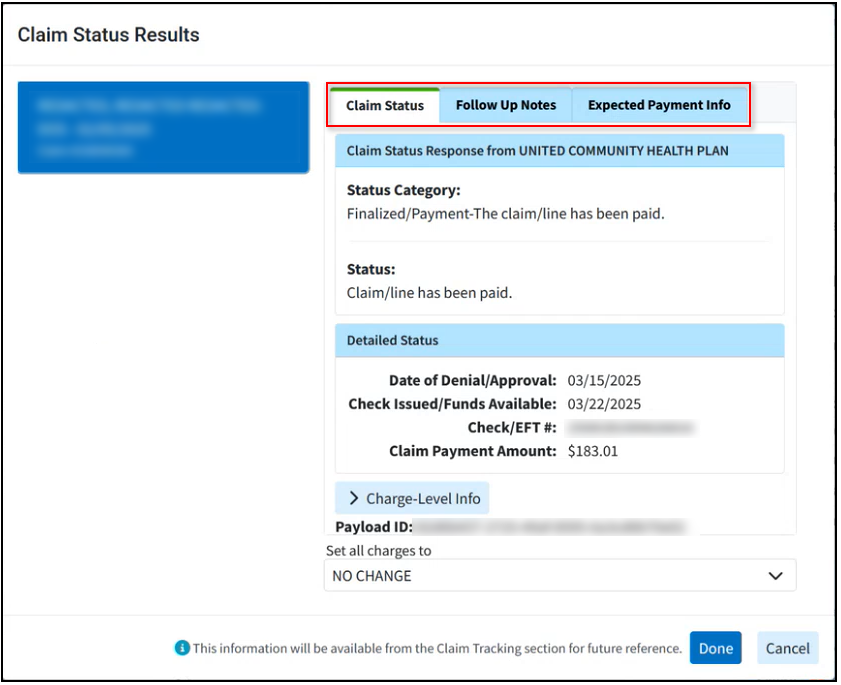
The Claim Status Results window has the following 3 tabs:
-
Claim Status: Provides the claim status response from the payer along with a detailed status, payments, and an option to update the charge status from the results screen.
-
Follow Up Notes: Allows the user to enter any follow up notes pertaining to the claim.
-
Expected Payment Info: Provides any expected payment information from the status result (paid amount, check date, and check number).
 Data from the follow up notes and expected payment info within the claim status results window will be available in the Follow Up Management section.
-
-
Click Done.
-
Click Close.

Follow the steps below to view a summary of the claim.
Select Claim > Claim.
Use the Search field to search for your claim.
Place a check in the “Show exact matches only” box to search for exact matches or “Show unpaid claims only” to show claims that may need follow-up.
Open the claim.
Click the Claim Summary tab from the side panel.
Review the claim information.
Patient: Displays the patient's name, account number, and reference number (when applicable).
DOB: Displays the patient's date of birth, age, and gender.
Form Version: Displays the claim version (CMS-1500 or CMS-1450 (UB04)).
Total Amount: Displays the total billed amount for the procedure codes included on this claim.
Ins Payments: Displays any payment(s) a payer has paid towards this claim.
Pat Payments: Displays any payment(s) the patient has paid towards the claim (e.g., a copay).
Adjustments: Displays any adjustments the payer has made towards this claim.
Balance: Displays any open balance remaining after insurance and/or patient payments have been applied towards this claim.
Patient Credits: Displays any credit amount available on the patient’s account.
Patient Follow Up Date: Enter a patient follow-up date.
Patient Recall Date: Enter a patient recall date.
Date of Service: Displays the date of the service(s) based on the claim’s procedure codes.
Date Entered: Displays the date this claim was created.
Last Billed Date: Displays the last date this claim was submitted to a payer.
Last Statement: Displays the last date a statement was sent for this claim.
Statements Mailed Count: Displays the number of statements mailed for this claim (this option is only available if the Statement Automation Setting to "Send separate statements for charges per claim" is enabled).
Electronic Statement Count: Displays the number of electronic statements sent for this claim (this option is only available if the Statement Automation Setting to "Send separate statements for charges per claim" is enabled).
Follow Up Date: Enter a follow up date for this claim. Claims with follow up dates can be tracked within the Follow Up Management screen.
The Follow up date can be automatically populated on a claim based on the payer the claim was billed to. For more information on defaulting follow up dates per payer reference the General Billing Options Help Article.Copay Remaining: Displays the unpaid copay balance for the claim.
Click Save.
The Patient Estimates feature allows you to easily create Good Faith Estimates as required by the No Surprises Act. Providers and billers can now create estimates of patient responsibility at the time of service for uninsured, self-pay patients, or high deductibles and copays. Once an estimate is created (from either an appointment or a claim), users can print the estimate, send a statement, collect payments in the patient payment portal, create payment plans for the estimate, and much more.
Follow the instructions below to create a patient estimate from a claim.
Important Note: You must have the Real-Time Eligibility and the Patient Estimates features enabled and configured in order to create Patient Estimates. For more information on turning these services on, please visit our Manage Real-Time Eligibility and Manage Patient Estimates Help Articles.
- Select Claim > Claim.
Use the Search field to search for your claim.
Place a check in the “Show exact matches only” box to search for exact matches or “Show unpaid claims only” to show claims that may need follow-up.Open the claim.
- Locate and click Estimate from the right-hand side panel.
Click New Estimate.
Select the type of estimate:
 The contract amount is required in order to create an accurate estimate unless the patient is Self Pay. For more information visit our Patient Responsibility Estimates FAQs.
Auto Estimate: Works directly with the payer’s eligibility system to determine the patient’s amount due based on the services and the latest plan information about remaining deductibles and other limitations.
Verify the estimate and click Save.
Quick Estimate: This is the most common option and will quickly create an estimate based on the patient’s copay amount. This option uses the copay that is set on the patient's Insurance policy (check the Patient > Insurance Info tab within the appointment).
Verify the copay estimate and click Save.
Custom Estimate: Works directly with the payer’s eligibility system to determine the patient’s amount due based on the services and the copay and coinsurance. For example, if both a copay and coinsurance are set, then it will use the copay. If you get rid of the copay, then it uses the coinsurance.
Check the box to calculate the amount based on copay, deductible, and coinsurance; or manually enter the copay, remaining deductible, and/or coinsurance amounts.
Click Save.
Once finished with the appointment, click Save.
 The contract amount is required in order to create an accurate estimate unless the patient is Self Pay. For more information visit our
 Notes can be used to include any special information regarding a specific patient interaction. Notes can be viewed by all users that have permission to access the Claim screen. Using the notes feature can help your team stay organized and up to date on general claim information or specific actions to come.
Add, edit or remove claim notes.
-
Select Claim > Claim.
-
Use the Search field to search for your claim.
Place a check in the “Show exact matches only” box to search for exact matches or “Show unpaid claims only” to show claims that may need follow-up.
-
Open the claim.
-
Locate and click on Patient Notes from the right-hand side panel.
Categorize your notes by selecting Appointment, Claim, My, Patient, Payment, or Notes for this Claim. -
Select one of the following actions:
Click the Pop-out  icon to expand your notes to see more details on each note.When searching for Claim Notes, Click the Pop-out
  icon to allow filtering notes by date of service
-
To add notes, click Add Note to write your message, then click Done.
-
To edit or view existing notes, click the Note and make your changes, then click Done.
-
To sort existing notes, click the Sort
 Icon and select a sorting option from the dropdown, then click Done.
 -
To remove a note, select the Note and click the Delete
 icon.
icon.-
Undo this action by clicking the Redo
 icon
icon
-
-
-
Click
 .
.
Copy claim notes to other claims.
-
Select Claim > Claim.
-
Use the Search field to search for your claim.
Place a check in the “Show exact matches only” box to search for exact matches or “Show unpaid claims only” to show claims that may need follow-up.
-
Open the claim.
-
Locate and click on Patient Notes from the right-hand side panel.
Categorize your notes by selecting Appointment, Claim, My, Patient, Payment, or Notes for this Claim. -
Select the note you want to copy.
-
Click the copy icon
 and select the unpaid claim(s) for this patient to copy the note to (by checking the corresponding box(es).
 - Click Select.
-
Click Done.
-
Click
 and select the unpaid claim(s) for this patient to copy the note to (by checking the corresponding box(es).
Follow Up Activity can be used to add follow up notes related to a patient’s claim or expected payment information. For more information, please reference our Follow Up Management Help Article
Add, edit or remove Follow Up notes.
Select Claim > Claim.
Use the Search field to search for your claim.
Place a check in the “Show exact matches only” box to search for exact matches or “Show unpaid claims only” to show claims that may need follow-up.
Open the claim.
Locate and click on Follow Up Activity from the right-hand side panel.
Select Follow Up Notes
Select one of the following actions:
To add notes, click Add Note and add your message.
Edit, or delete notes: use the icons associated with the note.
The copy icon
copies the note to other unpaid claims for this patient.The gear icon
 is used to configure which users can view this note.
The remove icon
 removes this note from the claim.
The Undo icon
 undoes removing the follow-up note.
Click
.
 is used to configure which users can view this note.
Expected Payment Info
After speaking to the payer, enter any expected payment info into this section, making it easier to locate this information for future reference.
Select Claim > Claim.
Use the Search field to search for your claim.
Place a check in the “Show exact matches only” box to search for exact matches or “Show unpaid claims only” to show claims that may need follow-up.
Open the claim.
Locate and click on Follow Up Activity from the right-hand side panel.
Select Expected Payment Info.
Add or edit payment information within the corresponding fields ( Check , Check Date, Paid Amount, Allowed Amount, Reference).

Click


CollaborateMD allows you to add specific alerts to a patient record. These alerts will appear as a pop-up whenever the patient is opened in any sections of the CollaborateMD applications.
Follow the steps below to add alerts to a claim.
Select Claim > Claim.
Use the Search field to search for your claim.
Place a check in the “Show exact matches only” box to search for exact matches or “Show unpaid claims only” to show claims that may need follow-up.
Open the claim.
Click the Alerts tab from the side panel.
Click the Add Alert Button.
Write the message you would like appear in the alert.
Use the Display Options boxes to determine when you would like the alert to appear.
 For more information on the Display Options, please visit the Alert Control Help Article.
 For more information on the Display Options, please visit the Alert Control Help Article.
The Effective date Range allows you to set how long the alert should remain active.
Once satisfied with the alert, click Done.
Click Save.
By default you are only allowed to edit or delete alerts you created. Users with the “Create and Edit All” Alert permission is able to edit and delete any report. Please reference our User Management Help Article for more information.
Follow the steps below to find, edit or delete an existing claim alert.
Select Claim > Claim.
Use the Search field to search for your claim.
Place a check in the “Show exact matches only” box to search for exact matches or “Show unpaid claims only” to show claims that may need follow-up.
Open the claim.
Click the Alerts tab from the side panel.
Click the alert you want to edit.
Make the desired changes.
Click Done. Otherwise, click Close to exit or Delete to remove the alert.
Click Save.
CollaborateMD allows you to create specific tasks associated with your claims. Tasks will help you keep track of items that need to be completed. Tasks can have due dates, links, descriptions, statuses, and priorities. You can assign tasks to yourself or to specific users within your business.
Follow the steps below to add tasks to a claim.
Select Claim > Claim.
Use the Search field to search for your claim.
Place a check in the “Show exact matches only” box to search for exact matches or “Show unpaid claims only” to show claims that may need follow-up.
Open the claim.
Click the Tasks tab from the side panel.
Click Create Task.
Enter the task name in the Task Title field.
Add the task’s Due Date, Status, and Priority.
- Low:
 blue down arrow.
 - Normal:
 Yellow side arrow.
 - High:
 Red upwards arrow.
- Low:
Write in the Description of the task.
Optional: Click the Add Link to link the task to an action. Tasks can be linked to a patient, claim, practice, provider, facility, payer, report, message, or customer.
Enter the username you would like to assign this task to. Or click
 and select the user from the list.
 Only users with the Administer All permission under administer tasks can edit tasks for other users.
 Only users with the Administer All permission under administer tasks can edit tasks for other users.
Click Done.
Click Save.
 For more information on Tasks, please visit the Tasks Help Article.
 For more information on Tasks, please visit the
 Follow the steps below to find, edit or delete an existing claim task.
Select Claim > Claim.
Use the Search field to search for your claim.
Place a check in the “Show exact matches only” box to search for exact matches or “Show unpaid claims only” to show claims that may need follow-up.
Open the claim.
Click the Tasks tab from the side panel.
Click the Task you want to edit.
Make the desired changes.
Click Done. Otherwise, click Cancel to exit or click the
 icon to the right of the task to delete it.
Click Save.
Add a document to a claim.
Select Claim > Claim.
Use the Search field to search for your claim.
Place a check in the “Show exact matches only” box to search for exact matches or “Show unpaid claims only” to show claims that may need follow-up.
Open the claim.
Click the Documents tab from the side panel.
Select whether the document is Patient Document or Claim Document.
Click the Add button and choose how you want to associate a document:
Select Associate Existing to choose a document that’s already been uploaded.
Drill down into the appropriate folder.
Click the document you want to associate.
Click Save.
Select Upload New to open a new window.
Click the Add Files button.
Select the file from your local drive.
Add any applicable note.
Choose the Folder Location to add the file.
Click Select.
Click Upload Files.
Click Save.
 A red number indicator is displayed in the "Documents" side panel tab, indicating the number of documents associated with the claim.
Delete claim documents.
Select Claim > Claim.
Use the Search field to search for your claim.
Place a check in the “Show exact matches only” box to search for exact matches or “Show unpaid claims only” to show claims that may need follow-up.
Open the claim.
Click on the Documents tab from the side panel.
Click the Delete
 icon next to the claim document file you want to delete.
 Click Save.
Who can use this feature?
Users with the Patient Payment permission can post patient payments within the Claim section.
Follow the steps below to apply a credit.
Select Claim > Claim.
Use the Search field to search for your claim.
Place a check in the “Show exact matches only” box to search for exact matches or “Show unpaid claims only” to show claims that may need follow-up.
Open the claim.
Click on the Payment tab from the side panel.
From the Claim Payment tab, fill in the radio button for Apply Account Credit to Claim.
The Credit Available will display.
Populate the Applied Amount field with the amount of credit to apply.
Select the Received Date.
The Memo field is defaulted to Apply Account Credit. If necessary, update the memo per your business needs.
Click Save.
Follow the steps below to apply an unapplied copay credit to a claim.
The unapplied Copay DOS and the Claim’s “From DOS” need to match and the claim must have an available copay balance.
Select Claim > Claim.
Use the Search field to search for your claim.
Place a check in the “Show exact matches only” box to search for exact matches or “Show unpaid claims only” to show claims that may need follow-up.
Open the claim.
Click on the Payment tab from the side panel.
From the Claim Payment tab, fill in the radio button for Apply Account Credit to Claim.
The Credit Available will display.
Populate the Applied Amount field with the amount of credit to apply.
Select the Received Date.
The Memo field is defaulted to Apply Account Credit. If necessary, update the memo per your business needs.
Click Save.
Save yourself some time and automate this process by enabling the Automatically apply unapplied copays when claims are entered: option found within the Claim Settings Help Article. If the Unapplied Copay and Claim DOS match and the claim has an available copay balance the system will enable this option.
Who can use this feature?
Users with the Patient Payment permission set to Post Only can post patient payments (as a credit) within the Claim section , but not apply the payment towards the patient's charges.
Users with the Patient Payment permission set to Apply can post and apply patient payments, discounts, adjustments, and credits within the Claim section.
Follow the steps below to add patient payments to a claim.
Select Claim > Claim.
Use the Search field to search for your claim.
Place a check in the “Show exact matches only” box to search for exact matches or “Show unpaid claims only” to show claims that may need follow-up.Open the claim.
Click on the Payment tab from the side panel.
From the Claim Payment tab, fill in the radio button for Post New Payment to Claim.
Enter the Payment Amount.
Populate the Payment Received Date.
If applicable, enter the Check #.
Select the payment Type.
Select the Source of the payment.
 If the In-app Credit Card Processing feature is enabled, after saving the payment, you will needed to enter the card information into the Enter Payment Window pop-up. For a detailed step by step guide, please reference the Processing a Credit Card Payment & Printing Receipts Help Articles
Update the Memo field as needed.
Click Save.
 If the
 CollaborateMD maintains a marker in the payer database that identifies whether a payer accepts secondary claims electronically. When an insurance payment is entered via EOB Auto Apply, the application will look for a remaining balance and whether the claim has a secondary payer. If there is a balance and a secondary payer, the application will change the charge status to “Send to Secondary via Clearinghouse” (as long as the payer is willing to accept electronic secondary claim(s)). If needed, please reference our Payer Agreements Help Article to learn how to submit and review payer agreements.
Once verified that the payer will accept secondary claims electronically and the agreement has been approved, follow the steps below:
Post the payment received from the primary insurance Please reference our Post Payments Help Article for more information on how to post insurance payments..
 Sometimes a payer will send an EOB where the check amount is $0.00. In these instances, a payer acknowledges the charge but will not reimburse you for the service, such as when a client has a deductible. If the patient(s) listed on the EOB have a secondary insurance and the claims can be submitted electronically to the second payer, you must post the $0.00 payment. Otherwise, the claim(s) will be rejected.
Once the payment is posted, change the line item Status under the Charges tab of the Claim to bill the “Secondary Payer via Clearinghouse.”
CMD will automatically send the primary insurance payment details as long as there’s a payment and adjustment made to each line item, even if the payer paid $0.00. The payment information that is transmitted electronically acts as the paper EOB the payer would normally receive.
Important Note:
If the secondary payer does not accept secondary insurance claims electronically, the application will set the charge status to “User Print and Mail”.
Secondary claims can be billed the same day the primary payment is applied, and Tertiary claims can be billed the same day the secondary payment is applied, accelerating reimbursement. It’s important to remember that these claims must be printed and mailed to the payer and the EOB must be attached to the claim.
Follow the steps below to re-submit a claim.
Select Claim > Claim.
Use the Search field to search for your claim.
Place a check in the “Show exact matches only” box to search for exact matches or “Show unpaid claims only” to show claims that may need follow-up.
Open the claim.
Change the claim Frequency field.
7 - Replacement of Prior Claim: This is replacing a prior claim.
8 - Void/Cancel Prior Claim: This is voiding or canceling a prior claim.
Provide an Original Claim #, under the Insurance information.
The original claim# can be either the TCN (Transaction Control Number) or ICN (Insurance Control Number). Typically, the number to use is dependent on whether you’re re-submitting the claim before (TCN) or after (ICN) the EOB has been received.
For Professional Claims ONLY: Click the Additional Info tab and enter a Resubmit Reason Code.
Click the Charges tab.
Under Charge Options, use the drop-down menu to select the status to Set all charges to. Or send by individual line item by updating the Status.
Click Save.
Customers can quickly change the order of charges on a claim for payers with specific requirements, even between primary and secondary payers.
Follow the steps below to re-order charges on a claim.
Select Claim > Claim.
Use the Search field to search for your claim.
Place a check in the “Show exact matches only” box to search for exact matches or “Show unpaid claims only” to show claims that may need follow-up.
Open the claim.
Click the Charges tab.
You can change the order of the charges by clicking the 2 lines to the left of each charge (
 ) and then dragging and dropping to the desired location/order.
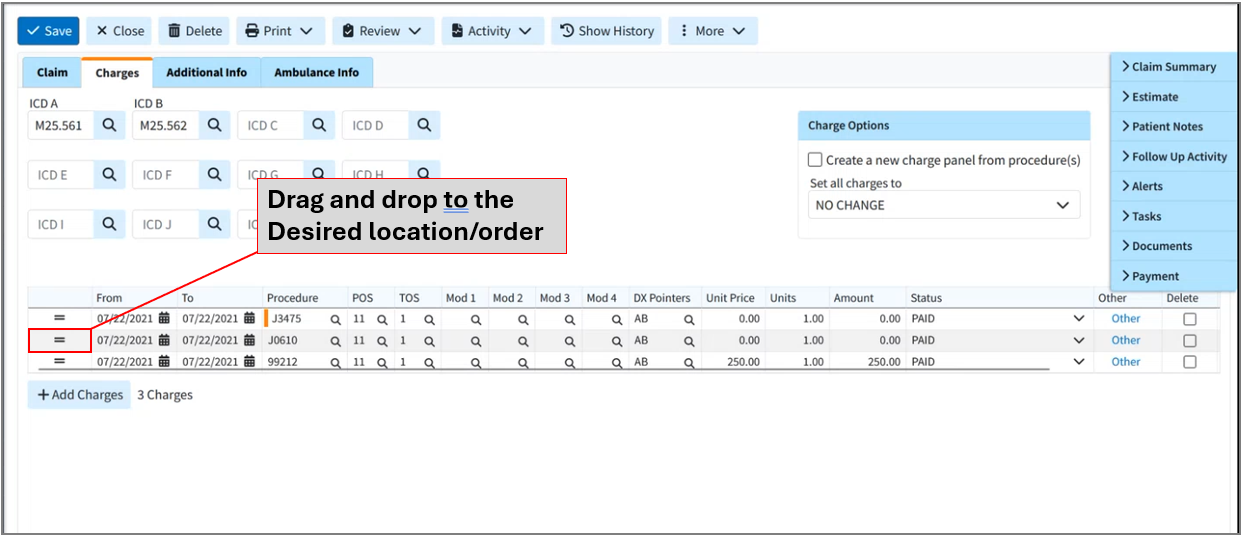
Click Save. Otherwise, click Close if no changes were made.

Roster Billing is a way for you to submit multiple claims to Medicare for flu or pneumococcal (PPV) shots and bill them using a simplified method using only one CMS-1500 form and a "Roster" listing the patients. Roster billing is used for Medicare-enrolled “Mass Inmunizers” when billing multiple patients at once. If you have other services to bill, use normal claims filing procedures and forms.
CollaborateMD does not save roster billing claims within our database for posting payments and will not track which patients were included in the "Roster." When it is time to post payments towards these claims we recommend using a Debit Code or creating a placeholder claim that is not sent to the payer. These claims are ONLY for printing purposes.
Select Claim > Claim.
- Click the
 icon to the right of the Add Professional Claim button and select Print Roster Billing.
 Begin adding Claim information.
Claim#: will default to Roster.
Patient: Will default to “SEE ATTACHED ROSTER.”
Rendering Provider: Click the
 icon and select the rendering provider name.
Billing Provider: Click the
 icon and select the billing provider name.
Facility: Click the icon and select the facility name.
Office Location: Select the office location from the drop-down menu if different than the Office location tied to the provider.
Payer: Click the
 icon and select the payer.
Select the Charges tab.
ICD A will default to Z23 (ENCOUNTER FOR IMMUNIZATION)
- Add the (From) date of service based on the payer requirements.
Add the charges (procedure codes).
The POS code will default to 60 (Mass Immunization)
Click the Print button and choose one of the following actions:
Show Preview: The preview option gives you a quick view of what the claim will look like once printed off.
Roster: Prints a copy of the claim.
Once printed click Cancel.
The Save button is not available since the claim or charges are not saved to the database. Users must Print the claim.
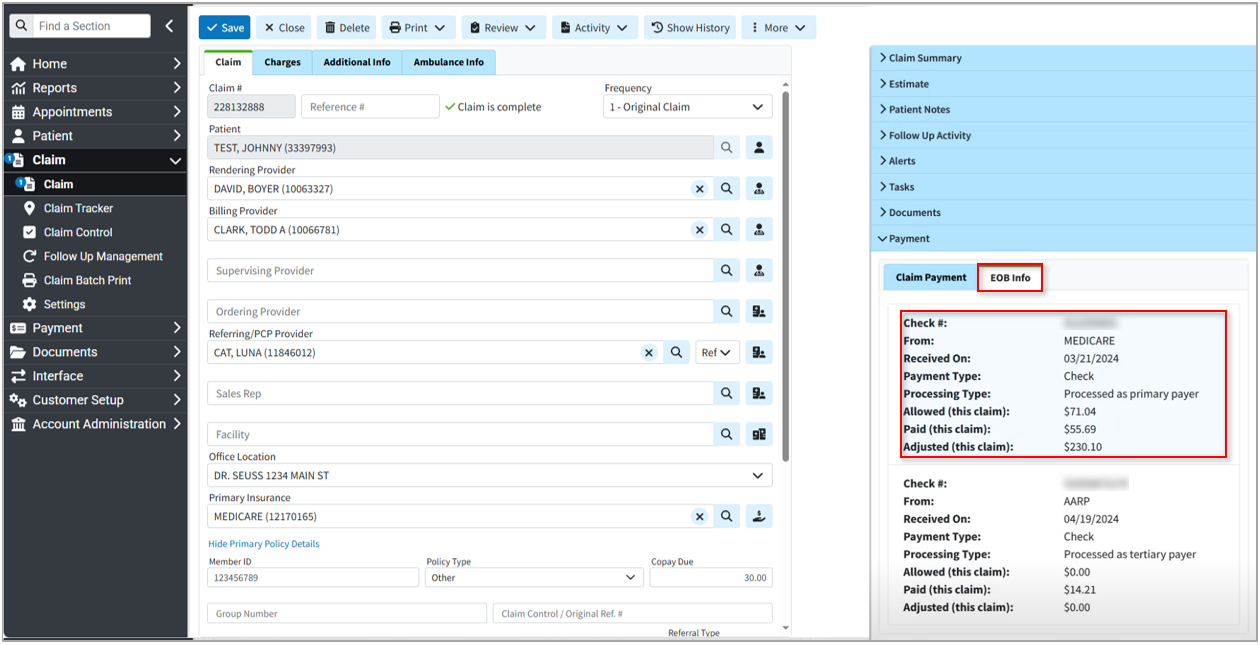
When working claim appeals and denials, users can view the claim EOB details, including remittance code information, directly within the Claim without leaving the current screen.
Follow the steps below to view the EOB info and details on a claim.
-
Select Claim > Claim.
-
Use the Search field to search for your claim.
Place a check in the “Show exact matches only” box to search for exact matches or “Show unpaid claims only” to show claims that may need follow-up.
-
Open the claim.
-
Click on the Payment dropdown from the side panel.
-
Click the EOB Info tab
-
View the EOB information (Check#, Payer, Received Date, Payment Type, Processing Type, Allowed Amount, Paid Amount, And Adjusted Amount).
-
To view the EOB details, click the desired check information to open the EOB details window.
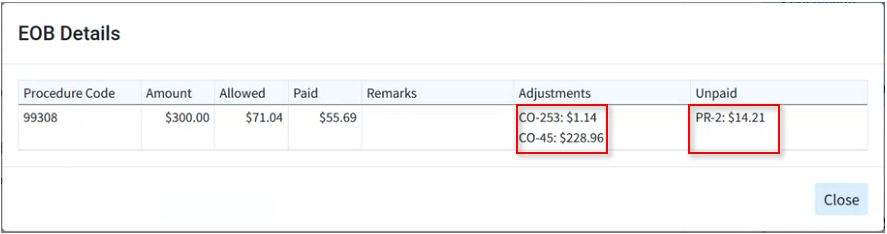 Hovering over the adjustment codes provides their descriptions; hovering over the unpaid reason codes provides any denial reasons.
 -
When finished, click Close.

