Daily credit card transactions can be processed within the Payment, Claim or Scheduler sections of the application. Transactions will automatically post to the patient account and be reflected on appropriate reports.
You will not see a confirmation if the transaction is successful. The system will alert you if the transaction fails or you attempt to make a credit card payment without entering the complete card information.
Transactions, such as voids and credits (refunds), can also be processed through CollaborateMD. Please reference our Refund a Patient or Insurance Payment help article for more information.
Daily credit card transactions can be processed within the Payment, Claim or Scheduler sections of the application. Transactions will automatically post to the patient account and be reflected on appropriate reports.
You will not see a confirmation if the transaction is successful. The system will alert you if the transaction fails or you attempt to make a credit card payment without entering the complete card information.
Transactions, such as voids and credits (refunds), must be processed through OpenEdge View and added manually to the patient’s account within CollaborateMD.
Process a credit card payment within the Payment screen.
Select Payment > Post.
Fill in the option for Patient Payment.
Optional: Check the Print receipt box to print the patient a receipt.
Click the
 icon next to the Patient search field and select the patient.
 Enter payment details such as Amount, Date, and Check # (optional).
Set the payment Source to Credit Card..
Choose how to apply the payment Credit Account (Apply Later), Apply Automatically, or Apply Manually.
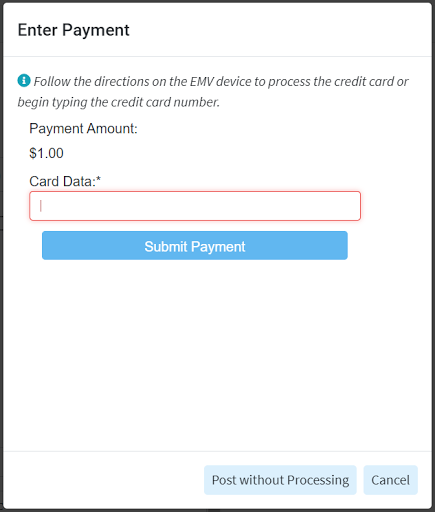
- Upon saving the Claim, follow the directions on the EMV device or enter the card information within the Enter Payment Window.

Do you have an EMV device plugged in, but are still seeing the message "EMV devices are now supported"? This means that the EMV standard has not been Set up correctly.
You will need to set up a physical card entry/EMV machine and the EMV software on the computer. This software allows the EMV machine to connect with CollaboratedMD.
Still have questions, or would like to receive an EMV device? Please reach out to the Global Payments Integrated TeamCard Number: Place your cursor in the Card Number field. Swipe the patient’s credit card using your card reader, or manually enter in the card number.
Expiration Date: Use the drop-down menus to select the card’s expiration date.
CVV2/CID: Locate the CVV2 or CID number on the card and enter it into the field.
- Click Submit Payment.


Process a credit card payment within the Claim screen.
Select Claim > Claim.
Select the Claim.
Click on the Payment tab within the side panel.
Select Post New Payment to Claim.
Optional: Check the Print receipt box to print the patient a receipt.
Enter payment details such as Amount, Date, and Check #.
Set the payment Source to Credit Card.
- Upon saving the Claim, follow the directions on the EMV device or enter the card information within the Enter Payment Window.
Do you have an EMV device plugged in, but are still seeing the message "EMV devices are now supported"? This means that the EMV standard has not been Set up correctly.
You will need to set up a physical card entry/EMV machine and the EMV software on the computer. This software allows the EMV machine to connect with CollaboratedMD.
Still have questions, or would like to receive an EMV device? Please reach out to the Global Payments Integrated TeamCard Number: Place your cursor in the Card Number field. Swipe the patient’s credit card using your card reader, or manually enter the card number.
Expiration Date: Use the drop-down menus to select the card’s expiration date.
CVV2/CID: Locate the CVV2 or CID number on the card and enter it into the field
- Click Submit Payment.
Process a credit card payment within the Scheduler screen.
Select Appointments > Scheduler.
Select the relevant appointment and then click Edit.
- Select the Payment tab.
Optional: Check the Print receipt box to print the patient a receipt.
Enter payment details such as Amount, Date, and Check #.
Set the payment Source to Credit Card.
Upon saving the Claim, follow the directions on the EMV device or enter the card information within the Enter Payment Window.
Do you have an EMV device plugged in, but are still seeing the message "EMV devices are now supported"? This means that the EMV standard has not been Set up correctly.
You will need to set up a physical card entry/EMV machine and the EMV software on the computer. This software allows the EMV machine to connect with CollaboratedMD.
Still have questions, or would like to receive an EMV device? Please reach out to the Global Payments Integrated TeamCard Number: Place your cursor in the Card Number field. Swipe the patient’s credit card using your card reader, or manually enter the card number.
Expiration Date: Use the drop-down menus to select the card’s expiration date.
CVV2/CID: Locate the CVV2 or CID number on the card and enter it into the field.
Click Submit Payment.
Payment Tracker screen gives you the ability to pull up previously posted patient payments and print the receipts associated with those payments.
-
Select Payment > Payment Tracker.
-
Enter your desired Search Criteria or Load a Search Filter.
-
Click Search.
-
Click the Send link (in the Receipt column) to open the print/send dialog box for the patient payment to be printed.
-
Select Print.
 You can also print a receipt with all the additional data required by the HSA/FSA guidelines by selecting the "Print w/HSA/FSA details" option.
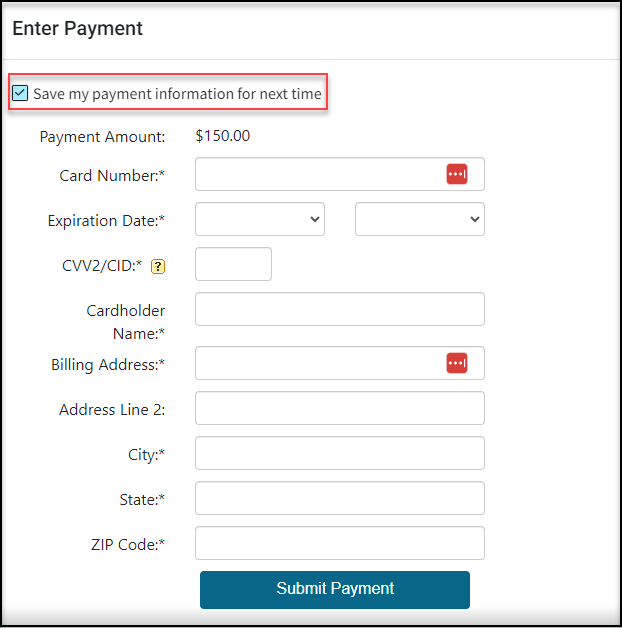
With cardholder consent, Credit Card information can be saved for future payments while collecting a payment from the Payment Screen, the Claim Screen, or the Appointment Screen.
 Need to save a credit card without collecting a payment? Visit our Add/Save a Patient Credit Card Help Article to learn how to save payment information from the Patient section.
-
Select Payment > Post (or post it from the scheduler or claim screen).
-
Fill in the option for Patient Payment.
-
Optional: Check the Print receipt box to print the patient a receipt.
-
Click the
icon next to the Patient search field and select the patient. -
Enter payment details such as Amount, Date, and Check # (optional).
-
Set the payment Source to Credit Card and select the card type from the dropdown.
-
Choose how to apply the payment Credit Account (Apply Later), Apply Automatically, or Apply Manually.
- Upon saving the payment, follow the directions on the EMV device or enter the card information within the Enter Payment Window.
-
Save my payment information for next time: Check the box to save the CC info for next time.
-
Card Number: Place your cursor in the Card Number field. Swipe the patient’s credit card using your card reader, or manually enter the card number.
-
Expiration Date: Use the drop-down menus to select the card’s expiration date.
-
CVV2/CID: Locate the CVV2 or CID number on the card and enter it into the field.
-
Cardholder Name: Enter the name on the credit card
-
Billing Address/City/State/Zip Code: Enter all the billing address info for the credit card.
- Click Submit Payment.
-
