The Patient Estimates feature allows you to easily create Good Faith Estimates as required by the No Surprises Act. Providers and billers can now create estimates of patient responsibility at the time of service for uninsured, self-pay patients, or high deductibles and copays. Once an estimate is created (from either an appointment or a claim), users can print the estimate, send a statement, collect payments in the patient payment portal, create payment plans for the estimate, and much more.
Who can use this feature?
Users with the Eligibility permission.
Important Note: You must have the Real-Time Eligibility and the Patient Estimates features enabled and configured in order to create Patient Estimates. For more information on turning these services on, please visit our Manage Real-Time Eligibility and Manage Patient Estimates Help Articles.
The Patient Estimates feature allows you to easily create Good Faith Estimates from an Appointment or a Claim as required by the No Surprises Act. Providers and billers can now create estimates of patient responsibility at the time of service for uninsured, self-pay patients, or high deductibles and copays. Once an estimate is created, users can print the estimate, send a statement, collect payments in the patient payment portal, create payment plans for the estimate, and much more.
Follow the instructions below to create a patient estimate from an appointment.
Important Note: You must have the Real-Time Eligibility and the Patient Estimates features enabled and configured in order to create Patient Estimates. For more information on turning these services on, please visit our Manage Real-Time Eligibility and Manage Patient Estimates Help Articles.
Select Appointments > Scheduler.
- Type in the patient name or comment related to the appointment in the Search for appointments by patient or comment field. Or click the Advanced Search field and use the filters to narrow down your search.
When the appointment(s) is displayed, right-click on the appointment and select Edit Appointment or click on the appointment and select the Edit button.
- Locate and click Estimate from the right-hand side panel.
Click New Estimate.
Click the Find Claim button and find the claim Note: Use this option only if the claim associated with the estimate already exists.
Use the Claim Type drop-down menu to select if the estimate will be associated with a professional, or institutional claim.
Add the procedure code(s) to be included in the estimate.
Enter or edit any applicable POS code(s), modifier(s), price(s), or units.
Select the type of estimate:
 The contract amount is recommended in order to create an accurate estimate unless the patient is Self Pay. If a contract amount is not in place, the system will automatically determine a reasonable price from recent Allowables when possible. If there aren't any recent allowables, the Quick Estimate option is always available to produce an estimate based on the patient's Copay amount. For more information visit our Patient Responsibility Estimates FAQs.
Auto Estimate: works directly with the payer’s eligibility system to determine the patient’s amount due based on the services and the latest plan information about remaining deductibles and other limitations.
Verify the estimate and click Save.
Quick Estimate: This is the most common option and will quickly create an estimate based on the patient’s copay amount. This option uses the copay that is set on the patient's Insurance policy (check the Patient > Insurance Info tab within the appointment).
Verify the copay estimate and click Save.
Custom Estimate: Works directly with the payer’s eligibility system to determine the patient’s amount due based on the services and the copay and coinsurance. For example, if both a copay and coinsurance are set, then it will use the copay. If you get rid of the copay, then it uses the coinsurance.
Check the box to calculate the amount based on copay, deductible, and coinsurance; or manually enter the copay, remaining deductible, and/or coinsurance amounts.
Click Save.
Once finished with the appointment, click Save.
Important Note: You must have the In-App Credit Card processing and the Patient Payment Portal features enabled and configured in order to use electronic statements. For more information on turning these services on, please visit our Manage In-Application Credit Card Processing and Manage your Patient Payment Portal Help Articles.
 If the Estimate was created from a Claim, open the claim in the claim section and continue to step 4.
Select Appointments > Scheduler.
Type in the patient name or comment related to the appointment in the Search for appointments by patient or comment field. Or click the Advanced Search field and use the filters to narrow down your search.
When the appointment(s) is displayed, right-click on the appointment and select Edit Appointment or click on the appointment and select the Edit button.
Locate and click Estimate from the right-hand side panel.
Click
Select the delivery option from the dropdown:
Email: Select this option to email the estimate statement to the patient.
Text: Select this option to send an SMS/Text estimate statement to the patient.
Print Enhanced: Select this option to print an enhanced estimate statement.
Print Plain Text: Select this option to print a plain text estimate statement.
 The statement templates must be edited first in the statements section for Electronic Statements and User Print Statements. Take a look at our Statement Configuration Help Article for more info.
If an electronic statement was selected, click Send Statement. If a printed statement was selected, click Print and Add Activity.

Follow the instructions below to post a manual payment toward an estimate.
If the Estimate was created from a Claim, open the claim in the claim section and continue to step 4.
Select Appointments > Scheduler.
- Type in the patient name or comment related to the appointment in the Search for appointments by patient or comment field. Or click the Advanced Search field and use the filters to narrow down your search.
When the appointment(s) is displayed, right-click on the appointment and select Edit Appointment or click on the appointment and select the Edit button.
Locate and click Estimate from the right-hand side panel.
Click
Enter the Payment Amount.
Optional: Check the Print receipt box and select your print option to print or send a patient receipt.
Optional: Check the Specify separate copay and payment amount box to add a payment amount and a copay amount in one transaction.
Enter the Received/Check Date.
Optional: Add the Check #.
Optional: Enter the Copay Date of Service.
 Create an Unapplied Copay Credit by selecting Copay, and populating the Date Of Service (DOS). Reference our Unapplied Copay Credits Help Articles for more information.
Select the Source of the payment.
If the In-app Credit Card Processing feature is enabled, after saving the payment, you will need to enter the card information into the Enter Payment Window pop-up. For a detailed step-by-step guide, please reference the Processing a Credit Card Payment & Printing Receipts Help Articles.

 Create an Unapplied Copay Credit by selecting Copay, and populating the Date Of Service (DOS). Reference our
 Optional: Type a custom Memo.
Click Save.
Follow the instructions below to create a payment plan for an estimate balance.
If the Estimate was created from a Claim, open the claim in the claim section and continue to step 4.
Select Appointments > Scheduler.
Type in the patient name or comment related to the appointment in the Search for appointments by patient or comment field. Or click the Advanced Search field and use the filters to narrow down your search.
When the appointment(s) is displayed, right-click on the appointment and select Edit Appointment or click on the appointment and select the Edit button.
Locate and click Estimate from the right-hand side panel.
Click

Verify the estimate amount and select one of the 2 options:
If there are no existing charges to associate to this payment plan: The Payment plan will only be associated with the Estimate.
If there are one or more existing charges that this payment covers: The Estimate Payment Plan will be associated with a charge.
Enter the payment plan amount.
Click Continue.
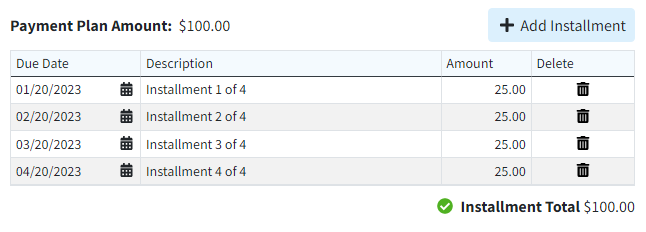
Generate Payment Plan Installments, due dates, and the amount due for each installment.
 A maximum of 200 installments can be added to a payment plan.
 To Auto Generate installments, configure the following options:
First Payment Plan Date: Select the due date of the first payment.
Use the Payments Due every drop-down menu to specify the frequency of the payment due date.
Select one of the following options to auto-generate installments:
- Each Installment Amount: Enter the expected payment amount that will be due for each installment. Select this option for the system to automatically calculate the number of installments.
Each Total Number of Payments: Select this option to have the system automatically calculate the amount due based on the number of installments you enter.
Last Payment Date: Select this option to have the system automatically calculate the number of installments and amount due until the date you enter.
Click Generate Installments.
The installment amount, due date, and description will appear and can be modified by clicking in the corresponding column.
To Manually Generate Installments, complete the following:
Click the Add Installment button.
Enter the Installment Due Date and Amount Due until you have entered all installment dates and amounts.
Click Continue.
Review your payment plan details.
Write a description about this payment plan for other users to reference.
Use the Practice drop-down menu to select which practice the payment plan should report under.
Optional: Place a check in the Set up Auto Pay checkbox to set up Automatic Payments for the payment plan installments.
Click Save.
Check the Cardholder has consented to Auto Pay box.
Click Next.
If a card was previously saved, you have the option to “Use a saved card” otherwise select “Use a different card.”
Click Save.
Enter the card information and check the “Save my payment information for next time” checkbox.
Click Save.
 If the patient’s account type is not set to “Payment Plan”. You will have an option to update the account type to “Payment Plan”.
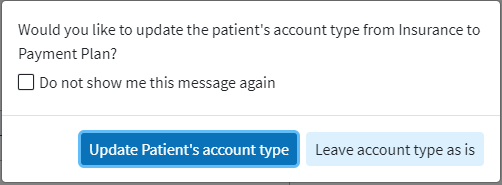


 If the patient’s account type is not set to “Payment Plan”. You will have an option to update the account type to “Payment Plan”.
 Don't want to worry about collecting patient payment for each installment date? With the patient's permission, enable Auto Pay so you never miss out on a payment plan payment again. Visit our Enable Auto Pay for a Payment Plan Help Article for detailed steps.
In the event a mistake is made while creating an estimate, you can delete the estimate by following these steps.
 Each appointment or claim can only have one related Estimate.
If the Estimate was created from a Claim, open the claim in the claim section and continue to step 4.
Select Appointments > Scheduler.
- Type in the patient name or comment related to the appointment in the Search for appointments by patient or comment field. Or click the Advanced Search field and use the filters to narrow down your search.
When the appointment(s) is displayed, right-click on the appointment and select Edit Appointment or click on the appointment and select the Edit button.
Locate and click Estimate from the right-hand side panel.
Click


You can also create a new Estimate, which will automatically delete the previous Estimate. Expand the Previous Estimates dropdown and select to un-delete the Estimate. Note: Doing this will delete any current estimate.
If the Estimate was created from a Claim, open the claim in the claim section and continue to step 4.
Select Appointments > Scheduler.
Find the appointment on the calendar.
When the appointment(s) is displayed, right-click on the appointment and select Edit Appointment or click on the appointment and select the Edit button.
Locate and click Estimate from the right-hand side panel.
Click


 A Good Faith Estimate will be printed for health care items and services along with the estimate disclaimer.
Follow the instructions below to mark an estimate amount as due, or not due.
If the Estimate was created from a Claim, open the claim in the claim section and continue to step 4.
Select Appointments > Scheduler.
Find the appointment on the calendar.
When the appointment(s) is displayed, right-click on the appointment and select Edit Appointment or click on the appointment and select the Edit button.
Locate and click Estimate from the right-hand side panel.
Select Mark as Not Due: to prevent the estimate amount from showing up as an amount due patient in CMD and the patient portal).
Select Mark As Due: to allow the estimate amount to show up as an amount due patient in CMD and the patient portal).
Click Save.
Follow the instructions below to select whether or not to display the estimate in the patient's Payment Portal.
If the Estimate was created from a Claim, open the claim in the claim section and continue to step 4.
Select Appointments > Scheduler.
Find the appointment on the calendar.
When the appointment(s) is displayed, right-click on the appointment and select Edit Appointment or click on the appointment and select the Edit button.
Locate and click Estimate from the right-hand side panel.
Select Remove from Portal: to prevent the estimate amount from being shown in the Patient Payment Portal.
Select Display in Portal: so the estimate amount can be shown in the Patient Payment Portal.
The Estimate will be displayed in the Patient Payment Portal by default.