Use a Contact Group to send a message to multiple people - a billing team, a follow-up committee, or to all staff members - without having to add each name to the To field individually. Contact Groups can help streamline your process to quickly send the right message to the right people.
Select Home > Messages.
Click the Create New Group button.
Add a name for the new group.
Click the Add Contacts button.
Select the username(s) you would like part of the group and click Save,
Click Save again.
Select Home > Messages.
Locate the contact group and click on the
 icon
iconClick Edit.
Rename the Contact group or add/remove users.
Click Save.
Select Home > Messages.
Locate the contact group and click on the
 icon.
icon.Click Delete, and select OK when the "Are you sure you want to delete the [Name] contact group?" pop-up displays.
Click Delete again.
Creating a Shared Contact Group allows you not only to send messages to groups but also to share those groups across your organization. This enables employees working on specific tasks (e.g., denials or collections) to ensure timely notifications are sent to the appropriate individuals.
Who can create Contact Groups?
Users with the Contacts permission set to Access, Modify, and Share can create new shared contact groups or edit their own.
Auth Reps and Admins can edit any Shared Contact Group.
-
Select Home > Messages.
-
Find the Contact Groups tab and click Add.
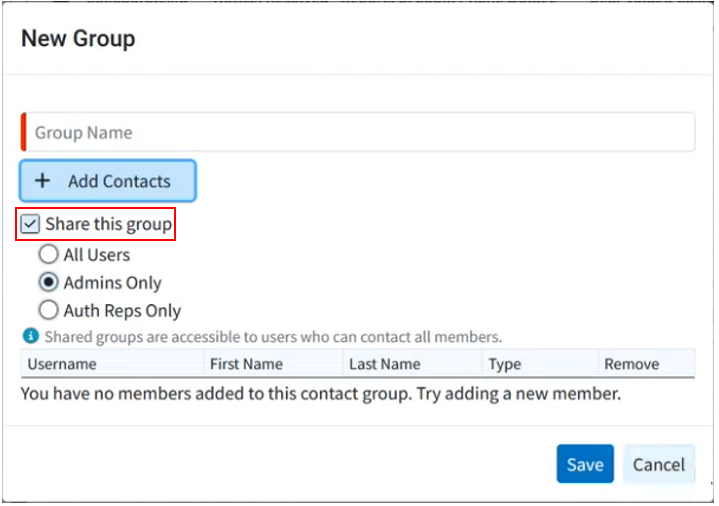
Add a name for the new group.
-
Check the Share this group box.
-
Select who to share it with (All Users, Admins Only, or Auth Reps Only) or click Add Contacts to manually add contacts to your group.
 When using the "Select Contacts" option, the contacts will be sorted by their respective customer, and it includes a search field for easier navigation.
 -
Optional: You can manually remove any users from your list with the "Remove" option.
-
Click Save.

 When using the "Select Contacts" option, the contacts will be sorted by their respective customer, and it includes a search field for easier navigation.
CollaborateMD allows you to create specific tasks associated with your patients, claims, payments, etc. Tasks help you keep track of items that need to be completed. Tasks can have due dates, links, descriptions, statuses, and priorities. You can assign tasks to an individual or to all individuals within a Contact Group. Follow these steps to assign a task to a Contact Group.
-
Find or Create a Task from the Task section or any record (Patient, Claim, Payment, etc.) that needs a task.
-
Enter the task name in the Task Title field.
-
Add the task’s Due Date, Status, and Priority (Low, Normal, High).
-
Write in the Description of the task.
-
Optional: Click the Add Link to link the task to an action. Tasks can be linked to a patient, claim, practice, provider, facility, payer, report, message, or customer.
-
Click
 and select the Group Name from the "Select Contacts" list
 -
Click Select Contacts.
 Only users with the Administer All permission under administer tasks can edit tasks for other users.
 -
Click Done.
 Only users with the Administer All permission under administer tasks can edit tasks for other users.
-
Click Save.
 All users in the group will see the tasks assigned to the group, and once completed, the system will track which user completed the task via the User Productivity by Tasks Completed Report, allowing you to monitor user productivity.For more information on Tasks, please visit the Tasks Help Article.
 All users in the group will see the tasks assigned to the group, and once completed, the system will track which user completed the task via the User Productivity by Tasks Completed Report, allowing you to monitor user productivity.