Follow the steps below to convert a professional claim to an institutional claim.
Select Claim > Claim.
Use the Search field to search for your claim.
 Place a check in the “Show exact matches only” box to search for exact matches or “Show unpaid claims only” to show claims that may need follow-up.
 Place a check in the “Show exact matches only” box to search for exact matches or “Show unpaid claims only” to show claims that may need follow-up.
Open the claim.
Click the More button.
Select Convert Claim to Institutional.
Click Save.
Once a claim has been saved, you can copy the claim following the steps below.
Select Claim > Claim.
Use the Search field to search for your claim.
Place a check in the “Show exact matches only” box to search for exact matches or “Show unpaid claims only” to show claims that may need follow-up.
Open the claim.
Click the More button.
Select Copy Claim.
A copy of the claim will open.
Modify the claim information .
Click Save.
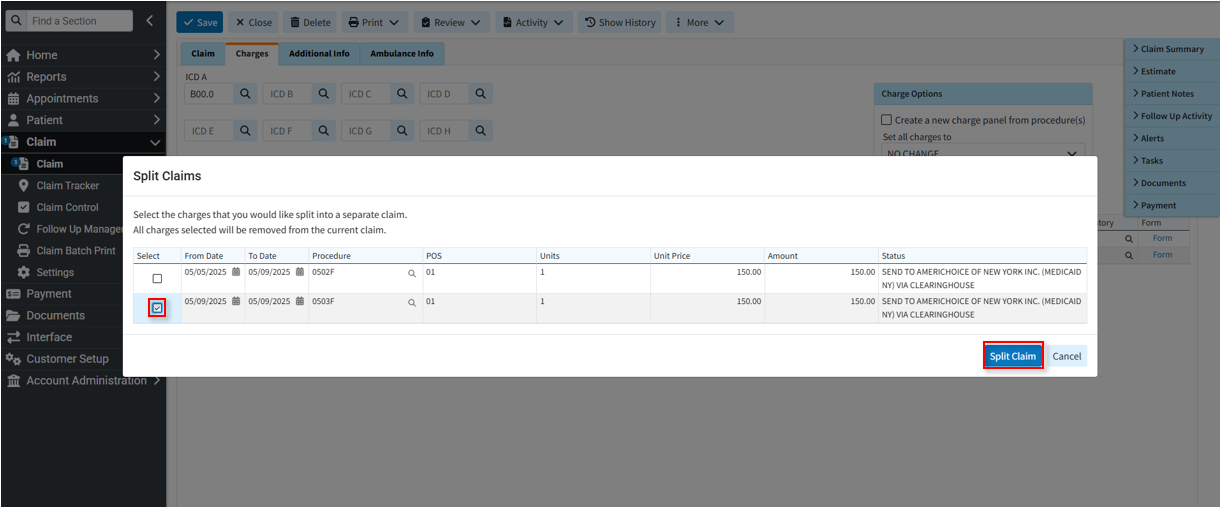
Split Claims allows users to take a single claim and split it into multiple claims. This process will move any selected charges (including any existing payments) to a new claim, while keeping all others in the existing claim.
Follow the steps below to split a claim.
-
Select Claim > Claim.
-
Use the Search field to search for your claim.
Place a check in the “Show exact matches only” box to search for exact matches or “Show unpaid claims only” to show claims that may need follow-up.
-
Open the claim.
-
Click the More button.
-
Select Split Claim.
-
Select the charge lines you want to move to the new claim by checking the box(es) to the left of the line.
-
Click Split Claim.
-
Click Save. The claim is now split into two claims.
Users can only split one claim into two. If they want to split more than that, they can re-open the claim after they've split it once to split it again.

Claim Status provides the capability for users to submit status requests and receive responses in real-time regarding their claims. The claim status response provides information about your claim within the payer’s adjudication process, including how much is being paid on the claim once approved. Users can retrieve this information within the CollaborateMD application without having to contact the payer. There are no additional fees for this service.
Claim status can be verified for any claim that meets the following criteria:
The payer supports electronic Real-Time Claim Status (RTCS).
The claim was submitted electronically to the payer.
- The claim status must not be set to any the following restricted statuses:
Standard & custom statuses listed as “Not Billed”
Balance Due Patient
Collection
Paid
Denied at Insurance
Rejected at Clearinghouse
Rejected at Insurance
 Depending on the payer, an agreement may need to be filled out prior to checking claim status. Please refer to our Payer Agreements Help Article for more information.
Follow the steps below to check claim status.
Select Claim > Claim.
Use the Search field to search for your claim.
 Place a check in the “Show exact matches only” box to search for exact matches or “Show unpaid claims only” to show claims that may need follow-up.
 Place a check in the “Show exact matches only” box to search for exact matches or “Show unpaid claims only” to show claims that may need follow-up.
Open the claim.
Click the More button.
Select Check Claim Status.
The Claim Status window will open, informing you of the status of the claim.
Click Close.
Track Claim Submission History allows users to review the submission history of a particular claim and confirm which payers received it. It enables easy tracking of how many times a claim was submitted, helping resolve denials, accepted and resubmitted claims, and identifying if claims require further action for reimbursement.
Follow the steps below to track a claim's submission history.
-
Select Claim > Claim.
-
Use the Search field to search for your claim.
Place a check in the “Show exact matches only” box to search for exact matches or “Show unpaid claims only” to show claims that may need follow-up.
-
Open the claim.
-
Click the More button.
-
Select Track Claim Submission History.
-
The claim will be opened in the Claim Tracker screen.
For more information on tracking a claim within the Claim Tracker, visit our Track a Claim Help Article.
This action allows you to review the audit history of each charge allowing you to know who made a change and when
Select Claim > Claim.
Use the Search field to search for your claim.
Place a check in the “Show exact matches only” box to search for exact matches or “Show unpaid claims only” to show claims that may need follow-up.
Open the claim.
Click the More button.
Select View Charge History.
A Charge History window will display showing changes made to a procedure code as well as the status of a claim.
Click Close.
The Preview Electronic Claim option will show the 837 ANSI that the system will generate for that claim and can be used to see how your claims will be sent electronically to the payer.
Select Claim > Claim.
Use the Search field to search for your claim.
Place a check in the “Show exact matches only” box to search for exact matches or “Show unpaid claims only” to show claims that may need follow-up.
Open the claim.
Click the More button.
Select Preview Electronic Claim.
Select the payer the claim is being sent to (if the patient has multiple payers).
Click

