Two critical steps must be completed in order to have your contract prices appear when posting insurance payments.
Step 1: You must create the contract in the Codes section.
Step 2: Once the Contract is created, the next step is to associate the contract with an insurance company.
Important: Both steps need to be are completed prior to posting any insurance payments. Not doing so will cause the Insurance Allowed and Paid columns to be displayed as $0.00.
As payments are posted and your office begins to track what’s allowed vs. what’s paid, we recommend running the Contract Analysis by Contract report as well as the Contract Analysis by Payer report to keep track of payment trends and negotiate future contracts with insurance companies.
Create an empty contract if you would like to include all of your codes, but want the values at $0. That way you can return and enter the prices manually.
Follow the steps below to manually add a new contract.
Select Customer Setup > Codes... > Contracts.
Click the New Contract button.
Select the Create an empty contact option.
Click the Show Preview button.
Add the contract name in the Name field.
Use the Type drop-down menu to select whether the contract will be FFS (Fee For Service) or CAP (Capitated).
 This is only used for tracking purposes.
Place a check in the box if you want to Allow users posting payments to update prices.
The Sequence# will be auto-populate once the contract is saved.
In the table below you will find all the codes that have been added or created for your account.
 To learn how to add or create codes, please visit our Procedure Codes Help Article.
In the Price column, enter your contract price for each billing procedure code as agreed upon with the payer.
Optional: If the Payer does not cover a particular procedure, place a check in the Exclusion box. Checking this box will make any remaining balance due to the patient after the insurance payment; the status of the charge will be set to Balance Due Patient automatically.
Open the Payers window to associate this contract with a payer.
To learn how to associate contracts with the payer, please visit our Add Payer Association Help Article.Click Save.
 This is only used for tracking purposes.
 To learn how to add or create codes, please visit our
 Follow the steps below to create a new contract based on an existing contract (i.e., duplicate prices and options), based on the Medicare Fee Schedule, or based on payments entered.
-
Select Customer Setup > Codes... > Contracts.
-
Click the New Contract button.
-
Select how you want to base the contract from:
-
From an existing contract?
-
Select the Set prices based on another contact option.
-
Use the Specify Contract drop-down menu to select the existing contract.
-
-
From the Medicare Fee Schedule?
-
Use the Medicare Fee Schedule Year drop-down menu to select which Medicare Fee Schedule year to use.
-
Enter your Zip code to enter the Carrier and Locality.
-
Select the Pricing Method, you can Use Non-Facility Pricing or Use Facility Pricing.
 The Medicare Fee Schedule includes the Medicare Physician Fee Schedule (MPFS) and the Medicare Clinical Laboratory Fee Schedule. Procedure codes associated with a lab or test will be priced by the Clinical Laboratory Fee Schedule, while other procedures will be priced by the Medicare Physician Fee Schedule. Please note that the Medicare Clinical Laboratory Fee Schedule consists of a single price, either local or national, in contrast with the Medicare Physician Fee Schedule, which is determined based on the specific zip code location.
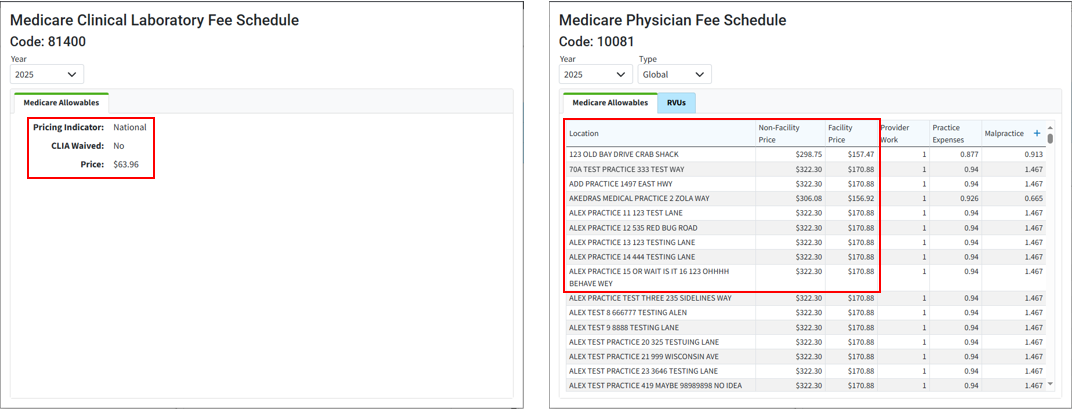
-
-
From Payments Entered?
-
Use the Specify Payer drop-down menu to select which payer payments to use.
-
Enter the number of Days you would like to base your contracts off of.
-
-
-
Select one of the Adjust Prices options to determine how you would like to adjust the prices for your new contact based from the existing contact.
- Do not adjust the prices of the new contract: Do not adjust any of the procedure code prices on this contact.
-
Increase prices by: Increase the procedure code prices by adding a percentage of change to the original amount.
If a procedure code with a price of $200 is increased by 140% it will calculate for a total of $480. ($200 + $280 (140% of the price)). -
Decrease prices by: Decrease the procedure code prices by subtracting a percentage of change from the original amount.
If a procedure code with a price of $200 is decreased by 40% it will calculate for a total of $120. ($200 - $80 (40% of the price)). -
Adjust prices to: Adjust the procedure code prices by a set percentage based off of the original price.
If a procedure code with a price of $200 is adjusted by 140% it will calculate for a total of $280. - Round prices up the next whole dollar amount: Automatically adjust the prices to the nearest whole dollar amount
-
Click the Show Preview button to review the price adjustments.
-
Type the name for this contact in the Name field.
-
Use the Type drop-down menu to select whether the contract will be FFS (Fee For Service) or CAP (Capitated).
 This is only used for tracking purposes.
 -
Place a check in the box if you would like to Allow users posting payments to update prices.
-
The Sequence# will be auto-populate once the contract is saved.
-
The table below will display all the codes that have been added or created for your account.
To learn how to add or create codes, please visit our Procedure Codes Help Article. -
In the Price column, enter your contract price for each billing procedure code as agreed upon with the payer.
-
Optional: If the payer does not cover a particular procedure, check the Exclusion checkbox. Checking this box will make any remaining balance due to the patient after the insurance payment; meaning, the status of the charge will be set to Balance Due Patient automatically.
-
Open the Payers window to associate this contract with a payer.
To learn how to associate contracts with the payer, please visit our Add a Payer Association Help Article. -
Click Save.
 The Medicare Fee Schedule includes the Medicare Physician Fee Schedule (MPFS) and the Medicare Clinical Laboratory Fee Schedule. Procedure codes associated with a lab or test will be priced by the Clinical Laboratory Fee Schedule, while other procedures will be priced by the Medicare Physician Fee Schedule. Please note that the Medicare Clinical Laboratory Fee Schedule consists of a single price, either local or national, in contrast with the Medicare Physician Fee Schedule, which is determined based on the specific zip code location.
 This is only used for tracking purposes.
Follow the steps below to add a new contract based on imported prices.
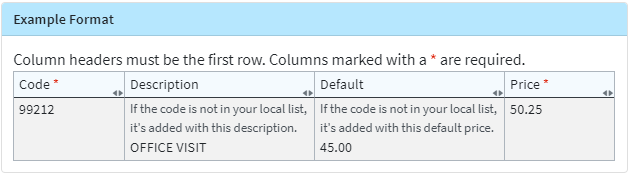
Part 1: Create a Spreadsheet
The first row of the spreadsheet should only contain column names.
Label the First column of the spreadsheet as Code, it should contain the list your billing codes.
Label the Second column of the spreadsheet as Description, it should contain the list of code descriptions.
If the code is not in your local list, it will be added with this description.Label the Third column of the spreadsheet as Default, it should contain the list of default billing prices.
If the code is not in your local list, it will be added with this default price.Label the Fourth column of the spreadsheet as Price, it should contain list of contract prices.
Save the spreadsheet as a Comma delimited (.csv), Excel (.xls or .xlsx) file.
Only the first sheet/tab will be imported.

Part 2: Importing into CollaborateMD
Select Customer Setup > Codes... > Contracts.
Click the New Contract button.
Select the Import Prices option.
Use the File to Import field to upload the spreadsheet.
Click the Show Preview to import the spreadsheet.
Type the name for the contact in the Name field.
Use the Type drop-down menu to select whether the contract will be FFS (Fee For Service) or CAP (Capitated).
 This is only used for tracking purposes.
Place a check in the box to Allow users posting payments to update prices.
The Sequence# will auto-populate once the contract is saved.
In the table below, you'l find all the codes that have been added or created for your account.
To learn how to add or create codes, please visit our Procedure Codes Help Article.In the Price column, enter your contract price for each billing procedure code as agreed upon with the payer.
Optional: If the payer does not cover a particular procedure, check the Exclusion checkbox. Checking this box will make any remaining balance due to the patient after the insurance payment; meaning, the status of the charge will be set to Balance Due Patient automatically.
Open the Payers window to associate this contract with a payer.
To learn how to associate contracts with the payer, please visit our Add Payer Association Help Article.Click Save.
 This is only used for tracking purposes.