Claim Attachments provide the ability to process Workers Compensation, Property & Casualty claims that require any additional form electronically with an easy, online attachment. Claim Attachments are accessible anytime, anywhere you need them and work in conjunction with CMD for a simplified approach to processing all of your claims.
Attachments are uploaded through the ChangeAssurance attachments portal, and the file names are associated with the claim within the CMD application, then sent out.
 Claim Attachments must first be enabled within the services section. Please reference our Services Help Article for instructions.
Who can use this feature?
Users with the Add Professional or Add Institutional Claim permission.
Users with the Payer and Payer Agreements permission.
In order to begin using the Claim Attachments feature, there are three important steps that must be completed before you can submit attachment claims.
Step 1: You must first enable and configure the Claim Attachments feature from the services section of CollaborateMD. Visit our Manage Claim Attachments Help Article for detailed steps on how to enable and configure this feature.
Step 2: You must also enable and configure the Cloud Document Imaging feature from the services section of CollaborateMD. Visit our Manage Cloud Document Imaging Help Article for detailed steps on how to enable and configure this feature.
Step 3: You must add your Attachment Payers to your personal Payer list. Visit our Add ePS Claim Attachment Payers Help Article for detailed steps on how to add attachment payers to your local list.
Once these steps are completed, you can then start to bill attachment claims.
In order to bill attachment claims, you must first add your Attachment Payers to your personal Payer list. Attachment Payers are created the same way you create any other payer within the Payer Screen. The only difference is that Attachment Payers will show an "Electronic Claim Attachments" column in the master payer list and the Clearinghouse connection side panel will also show if electronic claim attachments are available for the payer.
Follow the steps below to create a payer record that supports ePS electronic claim attachments.
Select Customer Setup > Payers.
Click the New Payer button.
A window pops up asking you if you like to configure a Clearinghouse connection for this payer. Click Yes.
Use the Master Payer Search window to locate your payer.
- Search for the Payer by using the name or the Payer ID, then click Search.
Ensure the payer has a checkmark in the electronic claim attachments column, and select the payer.
Finish entering the payer’s information and Billing Options.
Click Save.
 After creating your Payer, any agreements required to send claims, receive remittances, or check eligibility will need to be filled out and approved.
Please reference our New Payer Agreement Help Article for step-by-step instructions.
 After creating your Payer, any agreements required to send claims, receive remittances, or check eligibility will need to be filled out and approved.
Once you have enabled Claim Attachments in your account, Created your Attachment payers, and submitted any applicable payer agreements, you can begin uploading and submitting your claim attachments.
Follow the steps below to upload and submit an Attachment claim.
-
Select Claim > Claim.
-
Create your Professional or Institutional claim and ensure your Attachment Payer is added to the claim.
 Please reference our Claims Help Article for step-by-step instructions.
 -
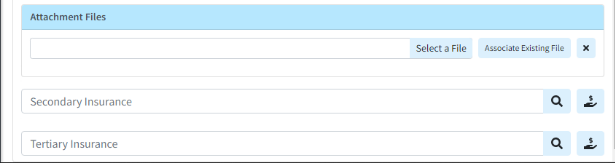
Under the Claim tab, locate the Attachment File section for your attachment Payer.
 Always verify with your payer, as some payers require adherence to a specific naming convention for file names.
-
There are 2 options to upload the attachment files:
-
Upload a file from your computer:
-
Click the Select a File button to locate and upload the attachment to the claim (up to 9 files).
-
-
Associate an existing file from the Documents section:
-
Click the Associate Existing File button to locate and upload the attachment to the claim (up to 9 files).
-
Use the navigation bar or the Search field to locate the document(s).
-
Place a check in the box for the document(s) you want to associate with this patient
- Click Add.
Document Imaging must be enabled to begin adding and storing documents onto the CollaborateMD server. Please reference our Manage Cloud Document Imaging for step-by-step instructions. Always verify with your payer, as some payers require adherence to a specific naming convention for file names.
-
-
-
Optional: The ACN information can be added within the Additional Info tab, under Documentation Method
-
Save and Submit the claim.
Please Note that Attachment Claims cannot be sent through the batch claim process and must be submitted individually with real-time claim submission.