The Claim Settings contain options that are change certain functionality when creating or editing claims. Some settings are specific only to your user while others impact all users in the customer. The Claim Settings for Customer contains options that will apply to all the users under the customer.
Who can use this feature?
Users with access and modify permission for Practice can edit Customer Claim Settings.
Users with any access permission for Claims can edit User Claim Settings.
The Claim Settings contain options that change certain functionality when creating or editing claims. Some settings are specific only to your user while others impact all users in the customer. The Claim Settings for Customer contains options that will apply to all users under the customer.
Real-Time Claim Submission (RTCS) Settings.
This setting gives you on-demand visibility into your claim for tens of thousands of clearinghouse edits on an individual or batch claim level. Validating claims using RTCS means less claim rework, and accelerated reimbursements so you get paid faster. Enabling this feature is highly recommended based on the benefits.
Select Claim > Settings.
Click the Edit button.
Optional: Click the Copy Settings link to copy the current settings to another customer associated with your account.
Use the drop-down menu to determine the action that happens when a claim is set to send to insurance via clearinghouse:
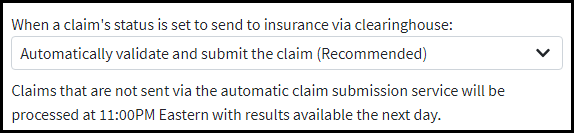
Automatically validate and submit the claim (Recommended): This option will give you real-time claim results along with real-time claim status. Rejected Claims will be set to “Rejected at Clearinghouse”. Accepted Claims will be set to “Claim at Insurance”. Results and statuses will be visible within Claim Tracker.
Automatically validate, but do not submit the claim: This option will allow you to obtain real-time claim results, however, claim statuses will not be updated in real time. Claim statuses will remain at “Send to Insurance via Clearinghouse” until we automatically batch process claims at 11:00 PM Eastern Standard Time.
Do not validate or submit the claim automatically: This option will disable RTCS. Claim statuses will remain at “Send to Insurance via Clearinghouse” until we automatically batch process claims at 11:00 PM Eastern Standard Time. Claim results along with claim status updates will not be available until the next day within claim tracking.
Click Save.

Fee Schedules Settings
This setting allow you to control what price is used on a charge in the event that more than one option could apply based on the fee schedules created for your customer. These changes apply to ALL fee schedules created for your customer account.
Select Claim > Settings.
Click the Edit button.
Use the drop-down menu to determine the type of Fee Schedule pricing for Institutional claims based on the: HCPCS Code or Revenue Code.
 By default, the system will always use HCPCS Code prices on Institutional claims. However, if you wish to base prices for Institutional to always be based on Revenue Code prices, click on the drop-down menu and select Revenue Code.
When multiple fee schedules apply to a claim based on their associations, the fee schedule used will be determined by the following order of precedence you select: Click on the association to highlight it and select the up or down arrow or right-click the association and select “move up” or “move down” to change the order of precedence.
Click Save.
 By default, the system will always use HCPCS Code prices on Institutional claims. However, if you wish to base prices for Institutional to always be based on Revenue Code prices, click on the drop-down menu and select Revenue Code.
Charge Total Amount
Select Claim > Settings.
Click the Edit button.
Allow users to override the charge total amount?
If set to Yes, the user will be able to override and the edit the charge "Amount" column on a claim.
You also need to place a check in the box to "override the total charge amount" under Charge Options on the Charges tab to override the total charge amount. 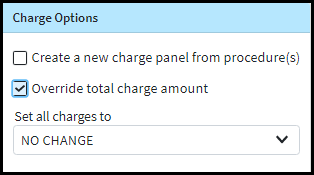

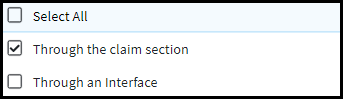
Automatically Apply Copays
Enable setting to automatically apply an unapplied copay credit when the claim is saved if the Date Of Service (DOS) matches.
Select Claim > Settings.
Click the Edit button.
Use the “Automatically apply unapplied copays when claims are entered:” drop-down menu to select when to apply an unapplied copay credit based on if the claim is created via the claim section, or via an interface.
Click Save.

The Claim Settings for User contains options that will apply to your user account.
Claim Print Settings
This setting allow users to set the default margins to use when printing the CMS-1500 (Professional Claim) and the CMS-1450 (Institutional Claim).
 Any open print tabs will need to be closed and re-opened after making changes to the Claim Print Settings.
Select Claim > Settings.
Click the Edit button.
Use the arrows to set the margins to use when printing claims on the CMS-1500 claim form.
Left margin: The number in this field indicates the horizontal spacing that will be used when you print HCFA forms. To move to the right, increase the number in this field to add space to the beginning of the line. To move left, decrease the number to delete space from the beginning of the line.
Top margin: The number here indicates the vertical spacing used when printing HCFA forms. To move up, decrease the number to remove space from the top of the page. To move down, increase the number to add space to the top of the page.
Use the arrows to set the margins to use when printing claims on the CMS-1450 (UB-04) claim form.
Left margin: The number in this field indicates the horizontal spacing that will be used when you print HCFA forms. To move to the right, increase the number in this field to add space to the beginning of the line. To move left, decrease the number to delete space from the beginning of the line.
Top margin: The number here indicates the vertical spacing used when printing HCFA forms. To move up, decrease the number to remove space from the top of the page. To move down, increase the number to add space to the top of the page.
Click Save.
Claim Default Settings
Set User level Claim Default Settings by selecting Yes or No to the available claim settings:
Select Claim > Settings.
Click the Edit button.
Show a warning when creating a new claim that is a duplicate of an already entered claim based on the patient, procedure codes, and date of service?
If set to Yes, a warning will pop up if you’re creating a duplicate claim.
Show a warning when creating a new claim that falls within the global period of a previously rendered procedure?
If set to Yes, a warning will appear when saving a claim within the global period of previously rendered procedure.
Notify me when a claim has been accepted after being submitted via Real-Time Claim Submission (RTCS)?
If set to Yes, a pop up will appear after a claim has been submitted using RTCS letting you know the claim was accepted by the clearinghouse.
Automatically populate patient's default Provider on new claims?
If set to Yes, the claim will be created based on the patient’s default provider. Please reference our Claim Defaults Help Article.
Automatically populate patient's default procedure codes on new claims?
If set to Yes, the claim will be created based on the patient’s default procedure codes. Please reference our Claim Defaults Help Article.
Automatically populate patient's default diagnosis codes on new claims?
If set to Yes, the claim will be created based on the patient’s default diagnosis codes. Please reference our Claim Defaults Help Article.
When creating a new claim, update the patient's default procedure and diagnosis codes with the information entered on the current claim?
If set to Yes, the system will take the codes entered on the claim and set them as the patient’s default procedure or diagnosis codes.
Automatically populate patient's default authorization information on new claims? If disabled, the authorization can still be copied or entered manually on the claim.
If set to Yes, the claim will populate with the patient’s default authorization information.
 If disabled, an authorization can still be copied or entered manually on the claim.
Show confirmation when manually copying a patient's authorization onto a claim which already has an authorization # populated for that insurance policy?
If set to Yes, a pop-up window will appear if you are editing a patient’s authorization.
Show prompt to set the Admission Code with the same value as the Principle Diagnosis Code when creating institutional claims?
If set to Yes, a pop-up window will appear when adding an Admission code asking if you would like to set the same value as the Principal Diagnosis code.
Show Durable Medical Equipment (DME) fields on the claim screens? The DME fields include the Sales Rep and initial deliver date are not submitted on the claim.
If set to Yes, the Sales rep and an initial delivery date will display. These fields are for reporting purposes only; they are not submitted on the claim.
Show Chiropractor fields on the claim screens? The Chiropractor fields can be accessed via the "Chiro" button on a particular charge when enabled.
If set to Yes, a “Chiro” column will be available to add information related to services under the Charges tab.
Show Inventory fields on the claim screens? The Inventory code can be entered for a particular charge when enabled.
If set to Yes, an additional column will be available under the Charges tab. Please see the Inventory Codes Help Article for more information.
When creating a Professional claims, default the Homebound (patient that is unable to leave their residence without assistance) option to "Yes".
If set to Yes, the Homebound option will default to “Yes” for all new professional claims. This is a helpful option if most of your visits are home visits.
Show the gestational age next to the populated Last Menstrual Period field in the Claim section?
If set to Yes, the patient's gestational age will populate from the last menstrual period field in the claim.
Default the payment received date to the earliest DOS when posting the payment from the claim screen?
If set to Yes, the payment received date will default to the earliest date of service on the claim.
Change the shortcut for Atl+N to create Institutional Claims?
If set to Yes, the Alt+N keyboard shortcut will create an Institutional claim instead of a Professional claim.
Click Save.
 If disabled, an authorization can still be copied or entered manually on the claim.