We recommend using this option if you want to create a quick one-time Broadcast Communication Campaign (i.e. "Our office will be closed on Friday").
-
Select Patient > Communications... > Broadcast Campaign.
-
Select "Start a blank Campaign
-
Configure your patient search parameters (default criteria for determining which patients will receive the message):
- Date Search Options: Select whether you want to search by days or by dates.
-
Populate the applicable date/days filter(s) from the drop-down menu and the number of days or dates for the filter(s) (days since last appointment, days since last seen, etc.).
-
-
Appointment Search Options: Select the appointment options you want to search by.
-
Populate the applicable appointment filter(s) from the drop-down menu (appointment status, resource, etc.).
-
-
Patient Search Options: Select the Patient options you want to search by.
-
Populate the applicable patient filter(s) from the drop-down menu (age, gender, balance, etc.).
-
-
Claim Search Options: Select the Claim options you want to search by.
-
Populate the applicable claim filter(s) from the drop-down menu (diagnosis codes, procedure codes, excluded codes, etc.
-
- Date Search Options: Select whether you want to search by days or by dates.
-
Click Search.
-
You will be presented with a preview list of the patients that were retrieved based on the search criteria you selected.
 You can exclude a patient from receiving the communication by unchecking the checkbox next to the patient's name on the list.
 - Modify the "Send Message On" date and time to specify when you want the message to be sent.

 Please note that when scheduling a campaign communication it must be scheduled at least 5 minutes in the future.
-
-
Click Start Campaign.
Enter a Campaign Title.
Enter your message body. You can also add/edit your patient details (variable fields) by right-clicking on the message body and selecting the variable from the list (Patient Last Name, Primary Insured First/Last Name, Guarantor First/Last Name, etc.).
Click Next.
-
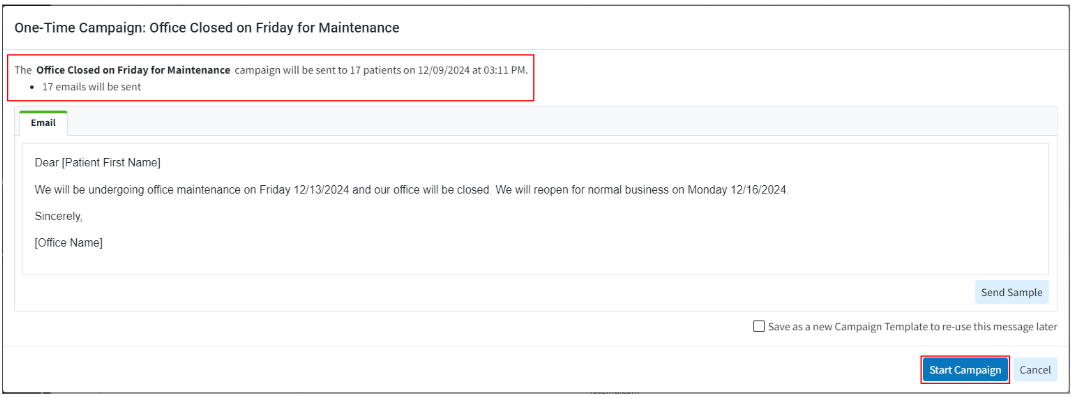
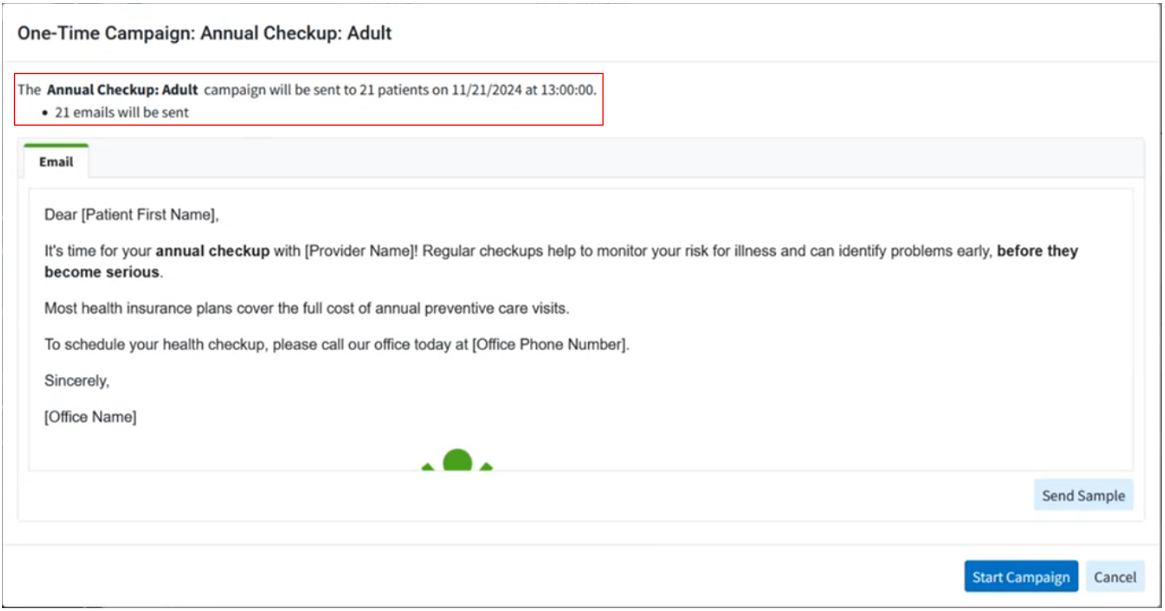
The preview window displays the campaign and template title, the number of patients who will receive the message, the date and time of the scheduled send, how they will be sent, and a preview of the message that will be sent.

Click Start Campaign.
 Your campaign is now scheduled to be sent on your selected date/time. Please visit our Track a Campaign Help Article to see any existing or scheduled campaign messages.
We recommend using a previously created template to broadcast messages to patients. Visit our Add a Broadcast Campaign Template Help Article for more information on how to create/save a template.
-
Select Patient > Communications... > Broadcast Campaign.
-
Select the "Use a template" option from your filters
-
Search for the pre-built campaign by title or message or browse through the existing campaigns and select your template.
-
-
Click Search.
-
You will be presented with a preview list of the patients that were retrieved based on the search criteria you selected.
 You can exclude a patient from receiving the communication by unchecking the checkbox next to the patient's name on the list.
 - Modify the "Send Message On" date and time to specify when you want the message to be sent.

 Please note that when scheduling a campaign communication it must be scheduled at least 5 minutes in the future.
-
- Click Start Campaign.
-
The preview window displays the campaign and template title, the number of patients who will receive the message, the date and time of the scheduled send, how they will be sent, and a preview of the message that will be sent.

-
-
Click Start Campaign.
 Your campaign is now scheduled to be sent on your selected date/time. Please visit our Track a Campaign Help Article to see any existing or scheduled campaign messages.
 You can exclude a patient from receiving the communication by unchecking the checkbox next to the patient's name on the list.
 Please note that when scheduling a campaign communication it must be scheduled at least 5 minutes in the future.

