The "Other" link within the claim charges tab allows users the ability to add information specific to a procedure code on the claim. Users can add things like associated drug information, anesthesia start and stop times, or assign a different rendering provider for a specific code on the claim.
Follow the steps below to add Other info on a Claim charge.
Select Claim > Claim.
Use the Search field to search for your claim.
 Check the “Show exact matches only” box to search for exact matches or “Show unpaid claims only” to show claims that may need follow-up.
Open the claim.
Click the Charges tab.
Enter or find your procedure code (charge).
Optional: Click the "Other" link to the right of the procedure code.
Enter any applicable Service Information like EPSDT/Chap Code, Family Planning, Emergency, or Rendering Provider to send out on the claim.
Enter any applicable Drug Information like Drug Code, Units, Format, Price, or Drug Description to send out on the claim.
- Enter any applicable Measurements like Hemoglobin, Hematocrit, Epoetin, or Creatin measurements to send out on the claim.
- Enter any Other applicable info like Anesthesia/Oxygen Minutes, Narrative Notes, or CLIA # to send out on the claim.
Click Apply.
Click Save.
The "Form" link within the claim charges tab allows users to add a DME (Durable Medical Equipment) form to submit a DME Certificate of Medical Necessity (CMN) on claims.
 This field is tuned off by default. To see the DME Forms link option on a claim, the user-setting to "Show Durable Medical Equipment (DME) fields?" must be set to Yes. This setting can be found under Claim > Settings > Claim Settings for User.
Follow the steps below to add a DME Form on a Claim charge.
Select Claim > Claim.
Use the Search field to search for your claim.
 Check the “Show exact matches only” box to search for exact matches or “Show unpaid claims only” to show claims that may need follow-up.
Open the claim.
Click the Charges tab.
Enter or find your procedure code (charge).
Optional: Click the "Form" link to the right of the procedure code.
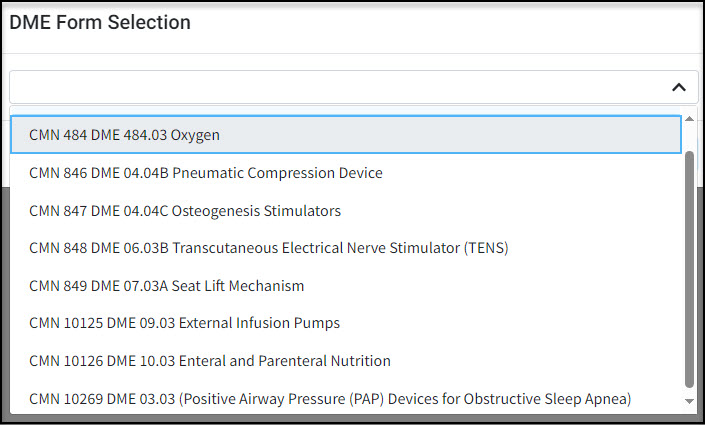
Select the required DME form from the dropdown.

Fill out the form and add any required data.
Click Apply.
Click Save.
The "Form" link within the claim charges tab allows users to show chiropractor fields on a particular charge within the claim screen.
 This field is tuned off by default. To see the Chiro link option on a claim, the user-setting to "Show Chiropractor fields on the claim screens?" must be set to Yes. This setting can be found under Claim > Settings > Claim Settings for User.
Follow the steps below to add chiropractor information on a Claim charge.
Select Claim > Claim.
Use the Search field to search for your claim.
 Check the “Show exact matches only” box to search for exact matches or “Show unpaid claims only” to show claims that may need follow-up.
Open the claim.
Click the Charges tab.
Enter or find your procedure code (charge).
Optional: Click the "Chiro" link to the right of the procedure code.
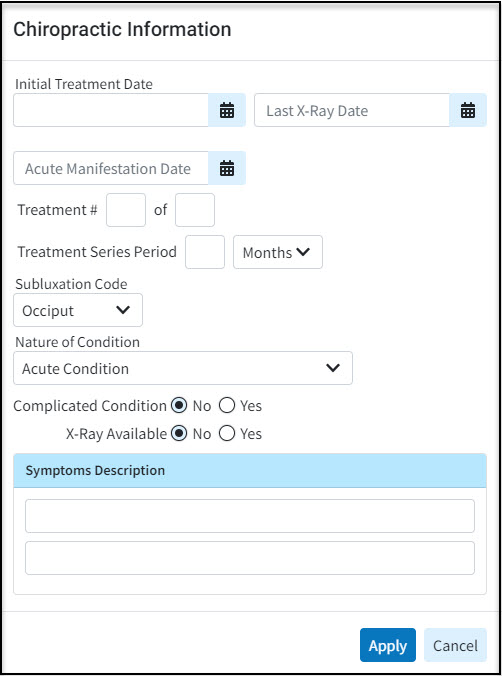
Add all required chiropractor information.

Click Apply.
Click Save.
The "Inventory" option within the claim charges tab allows users to add an inventory code for a particular charge on claims.
 This field is tuned off by default. To see the Inventory option on a claim, the user-setting to "Show Inventory fields on the claim screens?" must be set to Yes. This setting can be found under Claim > Settings > Claim Settings for User.
Follow the steps below to enter an inventory code on a Claim charge.
Select Claim > Claim.
Use the Search field to search for your claim.
 Check the “Show exact matches only” box to search for exact matches or “Show unpaid claims only” to show claims that may need follow-up.
Open the claim.
Click the Charges tab.
Enter or find your procedure code (charge).
Optional: Click the "Inventory" magnifying glass to the right of the procedure code.
Select the required inventory code from your inventory list.
Click Save.
 Check the “Show exact matches only” box to search for exact matches or “Show unpaid claims only” to show claims that may need follow-up.
